
Guide: Installing a new CPU cooler
 Sledgehammer70
California Icrontian
Sledgehammer70
California Icrontian
For most people buying or building a PC who are not thinking about overclocking (OC'ing) will most likely never find themselves buying an aftermarket processor (CPU) cooler. But the people who are aiming for just a cooler PC in general or to let them squeeze more CPU MHz/GHz of power for their buck should read the below.
I recently purchased parts to build a new PC that I have recently built in the confines of my office. The project was quick and easy & I had a system running with some of the latest top tech on the market. In this I was on a budget when ordering the parts so I decided to stick with the stock CPU cooler that ships with the CPU. Overall the stock cooler is a great cooler, it is quite & keeps the CPU running at a good temp while under stock settings. But after I realized I could really OC the hell out of my system I started looking for other options in cooling.
CPU cooling these days can get pretty complex & flat out intimidating if you go the route of complex water cooling or buy some of the crazier CPU coolers. But to keep things in perspective you will want to layout what your goals are for your CPU cooling needs. If you are overclocking the system you are going to want to do some research on what coolers offer the best cooling for what you want to do. In most cases water cooling isn't the best route as it is usually the most expensive route to go. So you will want to go looking the route of air cooling or even passive cooling.
Passive Cooling: $24-$80
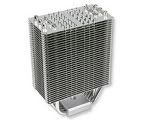
Passive cooling refers to technologies or design features used to cool things without power consumption. So in the case of PC's this would remove the fan from the cooling setup.
Air Cooling: $12-$150
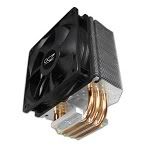
Air cooling is a method of dissipating heat. It works by making the object to be cooled have a larger surface area or have an increased flow of air over its surface, or both. In the case of PC coolers they use both the method of increased area & fans to provide extra airflow on that increased object.
Water Cooling: $129 & Up

Water cooling is a method of heat removal from components. As opposed to air cooling, water is used as the heat transmitter. While water cooling is the most effective way to dissipate heat from your CPU, it is the most bulky & pricey solution. But in recent years Water cooling has become a cheaper option with some kits starting at the $129 range.
With all the above options I went with some upgraded air cooling over my stock Intel CPU cooler. I spent about 2 hours online reading reviews & following up with our very own Thrax to get ideas what cooling solution was the best for my Motherboard, CPU & case. In general it is very easy to just pick out a monster cooler, but if you are not taking in mind your motherboard & case you might find your upgrade to not fit properly, even though it was meant for the CPU socket on your motherboard.
So after looking & looking I had to break down the basics before I could truly figure out what cooler was the best option. So below I broke down the 3 things you should ask yourself / look into before buying a cooler.
What socket should my cooler fit?
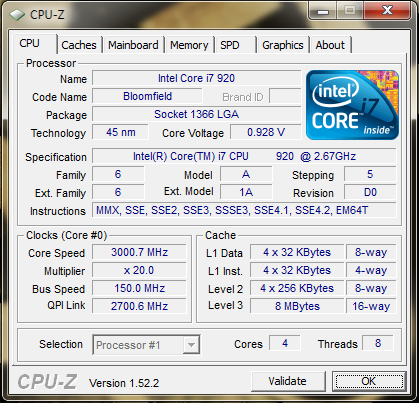
While most people getting into aftermarket cooling know what sort of CPU/socket they have, I have to assume someone out there might want to upgrade cooling on that fancy unknown system you purchased. In that case you can quickly find out what socket your system is running by downloading a sweet application called CPU-Z. This application will show you everything you need to know about your CPU. The socket type will usually be listed under the Package listing. - See below image
CPU-Z: http://www.cpuid.com/cpuz.php
Will it fit on my motherboard?
Most motherboards today especially enthusiast motherboards have all sorts of big coolers and pieces all over them. Most good companies will make sure you have plenty of room for an aftermarket heat sink, but some do not. make sure you look in your case or research if the cooler you like is compatible with your motherboard. Most cooling companies have a nice list with what motherboards will work/ not work. If you can't find that info, I suggest sending them a friendly e-mail. You will also want to make sure your cooler will not interfere with your memory. Most memory is set in a low form factor but some can have huge cooling fins that will block your CPU cooler.
Will it fit inside my case?
This is a tricky one. Again most manufactures of coolers keep them within specs of 80% of the cases on the market. but every now & than a sneaky vendor will make a cooler that is just to tall & it will not sit in your system.
0
Comments
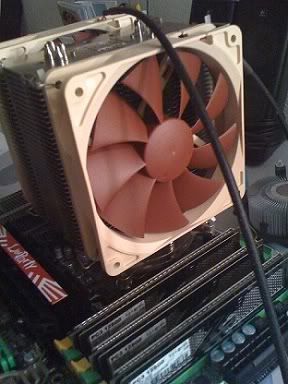
As mentioned above after all my research I purchased an air cooling solution from an Austrian company called Noctua. I am going to be honest & tell you I have never heard of this company before & maybe this is because they kicked off their operations in late 2005. But the reviews & performance their products are earning across the world have made them jump to the top of my list.
Noctua NH-U12P SE2 120mm SSO CPU Cooler
Specs:
Model: NH-U12P SE2
Fan Size: 120mm
Compatibility: Intel LGA1366 / LGA1156 / LGA775
AMD AM2 / AM2+ / AM3
Airflow: 54.36 CFM
Acoustical Noise: 19.8 dB(A)
Acoustical Noise with U.L.N.A.: 12.6 dB(A)
Heatsink Material: Copper (base and heat-pipes), aluminium (cooling fins), soldered joints & nickel plating
Fan Dimensions: 120 x 120 x 25mm / 120 x 120 x 38mm (2 fans can be installed)
Heatsink Dimensions:158 x 126 x 71 mm
Weight: 940g(with 2 fans)
Link: http://www.newegg.com/Product/Product.aspx?Item=N82E16835608014
Icrontic Approved:
If your installing and after market cooler on a system that is already built or on a system that has yet to be built the steps are very much the same. In my case I had already built my system within my case so I had to break the system down & pull the motherboard out to install the cooler properly. If your also adding a cooler to a pre-built system just know that 99% of all aftermarket coolers will force you to remove the motherboard from your system. You ask why? It is mostly because the aftermarket system require a special back plate to be installed so the cooler mounts properly.
Tools Needed:
Fingers
Phillips head screw driver
Thermal Compound (make sure your heat sink came with some)
Step 1:
Power down & unplug everything from your system & move it to a nice flat area you can use to work on.
Step 2:
Remove the cases side panel & expose all the inner glory of your system
Step 3:
Remove components & other items attached to your motherboard. This includes Graphics Cards, sound cards, SATA cables, USB cables, power cables.... everything. You will notice I left the Ram & CPU installed. In most cases I would recommend taking these items out as well. But if you feel comfortable leaving them in you can do that.
Images of case after I removed the mother & the motherboard outside the case.
Step 4:
Now you will want to remove your old heatsink & fan from your system. depending on the brand you might have different attachment methods. most AMD systems have a lever than can be switched back to loosen the heatsink and than a small amount of pressure is needed to unhook the metal clip from the plastic base. Most Intel systems will require you to turn 4 little plastic nobs to loosen the heatsink from the motherboard.
In all cases do not be shocked if the heat sink is plastered to the CPU. The thermal compound is pretty tough to pull apart so give it some small twisting motions.
Step 5:
Now you will need to wipe off the thermal compound from the CPU. I usually use tissue paper to get the bulk of the compound off and follow up with some cotton swabs & rubbing alcohol to get any residue off. If you don't have rubbing alcohol you can always use some....
Sauza Gold Tequila.. image courtesy of SMLAN 2006
Step 6:
This is where the directions for install will change slightly depending on what brand of heat sink you purchased. The best bet is to open the instructions that came with the heat sink and stat following those directions to the T.
Depending on your cooler you might want to think about how it will install. Will it be best to install the bracket than put the motherboard back in the case & than install the heatsink & fan(s)? Overall this is easy stuff, but you might find it very difficult to install the motherboard with the full heatsink & fan setup into the case. In my install I had just enough room to install the full setup outside the case and than move it back into the case with the install complete.
So overall mounting the hardware for this heatsink was very easy... I will provide some simple images below showing what was done.
Note: DO NOT FORGET TO PUT ON THE THERMAL COMPOUND I have read stories of this not being done... I would hate to see your system fry
Installing the back plate to the bottom of the Motherboard.
Installed mounting brackets
Attached heatsink to the mounting brackets (heat sink has thermal compound on it at this point)
A view of the mounting hardware with heatsink attached
Attached the Fans - make sure the flow of the fans is blowing the right way
The motherboard and system back in the case with the cooler... now time to clean up the wiring.
Overall the install took roughly 1 hour & 20 minutes mainly because I was taking pictures & doing other things. But as you can see the process isn't all that hard & can be done quickly.
Results:
After installing the new cooler I noticed that my system ran 10c cooler just with the system running idle & roughly 27C cooler under full loads. So instead of the system peaking at 79C when being OC'ed under full load, it now tips the 52C mark & never gets hotter.
But the real payoff happened once I started OC'ing the system. The PC is now purring at a nice 4GHz which is roughly a 50% increase in CPU power. So for a CPU that cost me $278 + a aftermarket cooling system at $65 has me sitting at $375 with all the shipping & tax. If I compare that with Intel's current top dog i7-975 Extreme running at 3.33GHz priced at $999.99 we saved $600+ while having a CPU running faster than the extreme. Now take in mind the i7 975 will get even better OC scores than our i7 920, but that is at a cost that is over $600 more than our setup.
Of course result will vary across the board based on many factors, but overall the purchase was well worth it.
Note: Definitions of passive, air & water cooling were modified from wiki entries.
The huge fan on top still sucks in the air from the side hole as I can feel the air flow when putting my hand near it.