
A Return to Oz (the with the Girl, 2 Witches, 3 Rejects and a Wizard)
It seems I never leave a build "finished". An exception has been the first "completed" build I ever did....the wife's Oz1. This is the one I used to start What Was Your 1st Completed Mod??
Well that is about to change because of wanting to test domestic tranquility again. The wife “gutted†this build when she got her laptop and just had it in her Oz collect as a “decorationâ€. Kept hitting her up to let me do something with it but she’s anti multi-computer. SO I’ve got to try and put this together quickly and quietly and hope I blow her away with how it looks and what I plan to do with it (Another wild hair story in the making!). As far as leaving it alone I was doing alright until I happened across a refurb'ed XFX 750a SLI motherboard on the ‘egg. Only bought it hoping the version sent is the one pictured. A nice green mobo would look great against the yellow interior. After all bling is more important than performance.....right?!?! Also I’d be using parts that are floating around the wife wants me to sell.
Well anyway here is what it will have ………
Case: Customized old generic "pakman" case
PSU: Thermaltake TR2 W0388RU 600W
Mobo: MDA72P7509 AM2+/AM2 NVIDIA nForce 750a SLI
CPU: PI X3 8750BE
HSF: Zalman CNPS9700-NT
GPU: Evga 9600GSO 512 (for now)
Memory: G. Skill F2-8500CL5D-2GBPK
While the PSU isn’t that “stellar†the price was right and it’ll get the job done for now. Might even try my hand at modding it (sleeveing, acrylic cover, leds, whatever) and won’t cry that much if I screw it up.
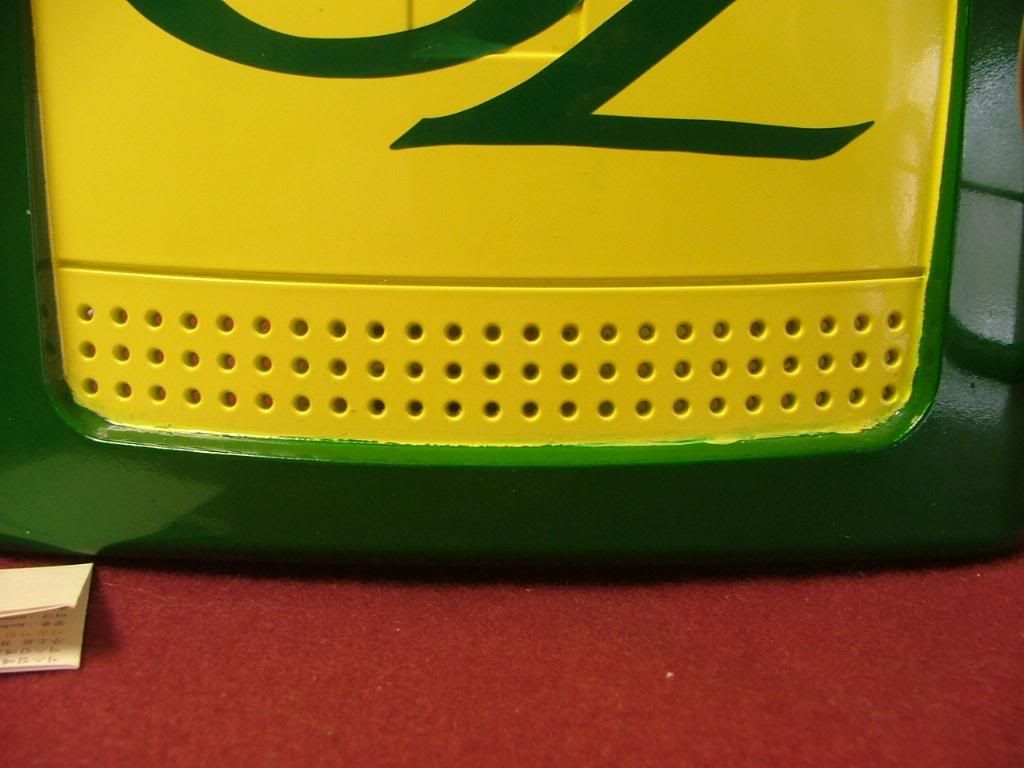
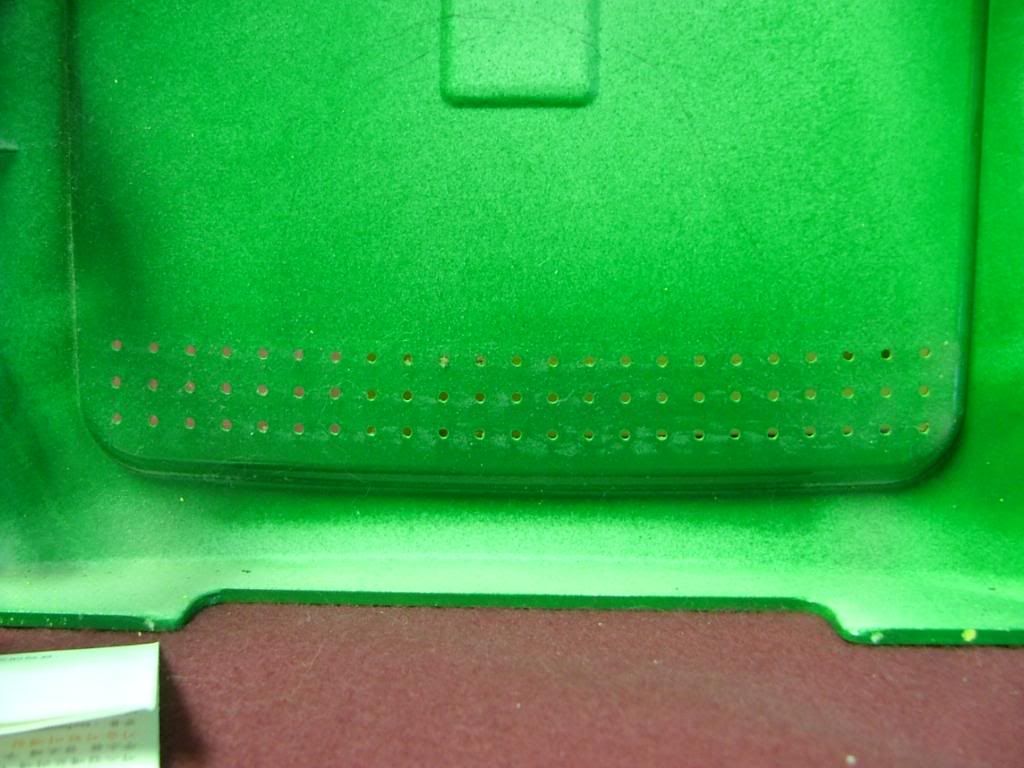
My biggest concern, other than the mobo’s bad rep, will be cooling. This unit has a limited number of “cooling†holes in the front bezel and slightly larger ones on the chassis front. Interestingly enough the bezel holes seem to be tapered and my heavy handedness with the paint didn’t help matters. Then there is provision for 2 x 80mm fans…1 front and 1 rear with some cooling holes in the back. The side panels have an area that looks to be about ½ to 1†high and about 9†long. However the ones on the left side went by-by when I put in the window.
Here are some of my thoughts my thoughts….
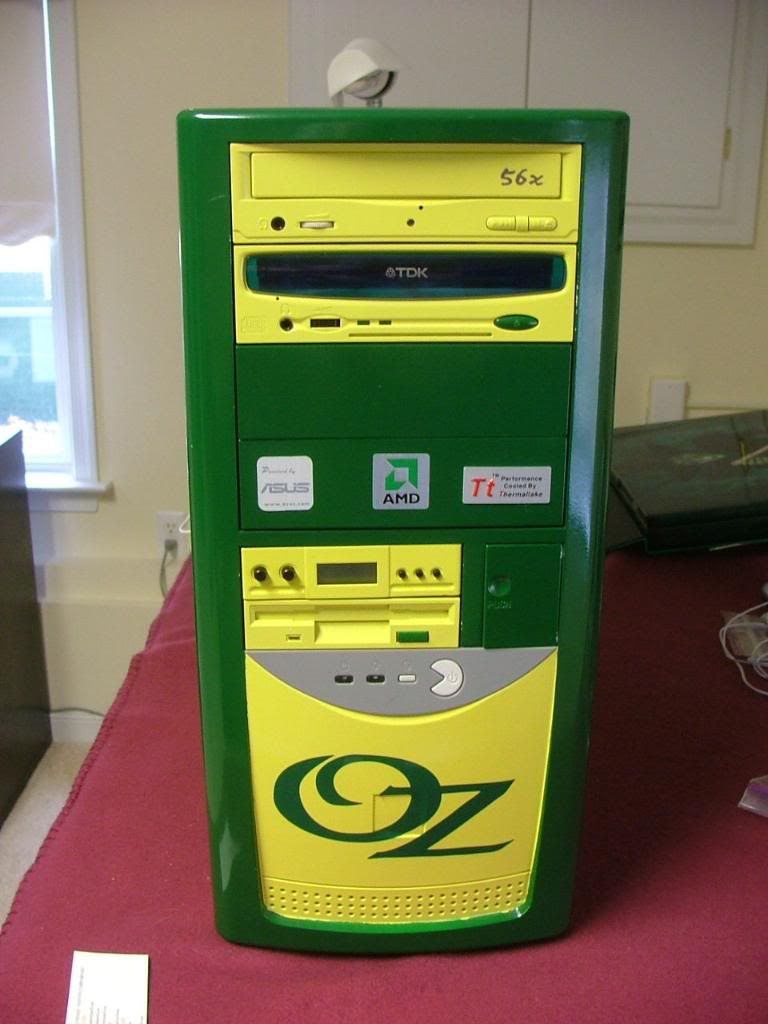
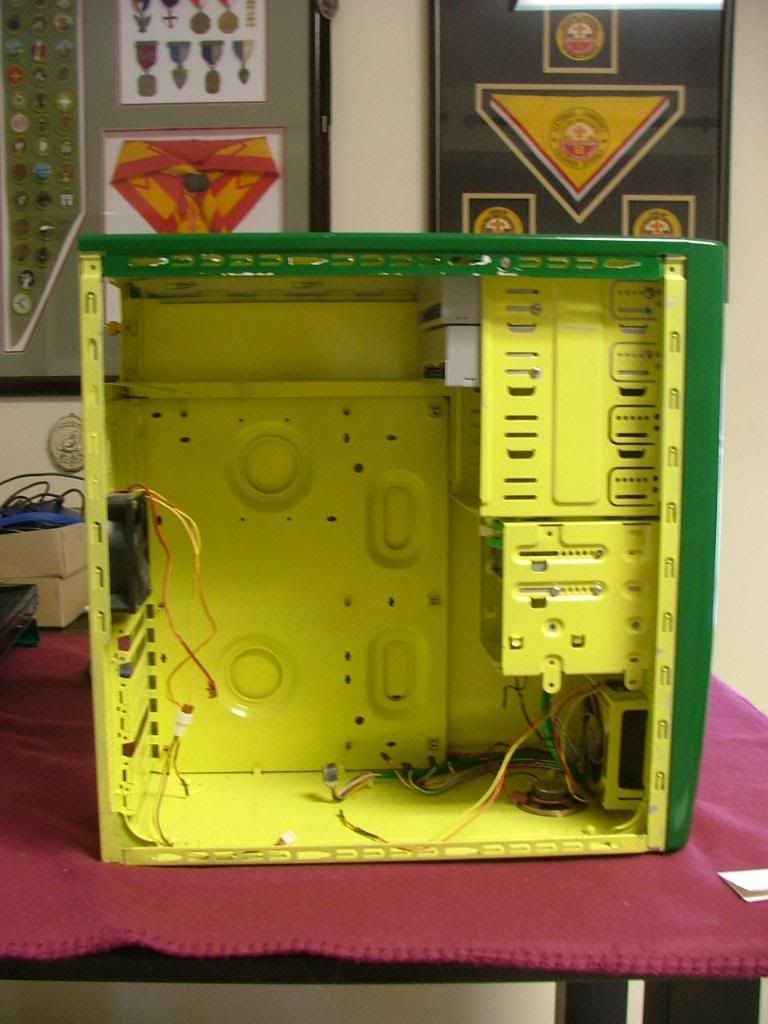
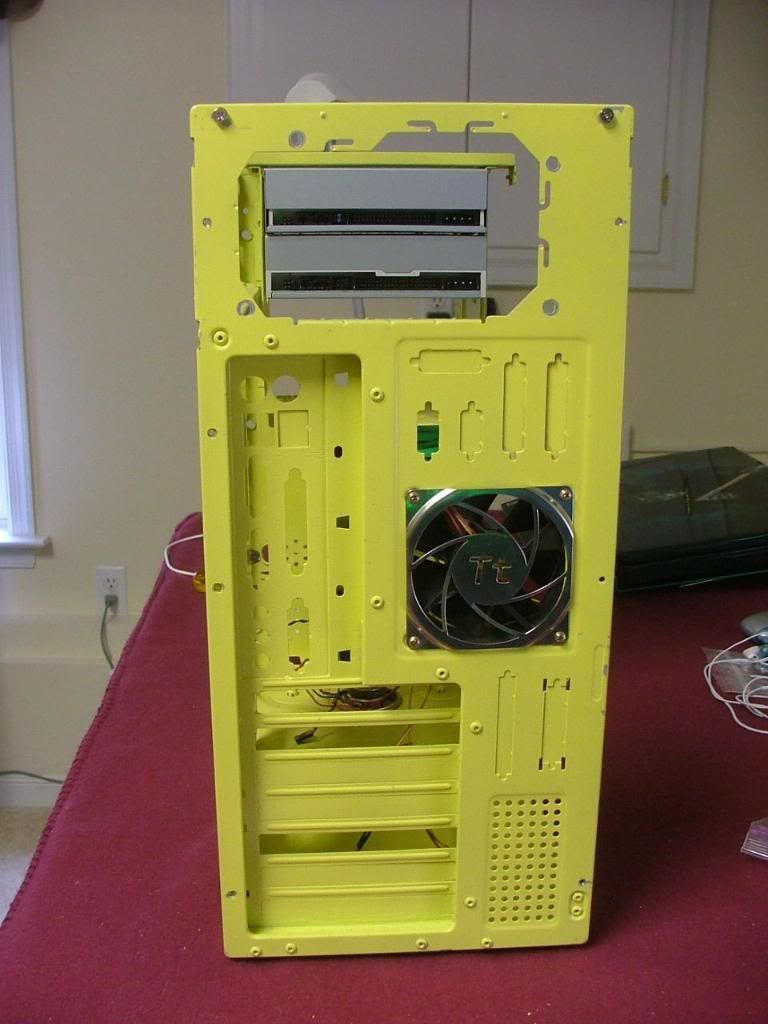
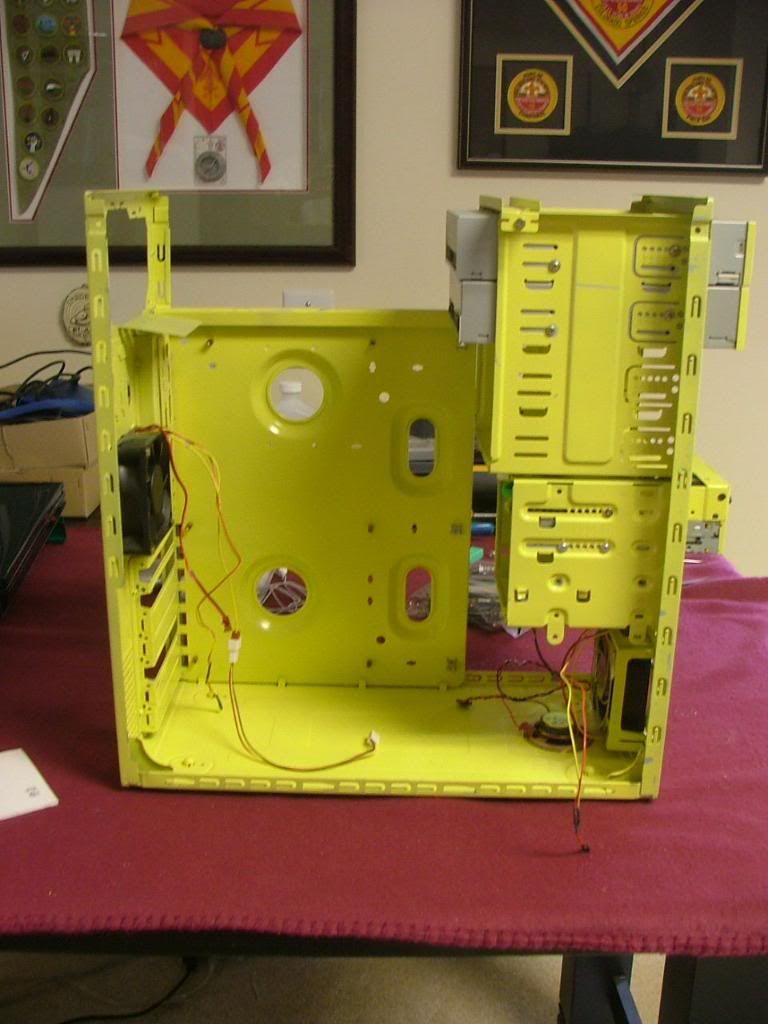
Here are a couple of pix with most of it together. In the front view look at the power switch and you’ll understand where I get the nickname for the case. In the second you have just the left side removed. It took me a while to get my bearings as I haven’t studied this interior since I had installed the AN266 / 1900+ Paly.
Then off came the front bezel, top, and right side leaving a fairly open chassis……..
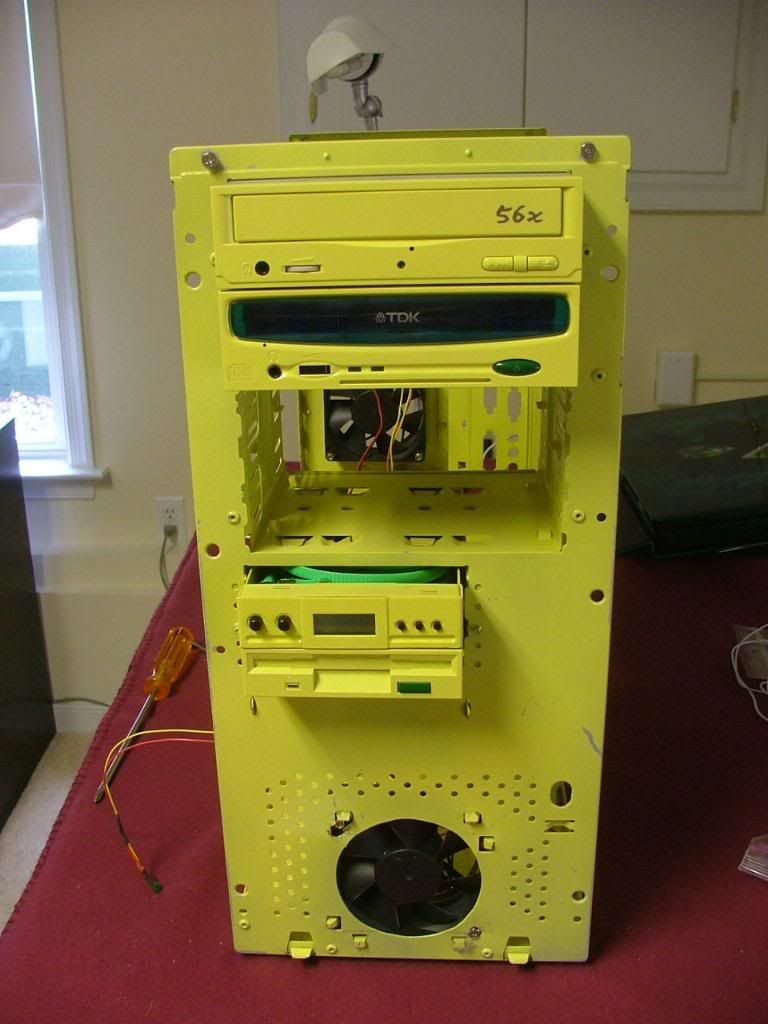
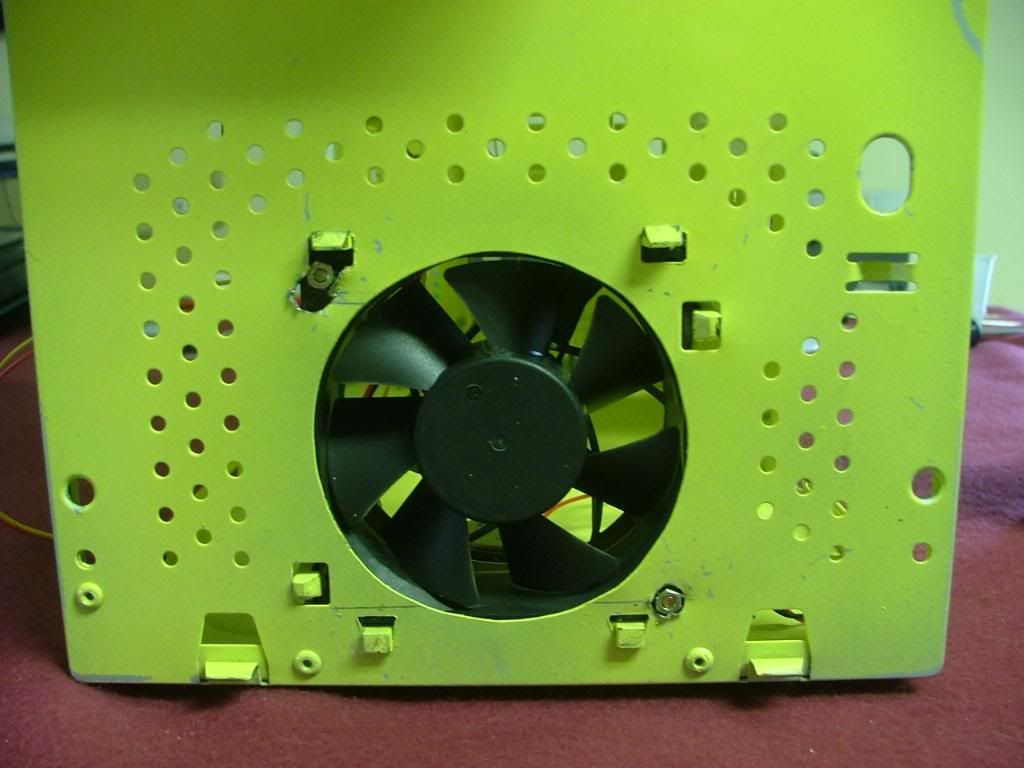
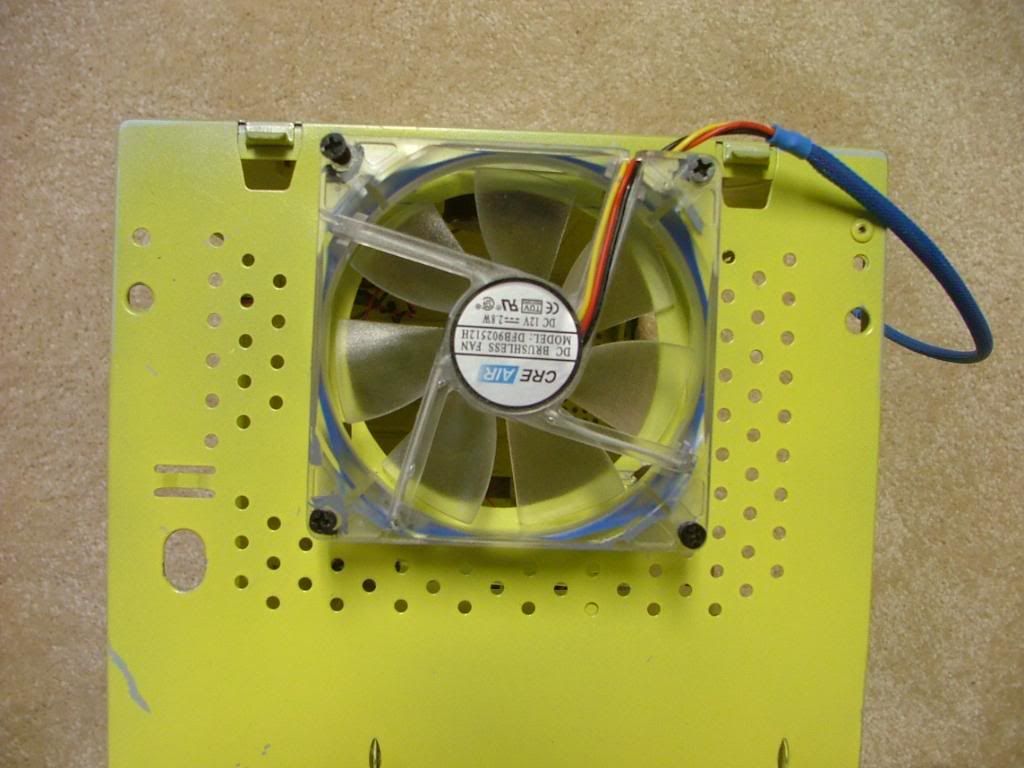
Now on to the cooling issues (I’m all ears when it comes to suggestions)…….the following pix will show what I was mentioning above along with some fans being “sizedâ€.
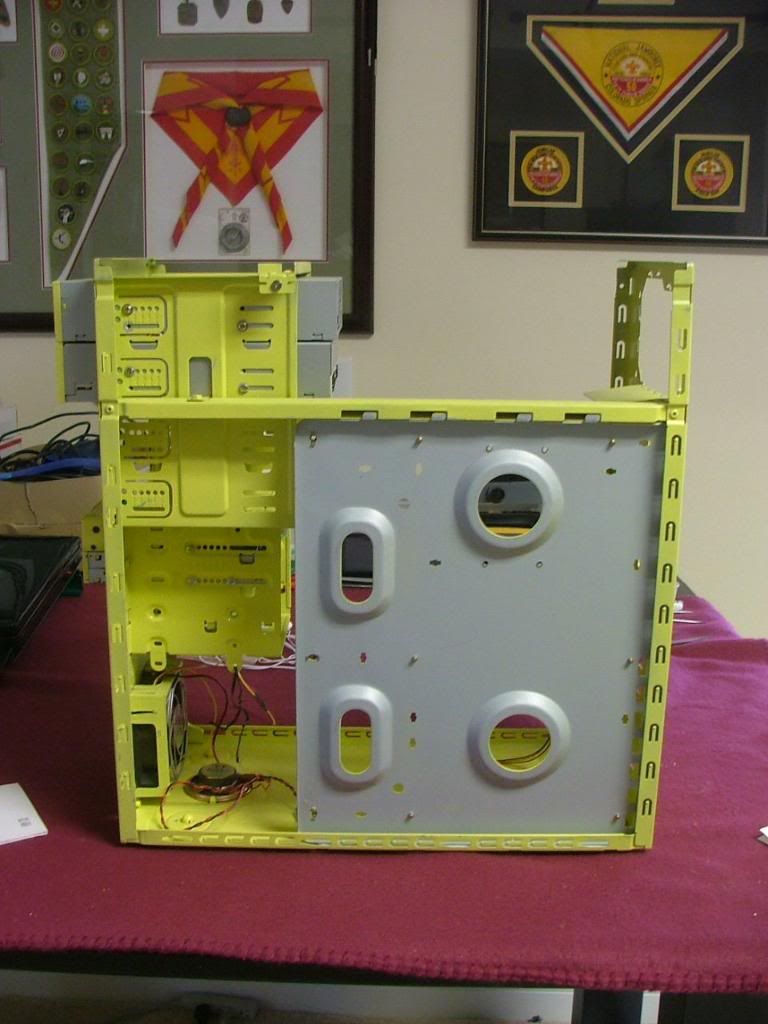
There shouldn’t be any issues with using a 92mm in the front but I would prefer to have a 120mm. In the side view it looks like I can shoehorn it in on the interior. However there is a mounting tab for another HDD that would have to be removed to allow the fan to be centered. You can see the one on the near side.
As the opening would be covered by the fan on the inside and the bezel on the outside was thinking about “cheating†and just cut a square hole as I don’t have a hole saw or hole puller.
Okay that is it for now as the mobo is supposed to be here Wed, the HSF Friday, and hopefully the PSU Saturday. May set the mobo up on the tech station with a substiture HSF and PSU just to make sure it works during the ‘egg’s return period.
Well that is about to change because of wanting to test domestic tranquility again. The wife “gutted†this build when she got her laptop and just had it in her Oz collect as a “decorationâ€. Kept hitting her up to let me do something with it but she’s anti multi-computer. SO I’ve got to try and put this together quickly and quietly and hope I blow her away with how it looks and what I plan to do with it (Another wild hair story in the making!). As far as leaving it alone I was doing alright until I happened across a refurb'ed XFX 750a SLI motherboard on the ‘egg. Only bought it hoping the version sent is the one pictured. A nice green mobo would look great against the yellow interior. After all bling is more important than performance.....right?!?! Also I’d be using parts that are floating around the wife wants me to sell.
Well anyway here is what it will have ………
Case: Customized old generic "pakman" case
PSU: Thermaltake TR2 W0388RU 600W
Mobo: MDA72P7509 AM2+/AM2 NVIDIA nForce 750a SLI
CPU: PI X3 8750BE
HSF: Zalman CNPS9700-NT
GPU: Evga 9600GSO 512 (for now)
Memory: G. Skill F2-8500CL5D-2GBPK
While the PSU isn’t that “stellar†the price was right and it’ll get the job done for now. Might even try my hand at modding it (sleeveing, acrylic cover, leds, whatever) and won’t cry that much if I screw it up.
My biggest concern, other than the mobo’s bad rep, will be cooling. This unit has a limited number of “cooling†holes in the front bezel and slightly larger ones on the chassis front. Interestingly enough the bezel holes seem to be tapered and my heavy handedness with the paint didn’t help matters. Then there is provision for 2 x 80mm fans…1 front and 1 rear with some cooling holes in the back. The side panels have an area that looks to be about ½ to 1†high and about 9†long. However the ones on the left side went by-by when I put in the window.
Here are some of my thoughts my thoughts….
- Try to mount, at a minimum, a 92mm in the front. Preferably it’ll be a 120mm. Sadly there is nothing I can do about the 80mm in the rear.
- When the PSU comes in see if there is a chance to do a 92 or 120mm blow hole. However that would have to be squeezed between the PSU and the 5.25†drive bays.
- Look at “opening†the front bezel and chassis cooling holes to allow more air to get in.
- For bling looking at going for either green led or UV fans.
Here are a couple of pix with most of it together. In the front view look at the power switch and you’ll understand where I get the nickname for the case. In the second you have just the left side removed. It took me a while to get my bearings as I haven’t studied this interior since I had installed the AN266 / 1900+ Paly.
Then off came the front bezel, top, and right side leaving a fairly open chassis……..
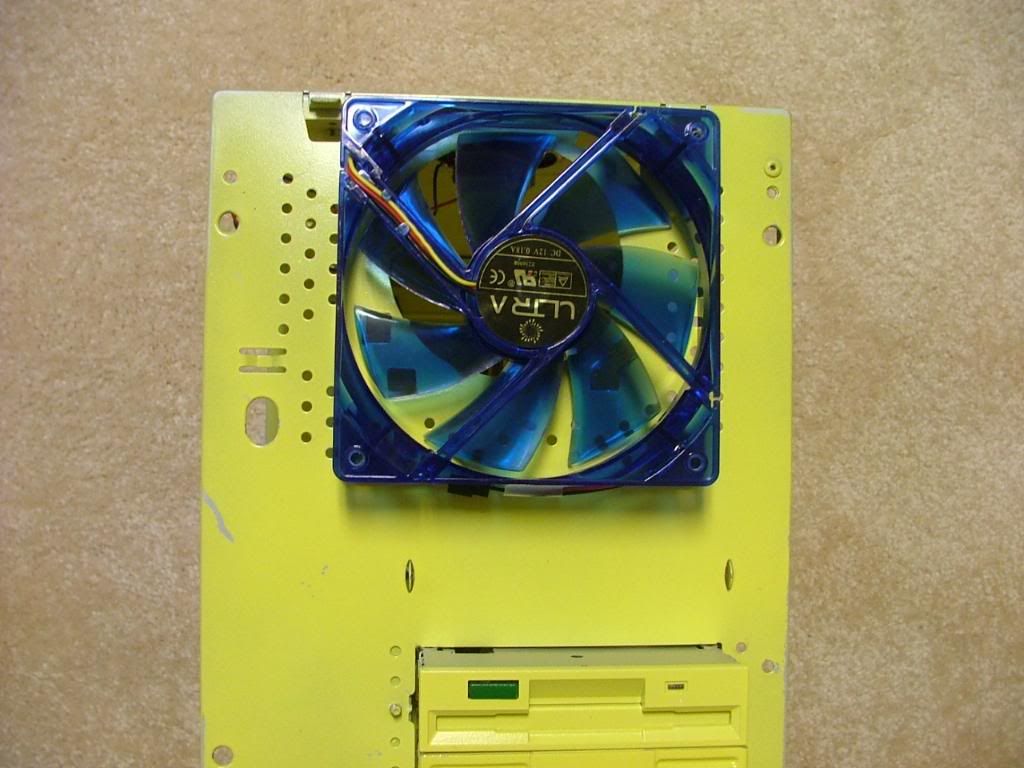
Now on to the cooling issues (I’m all ears when it comes to suggestions)…….the following pix will show what I was mentioning above along with some fans being “sizedâ€.
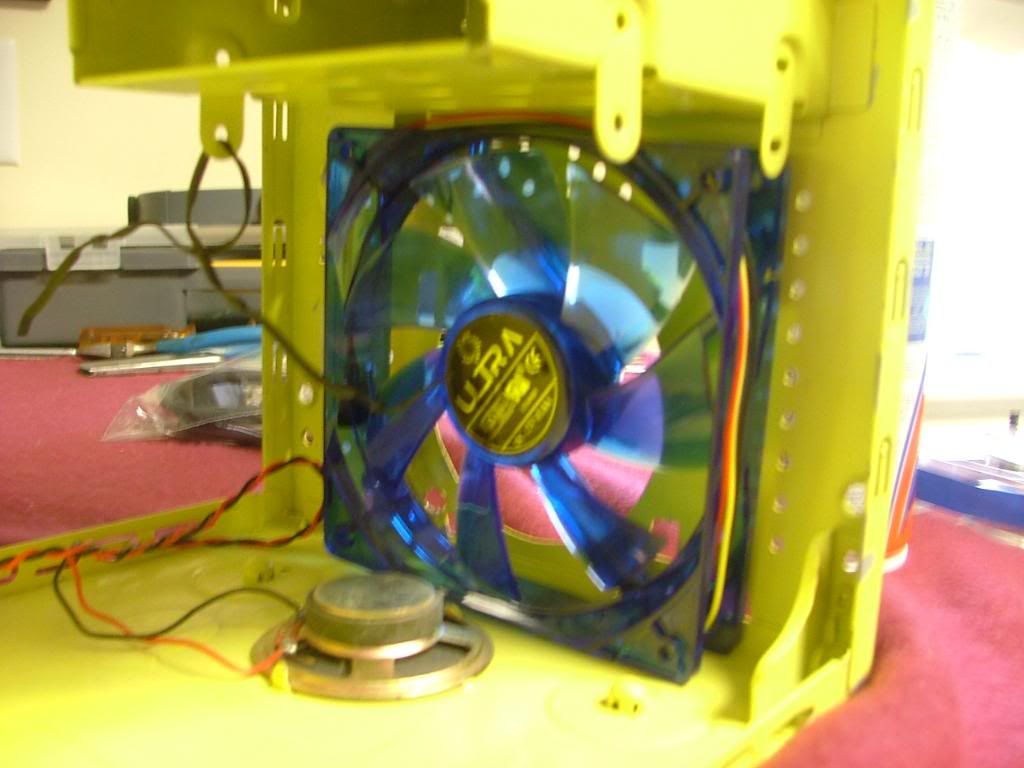
There shouldn’t be any issues with using a 92mm in the front but I would prefer to have a 120mm. In the side view it looks like I can shoehorn it in on the interior. However there is a mounting tab for another HDD that would have to be removed to allow the fan to be centered. You can see the one on the near side.
As the opening would be covered by the fan on the inside and the bezel on the outside was thinking about “cheating†and just cut a square hole as I don’t have a hole saw or hole puller.
Okay that is it for now as the mobo is supposed to be here Wed, the HSF Friday, and hopefully the PSU Saturday. May set the mobo up on the tech station with a substiture HSF and PSU just to make sure it works during the ‘egg’s return period.
0
Comments
Anyway the board came in and sure enough it was the black PCB!
BTW an interesting observation.....appearently in "the old days" I/O output layouts must have been more standard. I had to remove the stamped case I/O shield that was used with the prior build!
Sorry to disapppoint.....but that mobo was RMA'ed back for refund!
Also because of going green witht the mobo the bling considerations involved in going with green psb for the GPUs have changed.
I spent most of the weekend trying to figure out the bios issues I’m having with the 750a, without much luck!! SO off to do some mechanicals……….
Starting with remedying the front cooling issue I attached the front bezel with much in trepidation. After all if I mess it up, not only will it be obvious that I doing a clandestine build but ruined the case she likes.
First thing was to enlarge the cooling holes at the bottom of the bezel. Having a major cranial infarction right now and can’t remember the drill sizes. Anyway taped it off and marked the holes so as not to screw up the pattern. Using the top row as the start, I went form the first to the last marking every second hole and also did the third row. For the middle row of holes I offset one hole. Used these for the larger holes and then opened the balance with a slightly larger bit than the stock holes. This opened them up as the stock hole seem to taper and had been filled with my heavy handed paint job. To keep the bezel from moving too much I kinda sorta did a jig……(not the dance either!
Still not happy with the amount of “openings†I tried to figure what else could be done. Then I noticed that on the bottom of the bezel was an elongated cutout and went hummmmmm. Decided to see how much I could mess up and do something similar on each side. Need to miss the mounting extrusions, and have it high enough to take advantage of the 120mm fan. So marked it off, cut with the coping saw and then used a file to try and smooth it out. At that I wasn’t too successful.
Now it was time to cut the clearance hole for the 120mm, as I don’t have a hole saw it was rough cut time with the dremel. Didn’t have to be all that neat (and it wasn’t) as the bezel hides the front of the cutout and the fan does it for the interior. Didn’t have to do anything with the rear fan but mount it. Forgot what they called the finish but looks right good.
As noted I was flustered with the overclocking that I wasn’t doing, so decided to go ahead and just put the system together. I had taken all the drives and such out to cut the hole, so back in they went. As I wanted to attempt to do a half-A job of cable management I installed the PSU in the chassis and tried to figure where to hide the cables……PSU, Optical Drives, HDD, and the fan controller with its temp probes. I was even so desperate to get it running I “borrowed†a HDD as the one for Oz was still “in the mailâ€. Then went to install the mobo and remembered the I/O plate was also “still in the mailâ€. Well If I do it right, I shouldn’t have to do much but unplug things.
While this was an “old†case it still has a lot going for it. As mentioned earlier both sides, top, and front bezel come off make access to the interior great. Another thing is what I call the excess cable tray. This is the space between the drive cages and the right side. Makes routing things like Video power, floppy (have one I painted for this build back when sooooo), and optical drives. If I hadn’t had an empty 5.25 bay all excess power cable length would have been shoved there. Just ignore the FDD ribbon cable as I thought I had a rounded one in the parts box but didn’t. That eventually will be replaced.
Here are a few pix to show where we now stand wiring wise. Wanted to get it started up but seem to have a slight problem……the HDD seems to be DOA, all the fans spin, lights come on, but know vid or anything. Touched the drive itself and can not even feel any “vibrationâ€. As the HDD is going to be replaced any way and the I/O plate installed I’ll faness the cabeling then. Also hope to add another XFX GTS250 in a couple of weeks or so.
And speaking of GTS 250s here is what I did to the one I have……..the fuzzy pic hides the fact I painted this too quickly and too heavily trying to beat a self imposed deadline for the assembly. Basically get it together and running before the wife returned home from MD.
Now that leaves me with trying to decide if I want to control the two fans and where I want to use the temp probs. Right now the fans are running off of the mobo.
So should I use the fan controller and where should I monitor temperatures as for the most part I do HWMon without looking at the case?
Have had some ppl give me compliments on my first window........
I didn't do any pix when this thing was originally built thought I'd toss out some of the window to show that it is rather crude. As I went with what was available (no dremel) here is what happened.
1. Went to Lowes and bought a sheet of plex (use only lexan now)
2. Was working a P/T job where I could borrow a whole puller (no hole saws). Had a basic idea of what I wanted so dropped the hole centers and pulled the holes.
3. Drew lines tangent to holes and went after it with a jig saw and man it was "oil can" alley!
4. Tried to smooth things out with a file but that was a joke so went to PepBoys and bought some edging.
5. Put that on to hide the ragged edges and then cut the plex to fit with a coping saw. After test fitting it needed to remove material where the dempled "handle" is and notch on corner.
6. Then realized I didn't have any means of attaching it to side panel.
With two temperature sensors and two fan controllers I'm still trying to figure out what to do with them. The fans are easy as there are only two however not really sure what to do temp wise. For right now I’ve one on the NB cooler and the other stuck into one of the GTS 250s. Think the NB will stay so open for suggestions for the other one.
<O:p
<O:p
The second GTS250 came with Friday’s mail so installed that to test when I return from work after ffice:smarttags" /><?xml:namespace prefix = st1 ns = "urn:schemas-microsoft-com[IMG]http://icrontic.com/forum/ /><st1:time Hour=[/IMG]midnight</st1:time>. Seemed to do okay so off to paint in my usual rush mode. Had to buy a new can of paint and that appears to have cured one of the issues I had when painting the first card. That and it wasn’t raining! Anyway one of these days I spread that task out over several days as one should, but until here is the second 250 before it went into the box.
<O:p
<O:p
Then in it went, this is my first foray into SLI BTW unless you want to include my two pci voodoos that I used in Gateway G6 10+ years ago!
<O:p
<O:p
Right now I’m doing Prime to see if the system can be declared stable before going on to other stuff. Here is what it looks like in the dark with the initial led fans and am contemplating if I want to try a couple of UV laser lights I have lying around. Also there is room for a 92mm fan in the top for a blow hole if that becomes necessary.
<O:p
My constant lab assistant kept getting in the way as I was laying on the floor try to take the “night†shots!
<O:p
As previously stated he's always keeping me company whither building or just using the ‘puter! He and his bud have the wife and I well trained!
ffice:office" /><O:p></O:p>
Anyway I'm of the opinion it is the upper card as the cover feels "warmer" than the lower one.
So far this is what I have fan wise....
Incoming is 1 x 120mm
Exhaust is 1 x 80mm, 2 x GPU fans, & the PSU.
Have been contemplateing installing a 92mm blow hole (biggist that'll fit) between the PSU and the optical drives, but not sure if that'll help much.
As has been suggested I may need to add something to the side panel, but again I'm afraid to touch the plex window as it isn't the highest of quality.
So what do you think is more important incomeing or exhaust???? Suggestion???
I say you should add an additional intake. The one intake would never keep up with all the Exhaust. You don't need to strain the exhaust if you want proper cooling.
Back on the cooling for Oz1a……the top 120mm will be a given, however I’m still torn on if I should do a window mounted fan or if I can get away with something in the bottom.
For a bottom mounted fan(s) I have considered picking up a set of these http://www.performance-pcs.com/catalog/index.php?main_page=popup_image_scroll&products_id=4001&image_scroll_id=0 and depending on their height could do clear plastic tube to raise them higher. That would give me the “ground clearance†for the fan(s) to work. Also looking at doing something like this to keep the dust bunnies down http://www.performance-pcs.com/catalog/index.php?main_page=popup_image_scroll&products_id=27371&image_scroll_id=0 .
Then as my sucky sketch shows do a clear plex/lex deflector to get cooler air to the top card. The bottom GPU only covers half of a 120mm and thought to direct the balance to the upper card.
Another option I had thought about is still using the bottom fan(s) but figure how to add one or two of these to help direct the airflow. Maybe this would be enough to get something to the smoken’ NB cooler under the top vid card.
I'm having a hard time picturing what exactly melted. What's the pass through?
Did the GPU temps drop with the improved airflow?
If not, I wouldn't worry too much, unless the CPU temps when running SMP are too high with the rest of the heat generated inside. I'm not an expert on this topic, but I think your GPU temps are probably safe.
I love that CPU cooler! I've read some reviews and it seems like I could get a better-performing one for the money, but it's so gorgeous. I'm thinking about getting one for my work rig, but I wish the chrome one came with a blue LED. It seems kind of backwards to me that the copper version gets blue.
Sadly the pix are stuck on an external that the interface has borked and haven't had the time to cobble something together! Anyway what I ment by pass through is where Logisys has taken a standard molex to molex extension and "tapped" off one of the connectors for power. They then soldered or grimped those wires (with heat shrink) to a circuit that includes four leds and a push button. The two wires going from the molex to led circuit are what toasted.
Murphy at work.......I had been running to seperate f @ h client on each 250 so had "dropped" the SLI setup. Ended up having one of the clients go south before doing these mods so just let it set. Now that I tried to restart SLI to test the second GPU refuses to be found!! The fun spools up but it isn't found anywhere software wise. :sad2:
The 9700 ended up being replaced by an 8700-NT as it was a bit of overkill and used it in another build for a friend. Same bling effect but the green led fan can now be seen directly through the window.
As far as a blue fan in the 9700-NT all you need to do is what I've done often...swap fans. The one in the 9700-LED is a direct 110mm swap! Check with my source for stuff like that Kuan Koo theworldray@gmail.com
In the mean if you think it would help I'll try to round up a thread I did somewhere showing a conversion! That is another thing about most zalman coolers, if you can find a source for parts one can do a lot of mix and match! :thumbup
Before I get on with the slicing and dicing there are a couple of issues that are bugging me…….
1. The wiring the powers the LED feet did a meltdown. Funny thing is the only wires to melt run from the mail to female molex pass thru to where it has been spliced to the wiring for the LEDs. Which seemed a lighter gage than the rest. Logisys hasn’t returned any requests for info. Trying to remove the LEDs from the feet so I can repair the damage but can’t get the lights out of the feet (friction fit).
2. Can’t get the system to pick up the second 250GTS for SLI.
Had several things I wanted to get done…….
1. LED Feet
2. Fan hole in top and bottom
3. Paint and install some fan grills
4. Add filters to bottom and front fans
5. Replace 9700-NT (went to another build) with 8700-NT
6. Do something with the blue faceplate in the Zalman Fan Controller
Here is the order that I needed to get started……..
Under the heading of “best laid plans of mice and men….†was a major fitting issue. The original plan had called for dropping the two optical drives down on to two slots so as to have room for a 120mm fan instead of the originally planned 92mm. However the opticals are the originals from the beginning and are quiet long.
So ended up trashing the CD-Rom drive and keeping the DVD-RW where it was (it fit) and as the faceplate is already painted and didn’t want to invest in another one anyway. Ended up putting the fan controller in the top slot which was the plan. As there are a few outstanding things I haven’t taken any front view pix yet.
On to the top and bottom fan holes. As I didn’t have a hole saw I had to use my dremel and I can’t cut a round hole to save my life. That is why I decided to do the “octagonal†method. Doesn’t look too bad and isn’t too hard. The only thing that didn’t really work that well for me is the fact that the top paint is rather thick and if one looks closely the area around the hole doesn’t look the best. Because both the top and bottom hole were done I didn’t duplicate pictures. One thing, as mentioned before, that I liked about this old case was how far down one can take the chassis easily. Here we have the chassis ready for the laying out and cutting the hole as well as removing the original feet.
First the tape and pin hole(s) laid out, started cutting, finished cut, the filing and grinding (not shown), then mounting the fan. Also for the bottom and front fans I added a couple of filters that are pretty neat as their “frame†is magnetic.
For those areas where the fans may be mounted in plastic an adaptor ring is supplied.
Now on to the fan controller……..I’ve had a Zalman ZM-MFC1 floating around for years from a build that didn’t get finished. So with four fans in the case thought that would be a good thing to use. It has an attractive, to me, translucent faceplate but obviously the wrong color. Tried to find translucent yellow but couldn’t so settle for opaque. Only issue now is finding a way to get some instructions added to make it look finished.
It had been the plan to use one of the +12 – OFF - +7 toggles for the LED feet so removed the factory on-off switch that is mounted in a rear I/O plate. Here it is wired up…..
….however for whatever reason part of the “wiring harness†melted.
The original HSF was overkill but “looked neat†a Zalman CNPS9700-NT, but when I had the opportunity to use it in another build in came a CNPS8700-NT which at 19 – 20C for idle and the mid to upper 20sC under load.
So until which time I can figure out the SLI issue, get the feet LEDs repaired, and finalize the wire management I’ll leave you with these……..
Mobo: XFX MDA72P7509 AM2+/AM2 NVIDIA nForce 750a SLI (stays)
CPU: 8750 current >> 720BE >> 955BE
GPU: 2 x 250GTS current >> 2 x 285 GTX
HSF: CNPS8700-NT >> CNPS9900-NT
May have another surprise or two coming also concerning this unit. BTW I've looked but can't find......does anyone have a source that show the heatpipe cooler dimounted???? I'd like to see how the mosfets and the NB/SB are laid out.