
YsSMN V3.0 Worklog
As I had a copy in front of me and extra time at work desided to hit y'all with another worklog.  Also need to add another point about my builds and logs...No build is ever finished! Hence the revision numbers. Also I have a modded Tech Station I did to do initial testing and overclocking. Again I’ve given a wee bit of a time line here with dates.
03-17-09
<O:p
I’ve muddled through my multiple builds and have tried to figure out how to “name†the computers. With the recent wild hairs, associated purchases, and parts swap-a rounds several things happened, including an almost from scratch build. The total “new build†was going to get a new name, but then I’d loose one…..Yoda’sSizeMattersNot a.k.a. YsSMN. As this is another mATX build and will have the “biggest†new stuff decided to just do another one of my revisions……..so YsSMN v3.0 it will be! The major “up-in-the-air†component is the PSU as I have three new ones to distribute between the three “rebuilds†YsSMN v3.0 is now part of.
<O:pCASE: Silverstone SG03
PSU: Enermax Infiniti 650W or MODU82+ EMD525AWT (525W) or OCZ OCZ00MXSP (600W)
MOBO: Biostar 790GX XE
CPU: PII X3 720 BE
HSF: Zalman CNPS7500-CU
GPU: Sapphire 4870 1GB
MEMORY: F2-8500CL5D-2GBPK (2 x 1024)
HDD: WD Raptor X, 150 Gigs
Optical Drive 1: TBD
<O:p
Originally the CPU was to be a PI X3 8750BE but that will either be going over to Kermit "on ‘droids" rebuild or DC. Now have a PII X3 720 BE in the mail for this build. Otherwise this is at least 3 of the 4 major parts!
<O:p

<O:p
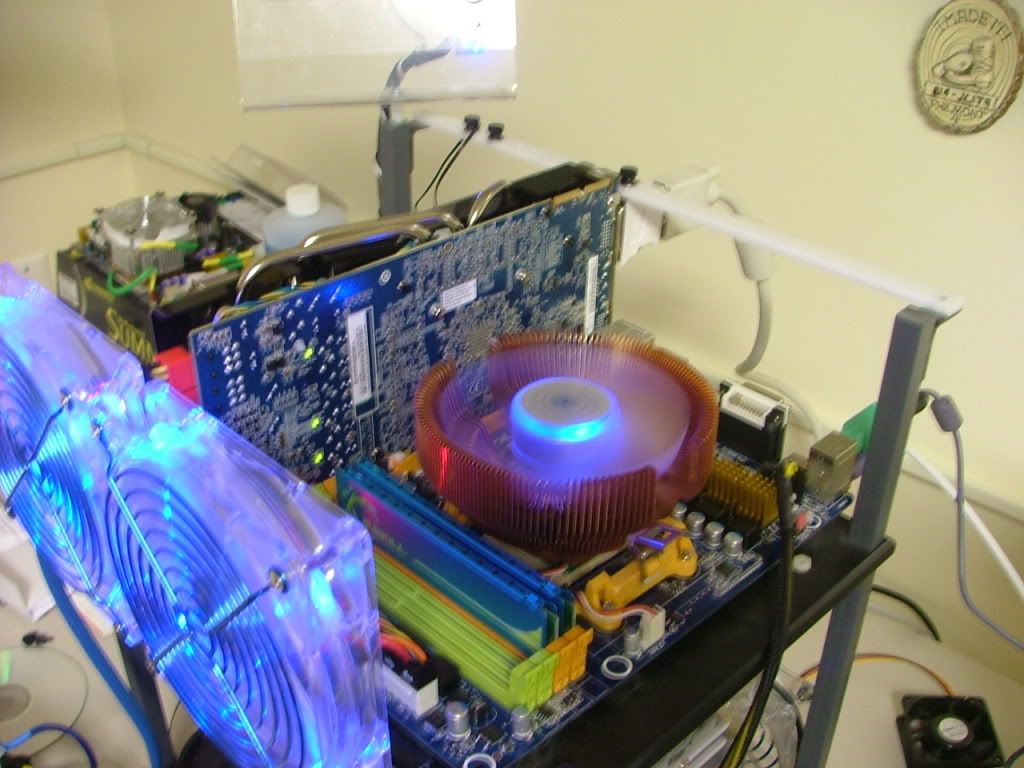
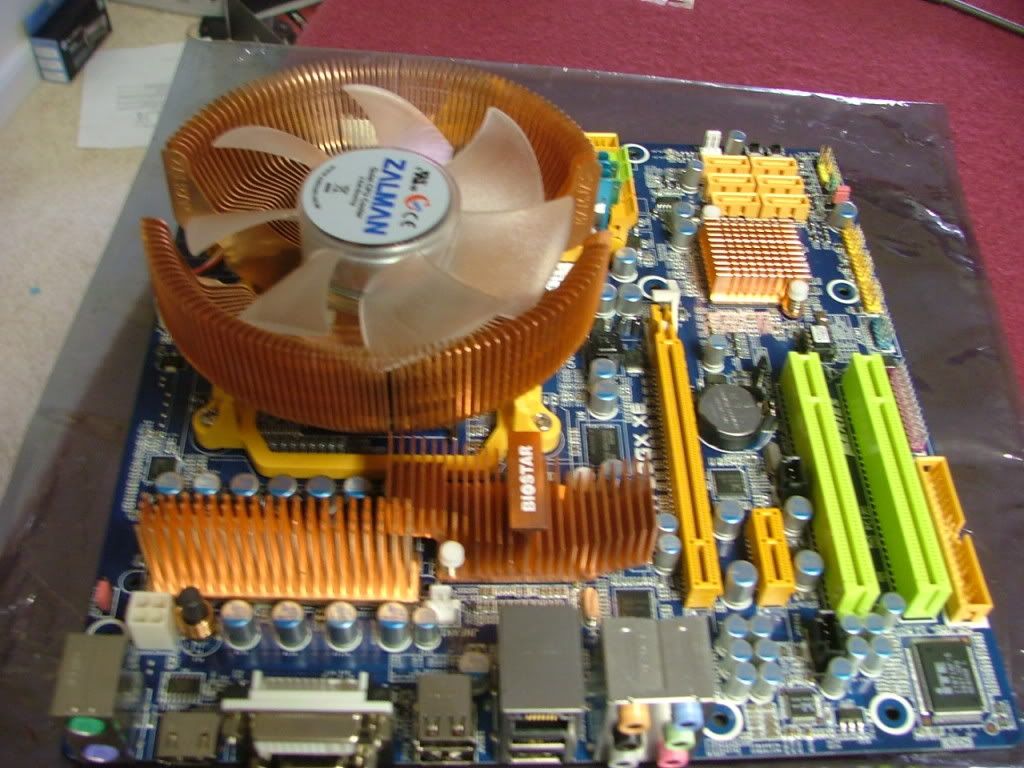
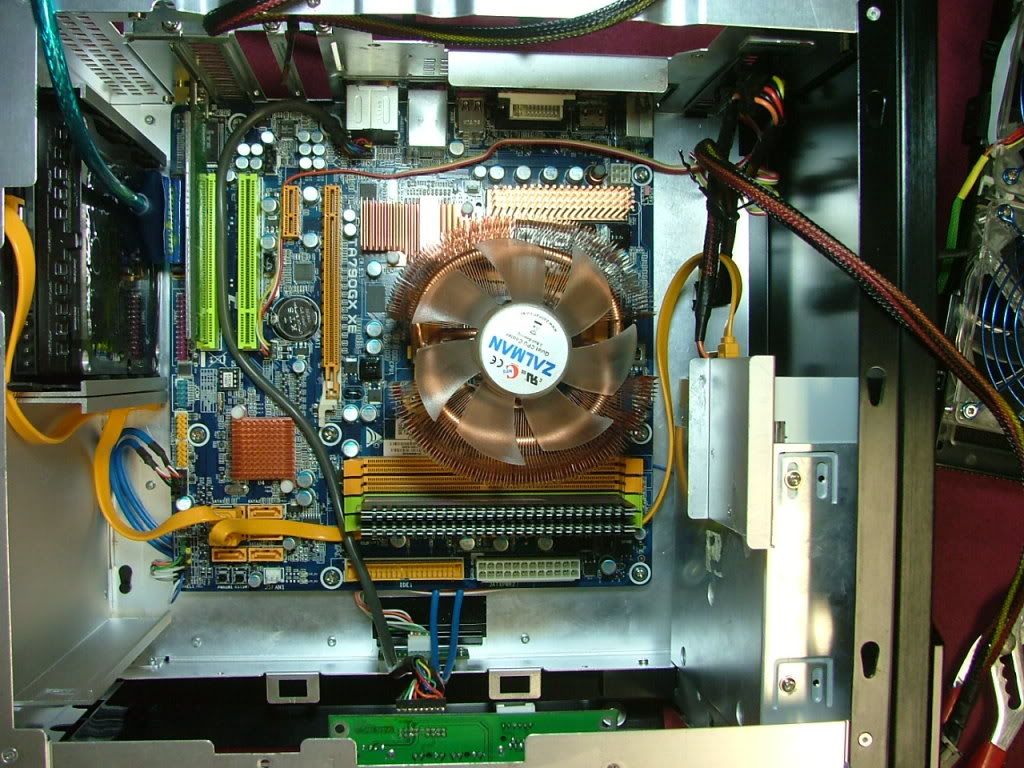
Here is the mobo / gpu / hsf that are going to be used on the Tech Station while working on the oc for the 8750BE.
<O:p

<O:p
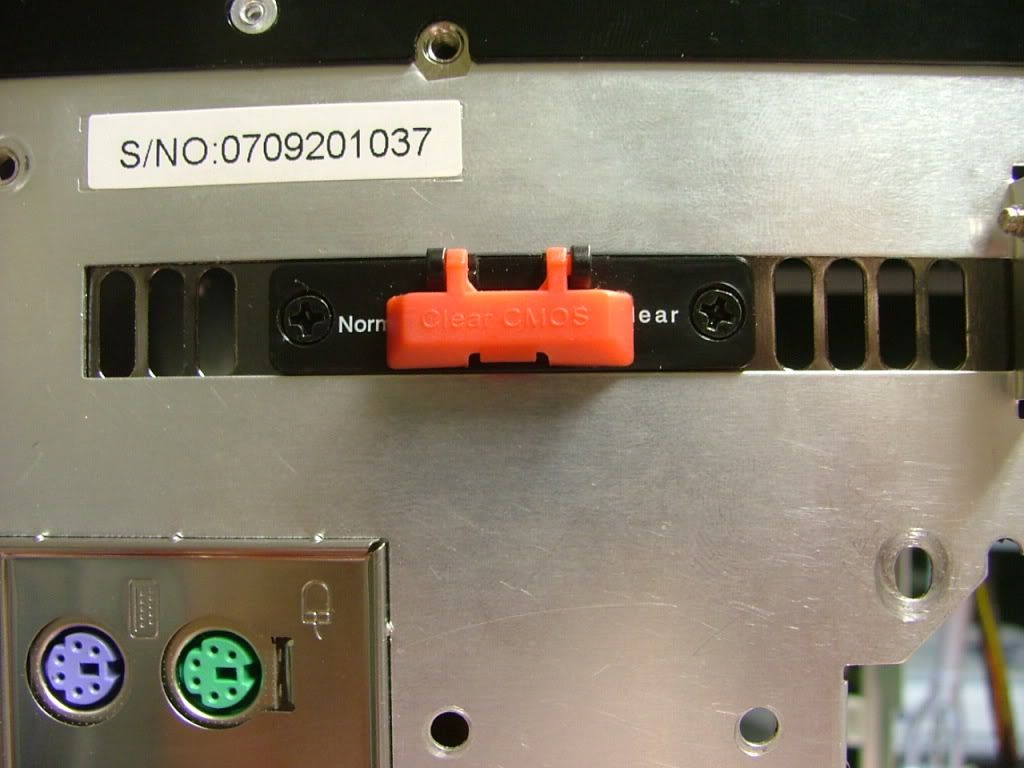
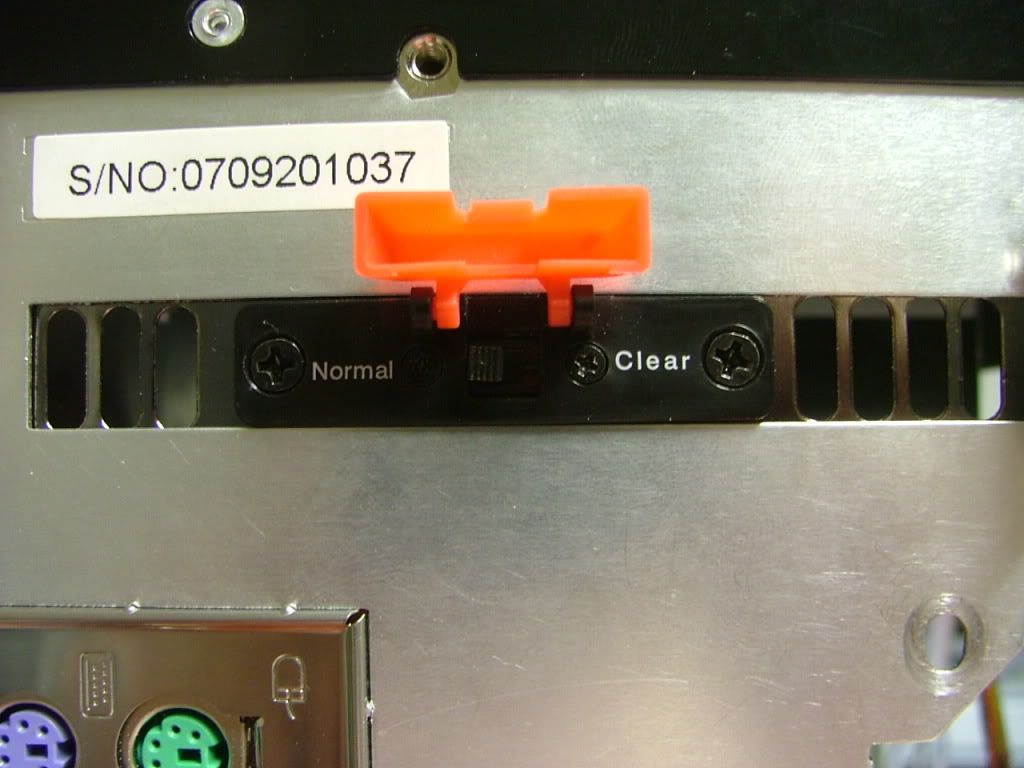
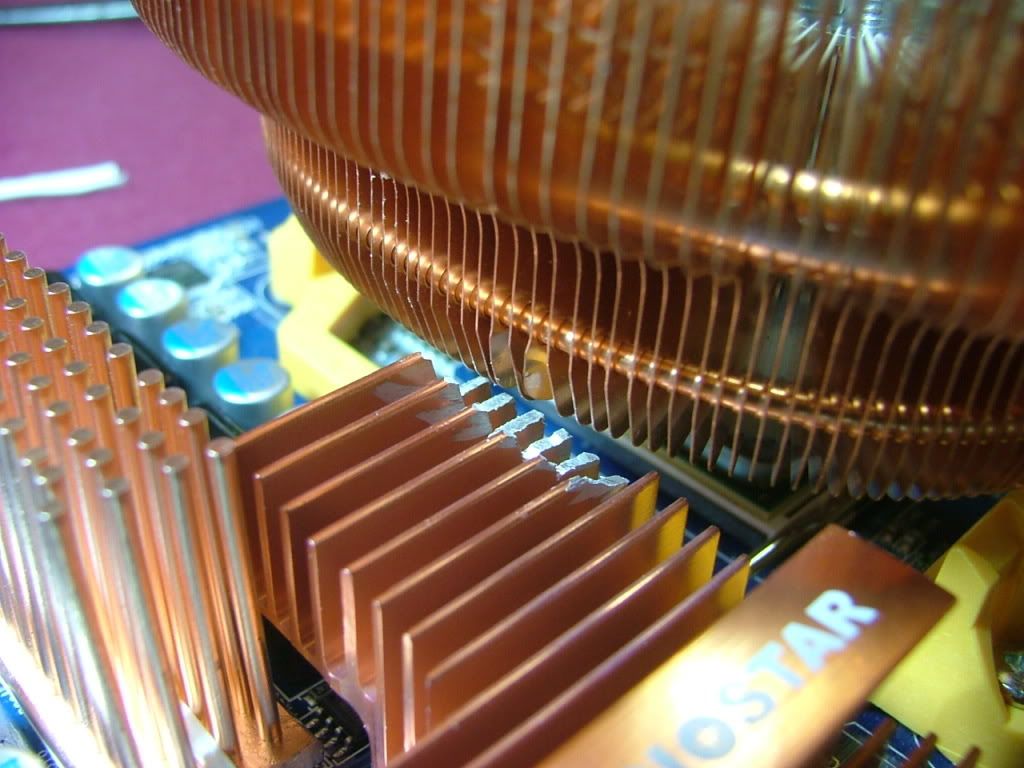
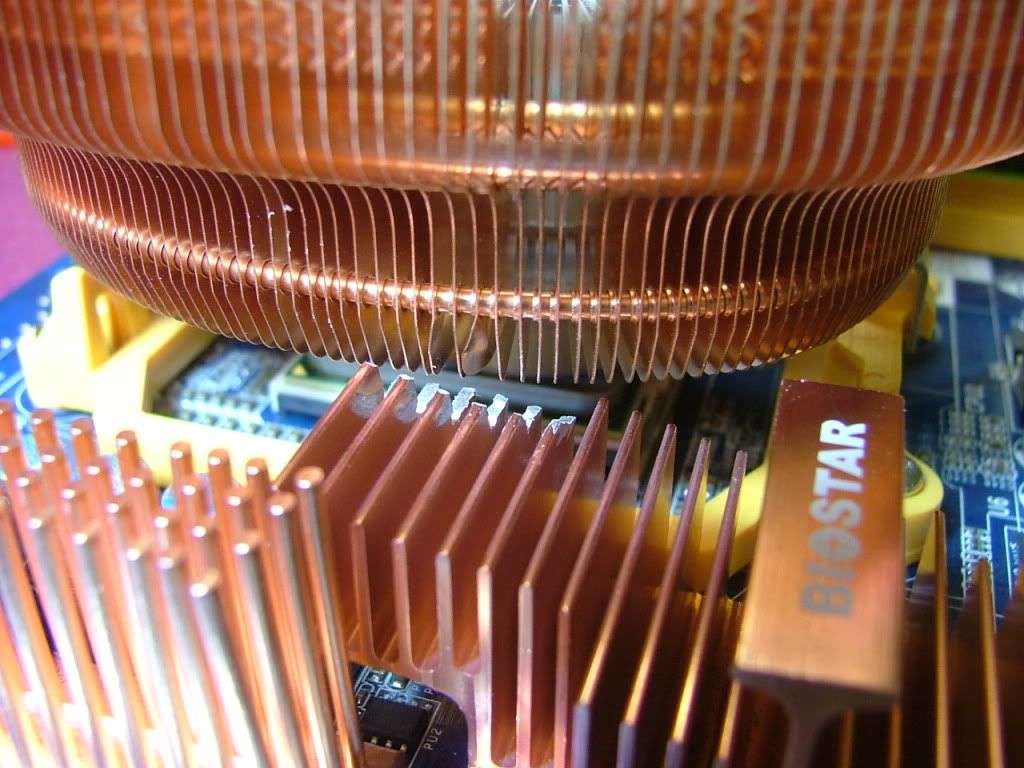
Right off the bat with having to reset the cmos quite often, I’ve learned to hate where Biostar put the jumper……
<O:p
<O:p
Look to the right edge of the PCI slot below the gpu cooler. Think a remote cmos reset switch will be in order, especially once all the stuff gets loaded into the SG03!
<O:p
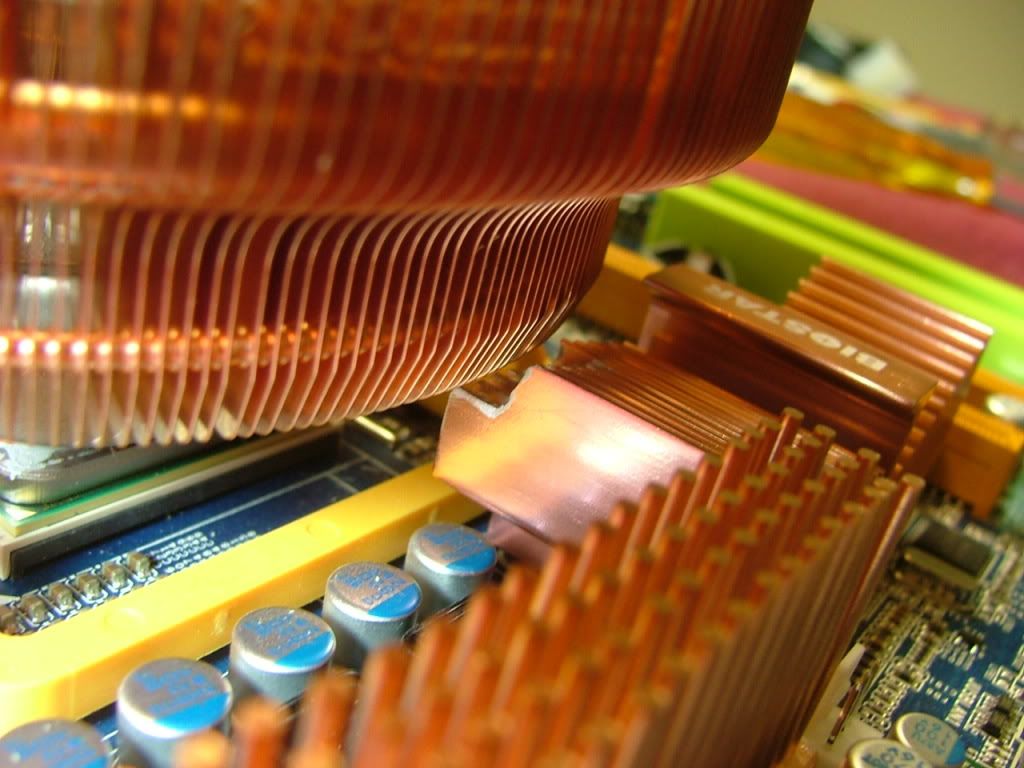
And the last are just some general shots showing what appears to be diagnostic leds on the back of the 4870 and the temporary heat sinks mounted on the mobo mosfets for overclocking. I’ve have something “in the mail†to replace those if I can re-engineer the mounting.
<O:p

<O:p
<O:p03-24-09
<O:p
Have had the 720 BE for a while now and while I’ve managed some S & G types of overclocks, it looks like it will be settling into the 3.60 – 3.65GHz range when installed into the case. Also will use the OCZ OCZ00MXSP 600W as it has the shortest cables.
<O:p
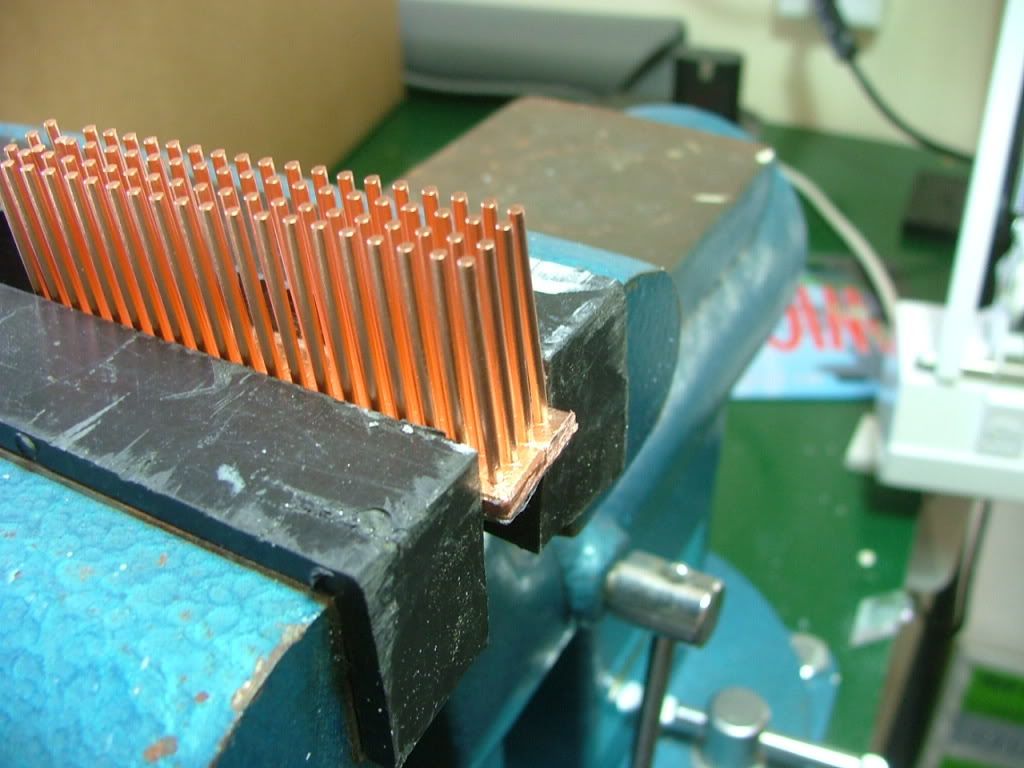
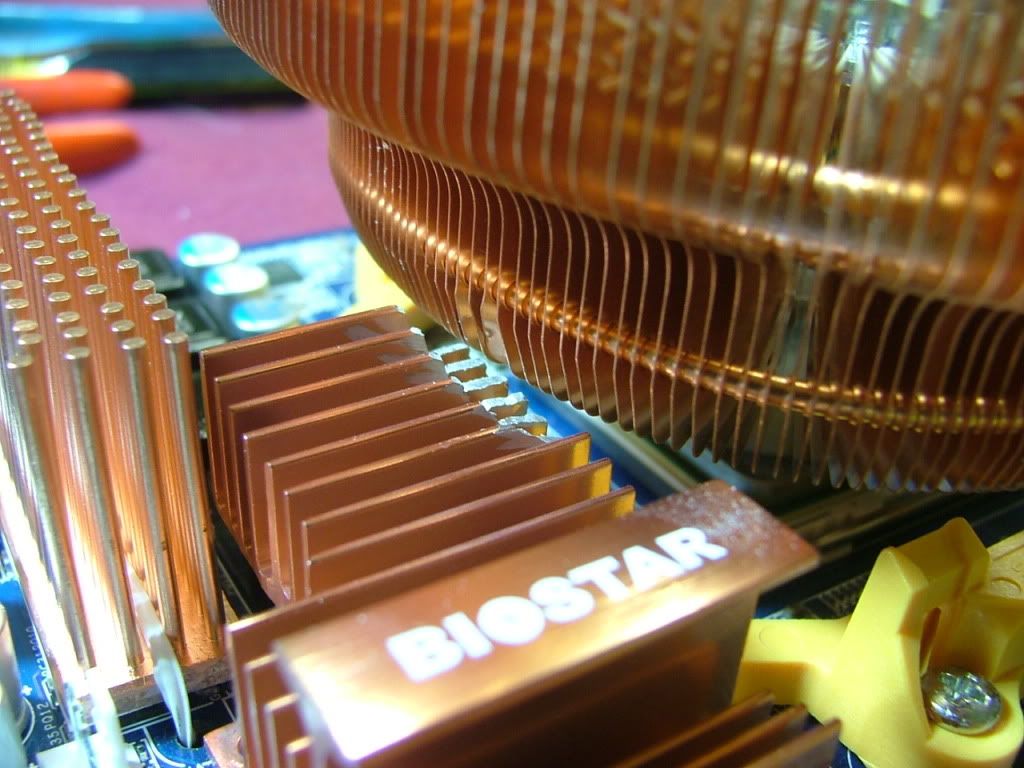
One of the small mods I did to start out was to cool the VR mosfets. As I couldn’t originally come up with an off the shelf cooler, I used several small aluminum coolers left over from some other build. Each block would cover three of the mosfets…you can see them mounted above. I had ordered Enzotech MST-81 knowing the mounting pins would not fit, but the “body†was the right size. When the sink came in I confirmed the base would cover all of the mosfets so off to the vise and to grab the hacksaw.
<O:p
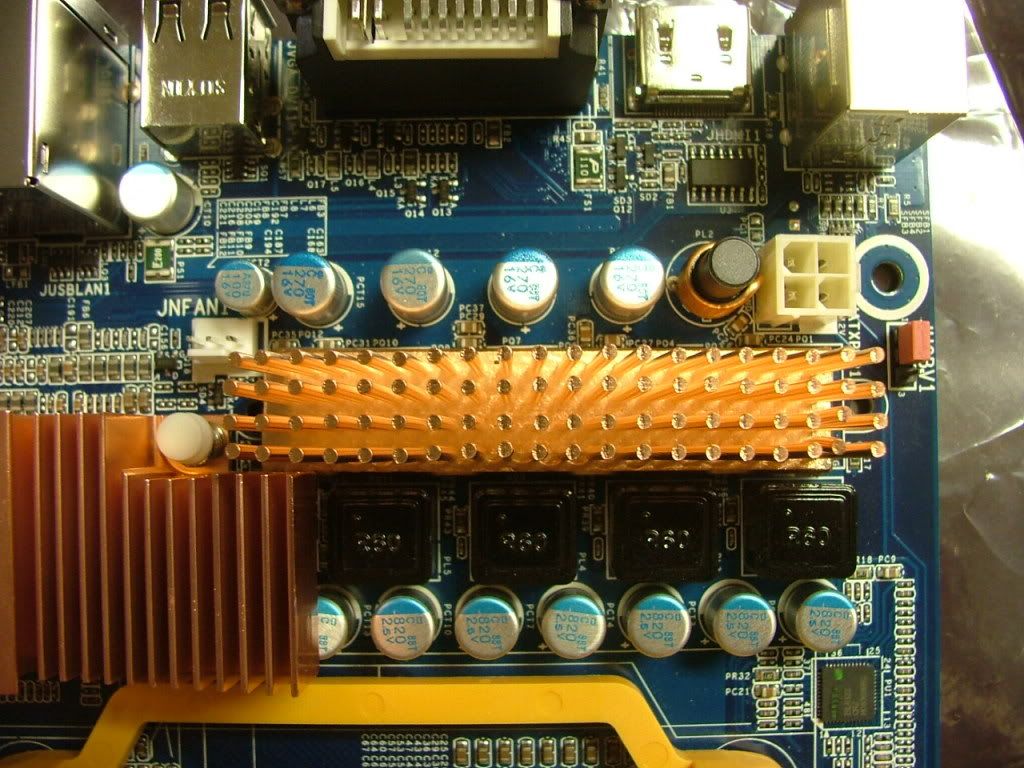
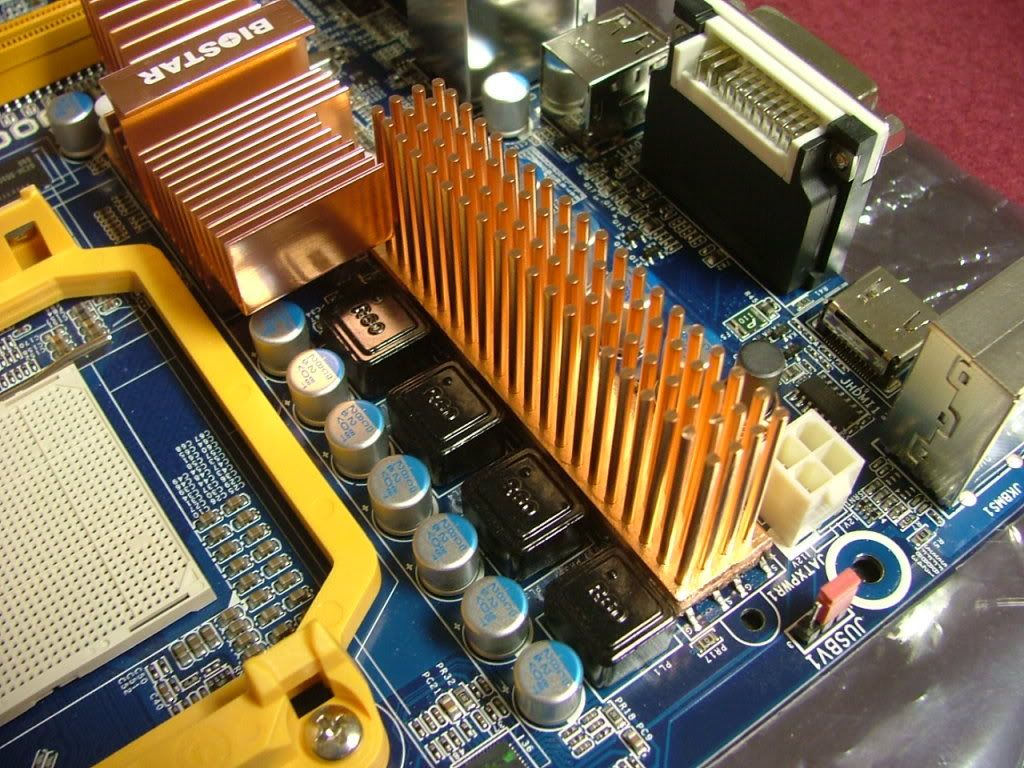
The copper sink goes right along with the NB, SB, and CPU coolers!
<O:p
<O:p
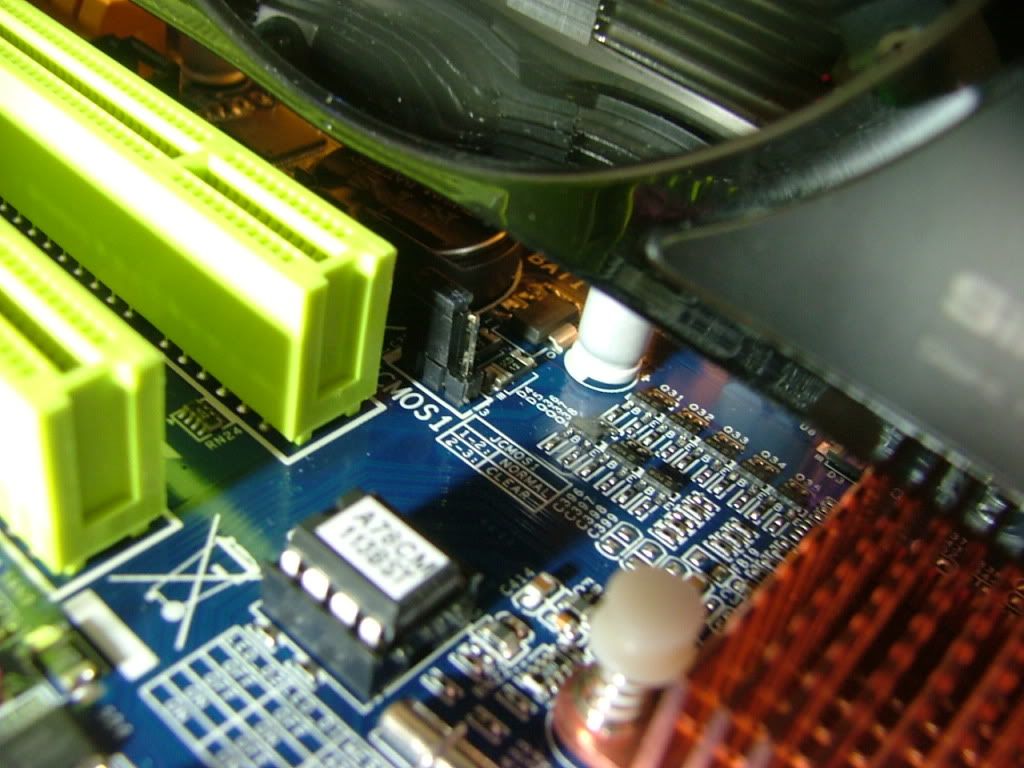
As mentioned earlier in working with the Biostar TA790GX XE on the tech station, there are a couple of things that I’ve found rather irritating. The location of the CMOS jumper (as mentioned above), CMOS battery, and the orientation of the GPU release lever. For me is a real pain! All three end up under the cooler of a two slot cooled GPU. In the first picture you can see where they are without the GPU in place. As a repeat look to the left middle of the picture just behind the PCI slot and under the GPU cooler is the CMOS reset jumper!
<O:p
<O:p
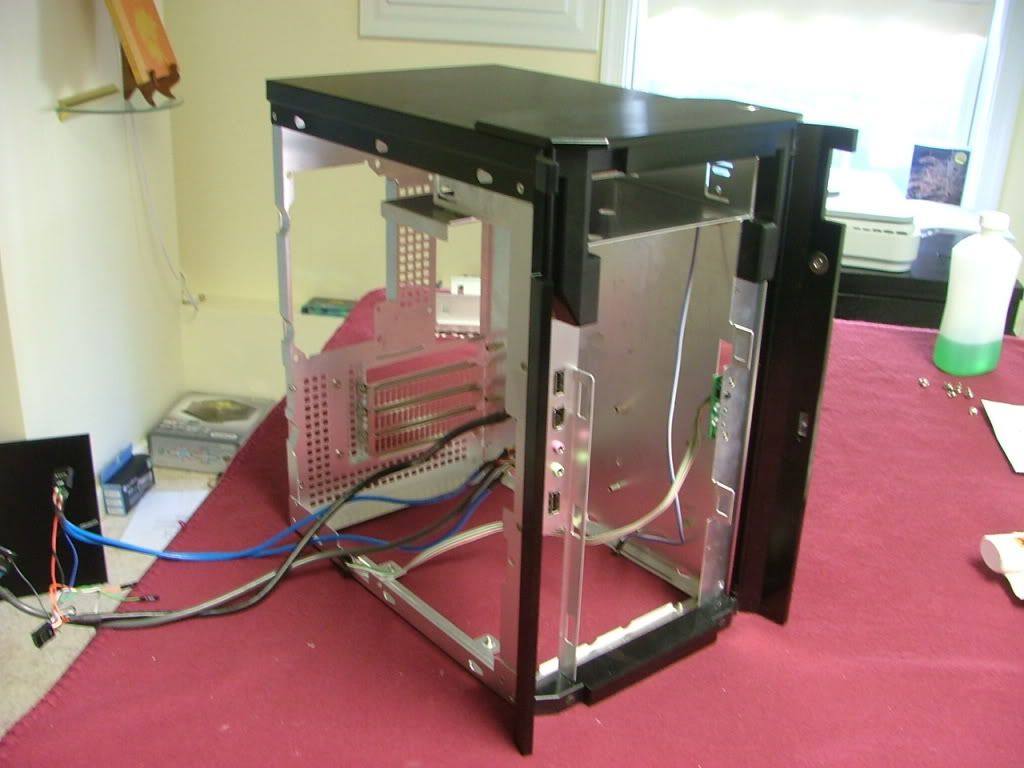
Other than that will hold off anymore whining until it is together. For those of you who may not be familiar with the Silverstone SG03 case it has one major character trait that one has to get used to. You have to almost totally disassemble the case to mount anything. We have a stock photo of it together and then here it is necked with everything removed to start placing stuff.
<O:p
<O:p
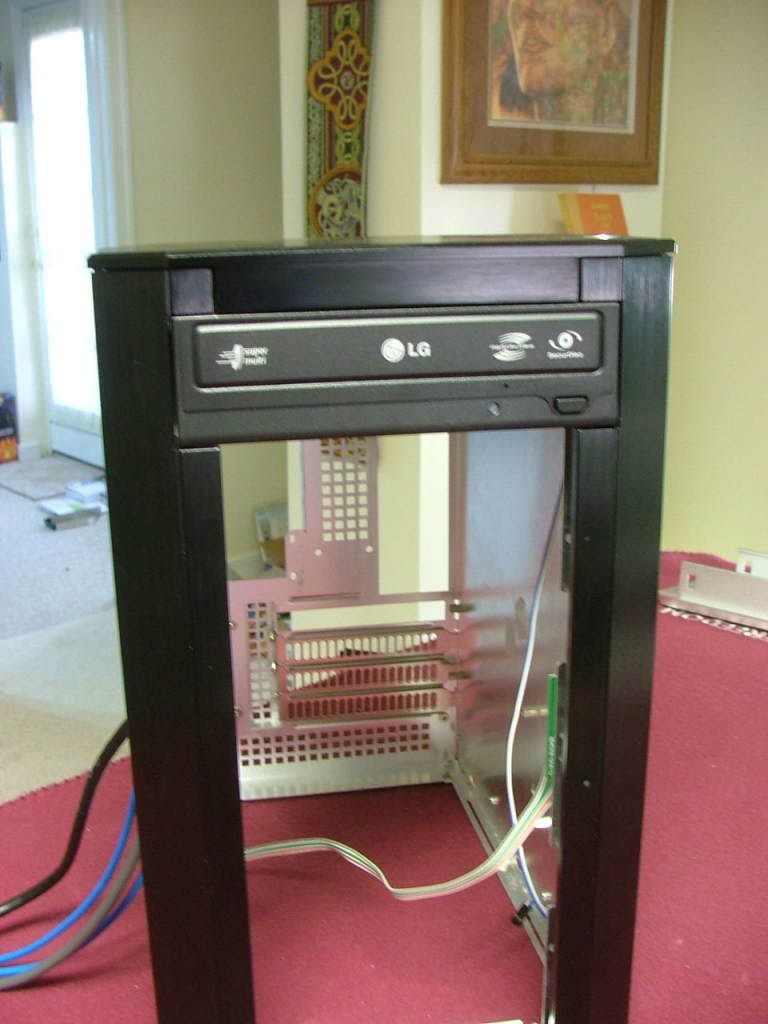
The first thing to go in is the optical drive in the one and only external 5.25†bay.
<O:p
<O:p
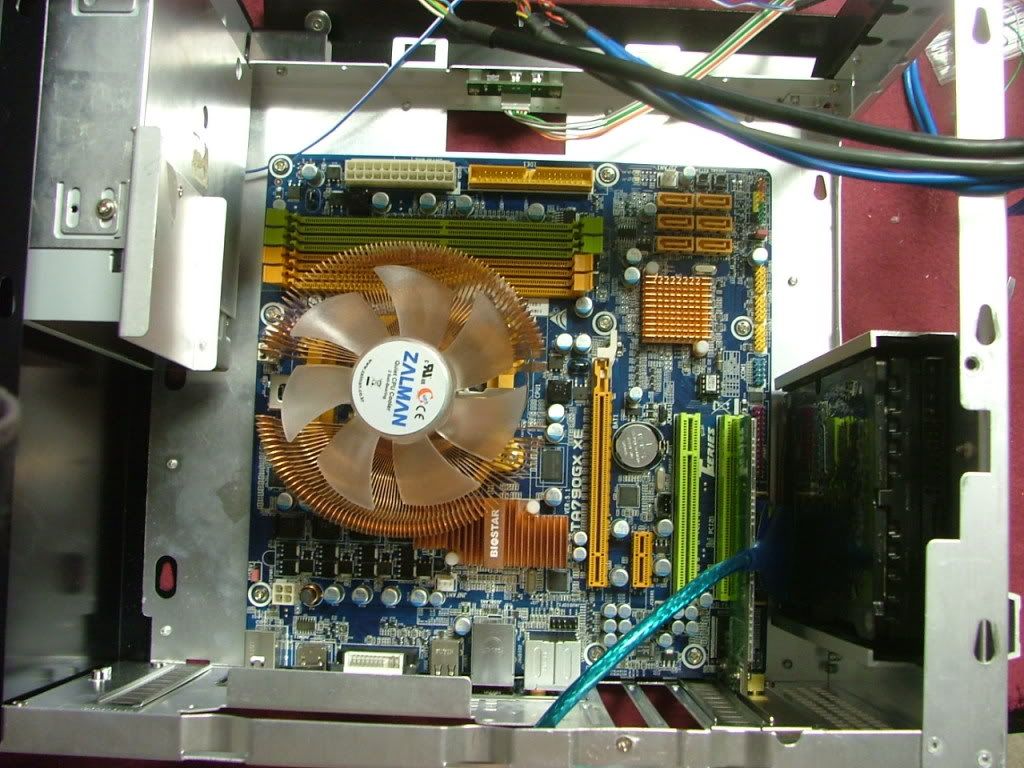
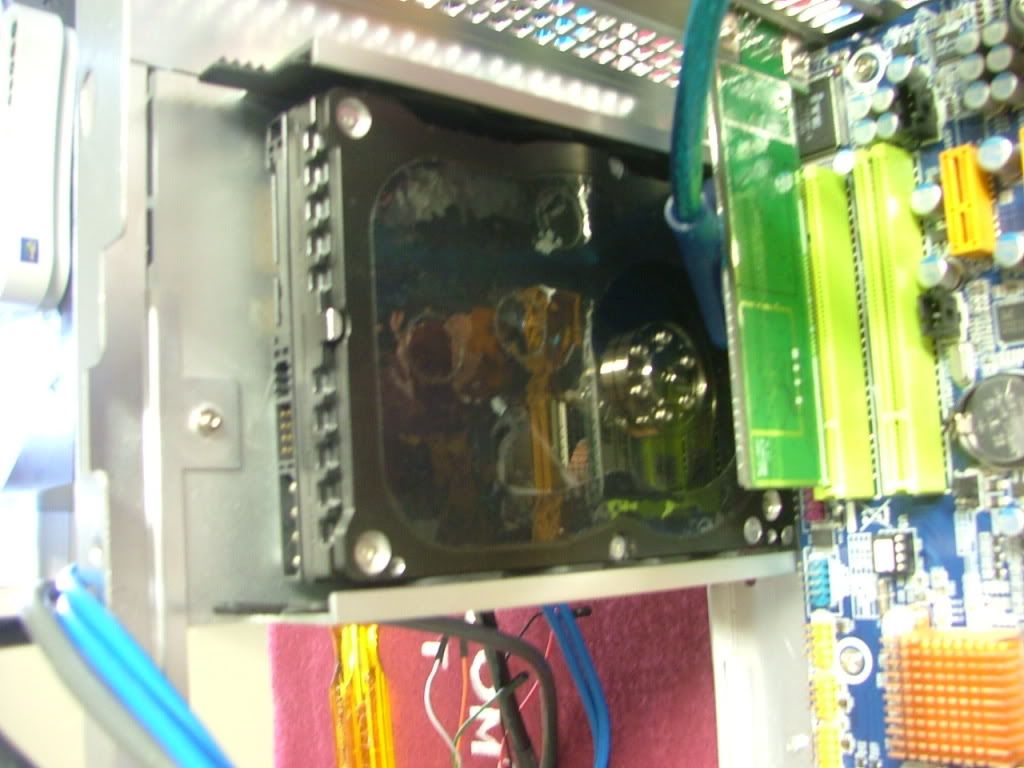
Next in goes the motherboard assembly and the Raptor X hdd. You may notice the mosfet heatsink is missing……it seems that what I thought was thermal tape ended up being just a thermal pad. When I lifted it off the tech station where the mobo is flat, it fell off! Waiting for some thermal tape to arrive.
<O:p
<O:p
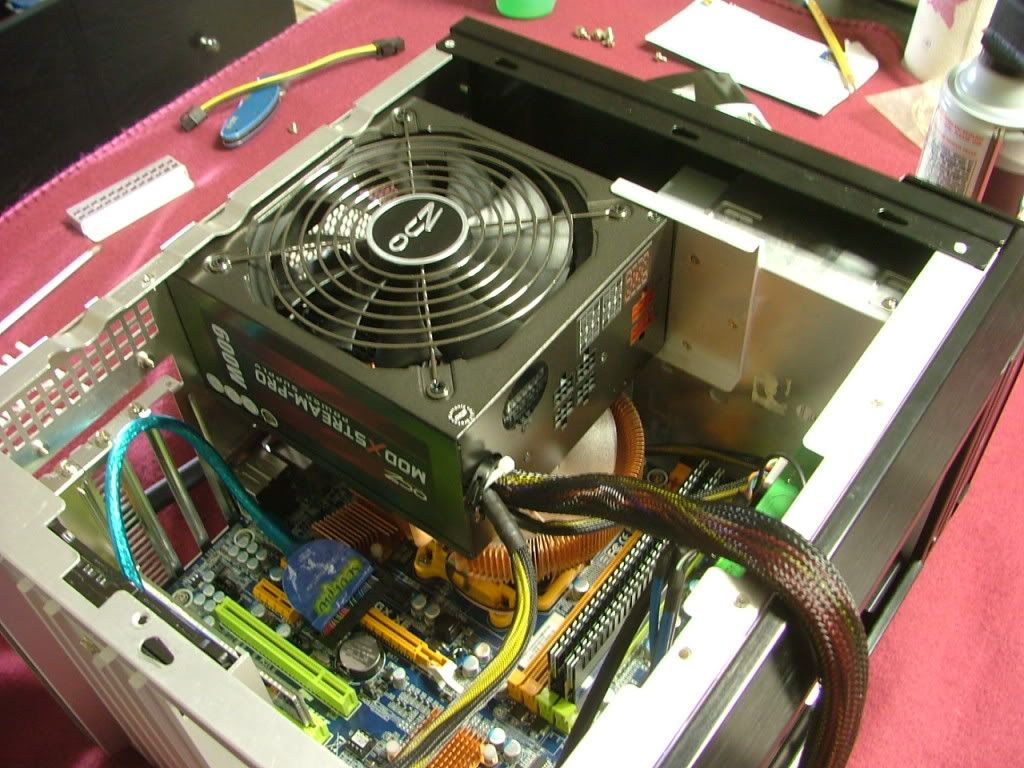
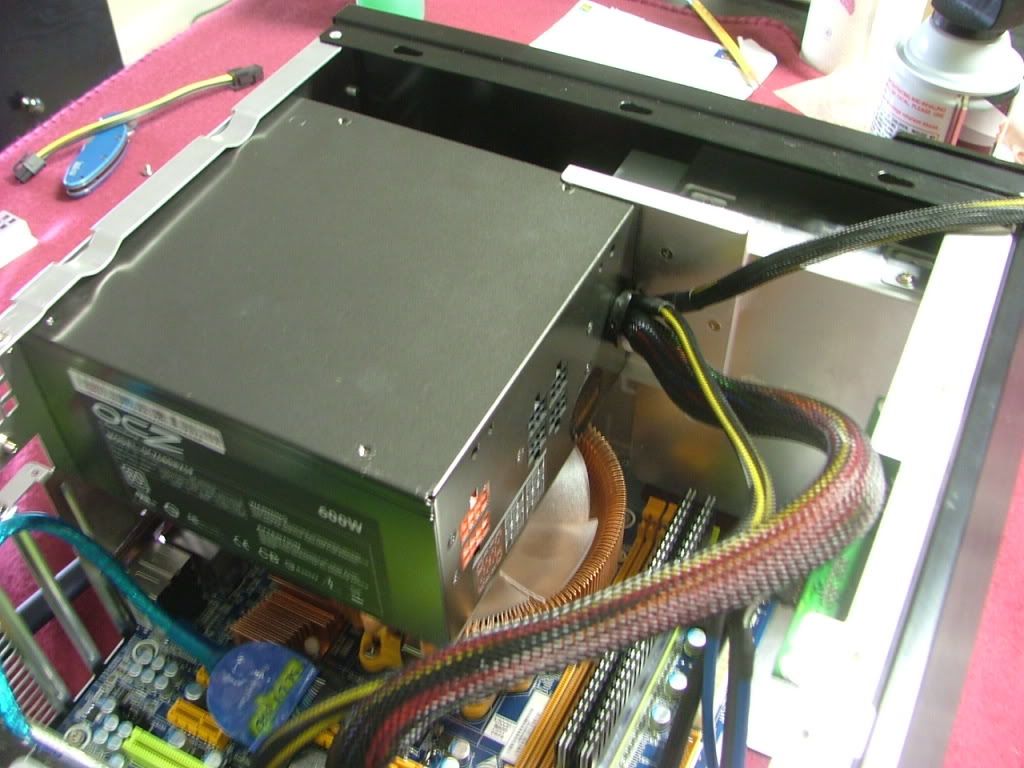
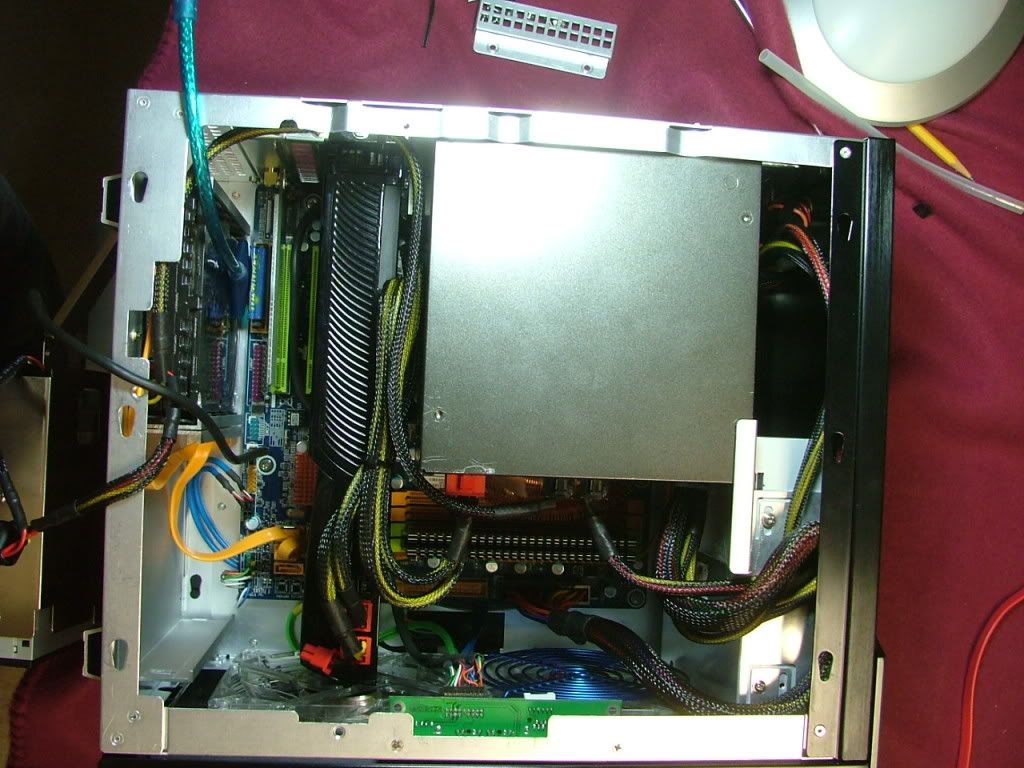
One of the options that the case gives you is the orientation of the PSU in relation to having the fan pull in or sit over the CPU HSF and draw out some of the heat. Originally I wanted to have the fan facing the opening for aesthetics reasons and also concerned it might interfere with the HSF fan. As it turns out the fan will be facing down. With the fan up, all of the board power cables would be at the bottom with the connectors for system parts at the top. Just the opposite of where stuff is located.
<O:p

<O:p
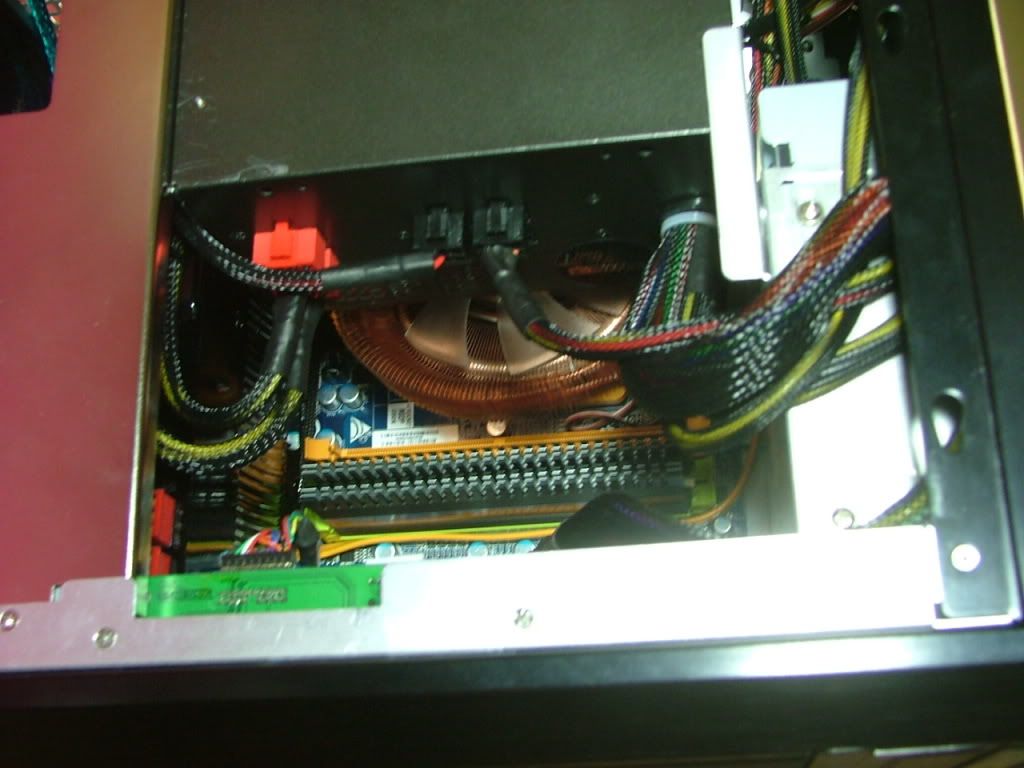
In order to figure out cable routing I mounted the GPU as well. It is starting to get very tight!. Also you can see what clearance there is between the PSU and HSF.
<O:p


<O:p
Work has slowed a bit as I wait on the thermal tape and I’ve decided to swap out the CNPS7500 for a CNPS8700-CU. It is just as efficient (if not better) and weighs less. I’ll use the 7500 in the revised Kermit build as that motherboard lies flat in the case.
<O:p
03-27-09
<O:p
Okay due to my usual source (the bay!) and planning for the future (when and if I drop XP) the memory has changed........... picked up a 2 x 2048 set of TWIN2X4096-8500C5DF. Sadly because of the size of the CNPS8700 (or 7500 for that matter) the taller mem will end up in the outer two slots and I will not be able to use the F part.
<O:p
<O:p
Those of you that may have looked closely when I showed the PSU orientation issue pics would have seen them in place!
<O:p
03-30-09
<O:p
Thought this was going to be the entry when I showed the system assembled and running........... so much for that idea!
<O:p
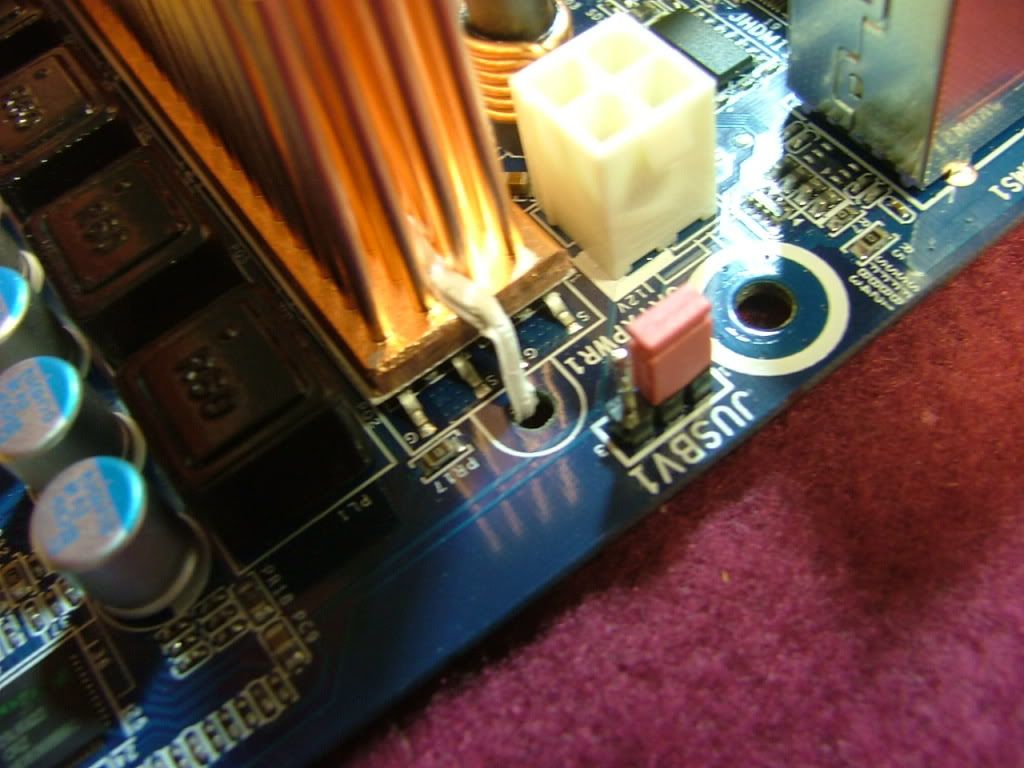
Got it all put together with the exception of the mosfet cooler (waiting on some thermal tape) and fired it up.............everything seems to be on but no boot!! So I swapped out the mem (first time to running the 2 x 2GB Dominator) and still no joy. Reset cmos and still nothing, so broke it down and reassembled it on the tech station, adding one piece at a time to see what might be the culprit. Everything is running fine!! Then it dawned on me the one piece I hadn't hooked up that was different from when I tested everything originally. Remembered the Silverstone cmos reset switch? Guess what............... it seems that Biostar and Silverstone need to talk to each other as their pin-outs are opposite!!
<O:p
So, the issue wasn't the hardware or anything else.....I was constantly clearing the cmos!!
<O:p
Now to put it all back together! On second thought....think I'll wait on the thermal tape so I don't have to take it apart again.")
<O:p
<O:p04-06-09
<O:p
After a major brew-ha-ha with the wife over why more than one computer and a “why can’t you be like everyone else and have just one, you know like a dell?†kind of “discussion†managed to get the system assembled. Sadly I didn’t get that many pictures as I wanted as it needed to get together before she had more time to “think about itâ€. Also as the fates and the bay would have it there has been a MAJOR change…….. the 4870 is out and I managed to shoe horn in the GTX260-216 that was in Kermit v2.0.
<O:p
Anyway here we have the pieces going together………First of course was trying to get the miscellaneous cables laid out (see the 8700 in place), fit the GTX, mount the power supply and then install the FDD rack. Also threw in some pics to show just how “tight†things are, the system fan header under the GPU cooling shroud, and when I installed the 10.5†GTX I had to remove the fan grill from the lower fan so it could fit.
<O:p
<O:p
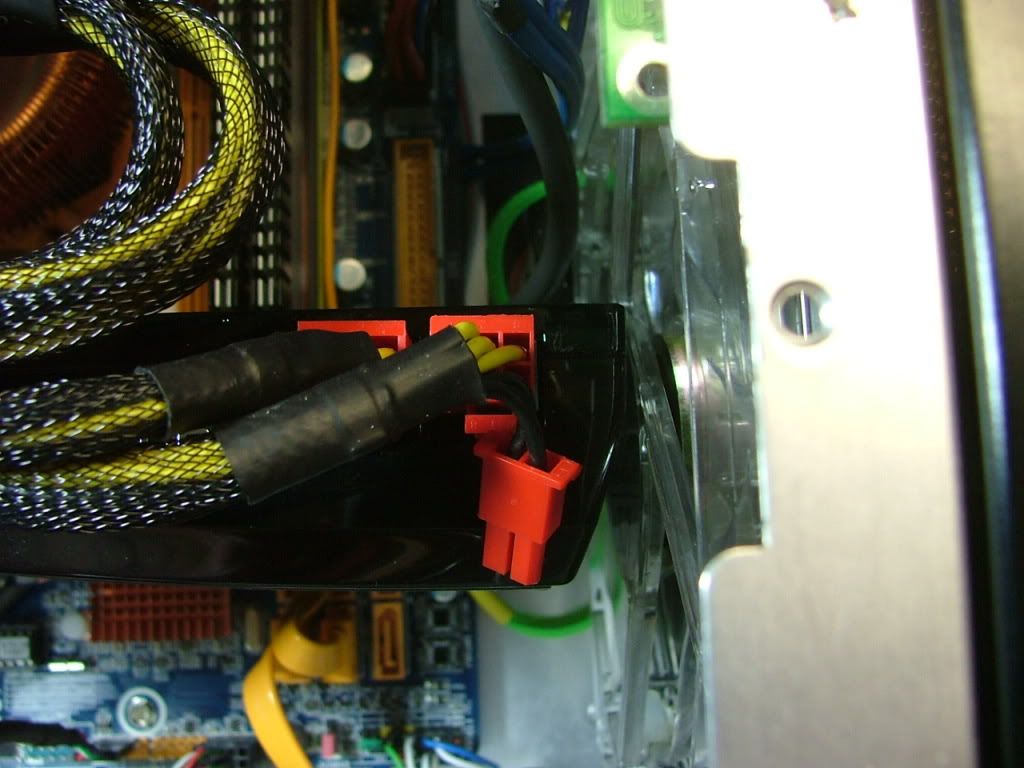
Also here is the item that did me in initially, the CMOS reset switch.
<O:p
<O:p
Finally here it is running with a Tt Smart Fan up top and one of the 120 LED fans from the tech station on the bottom. This is one of the disappointments of the build. With the motherboards I used before you could control the speed of the system fan as well as the HSF through the bios with temperatures. That is a no go however with the Biostar as “smart fan†only applies to the HSF. If I’m wrong PLEASE TELL ME HOW!! That Tt at full bore is a portable tornado and the other 120 isn’t much better.
<O:p
<O:p
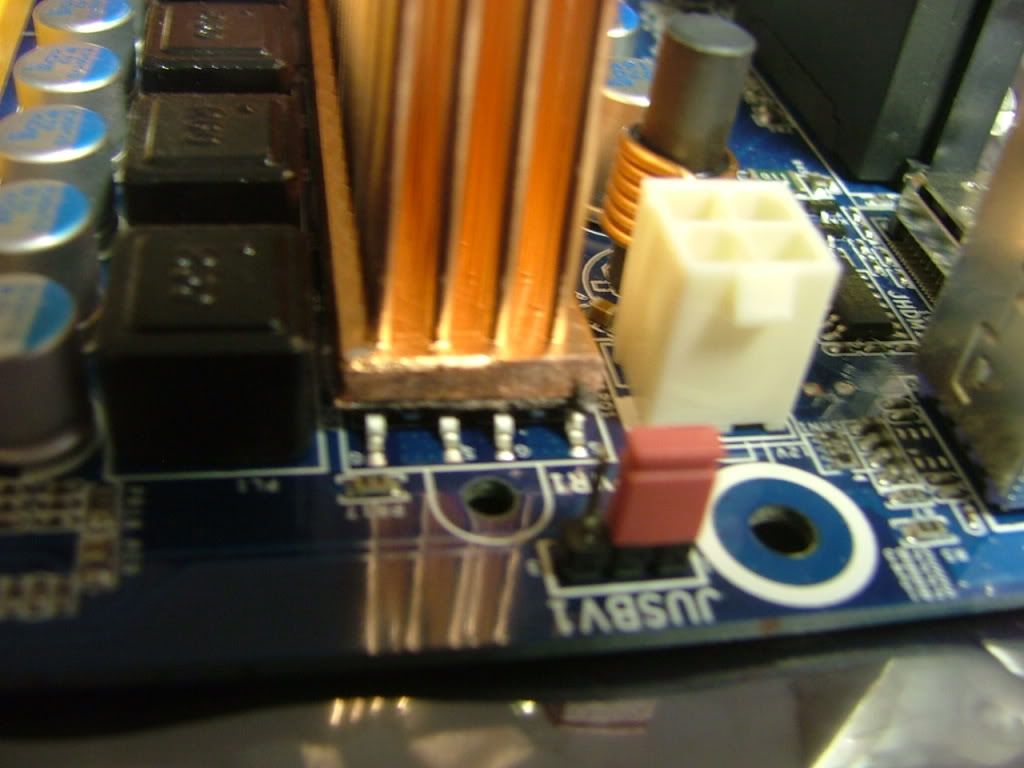
Now the final kicker. While running the system notice that Temp1 in Speed Fan and (forget the name right now) in Hardware Monitor was indicating that the NB and mosfets were running 62 -65C. I’ve dropped vcore as low as I could to stay stable, but was baffled as on the tech station they were in the mid 40s. So in looking in the backside of the case through the cooling holes (that area is covered by the PSU) think I found the problem. The sink I mounted on the mosfets didn’t stick and is currently lying up against the back of the case. SO will have to pull the PSU and FDD rack out and figure out why the thermal tape didn’t work. To be on the safe side I ordered some Akasa Thermal Adhesive Tape AK-TT12 from sidewinder computers.
<O:p
04-13-09
<O:p
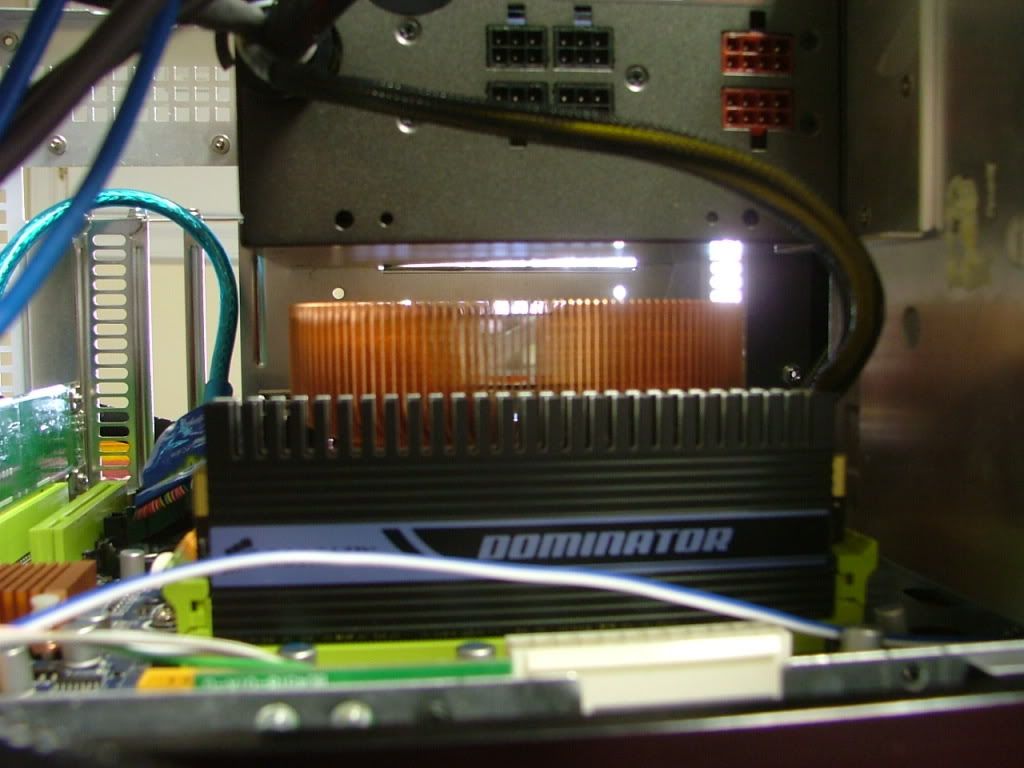
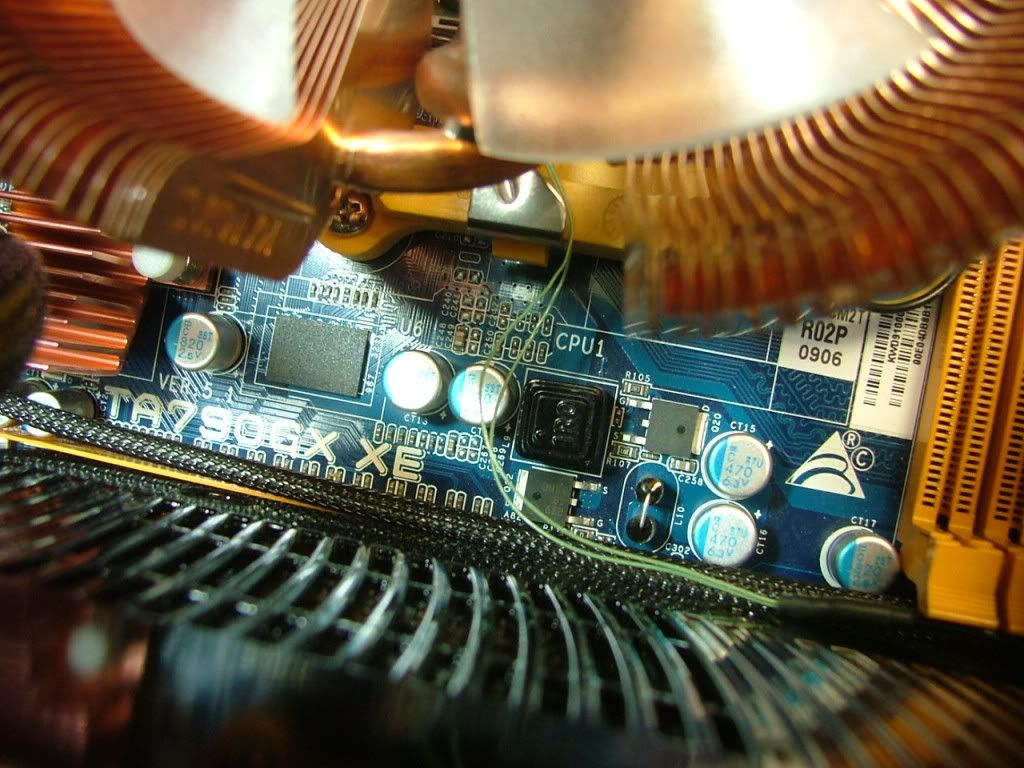
Ran into several problems, the biggest being that the sensor associated with the NB was giving some really weird readings and I thought that the senor was blown. After investigating further (read taking snit apart) it appears the HSF and NB cooler hit each other. When I first assembled everything it was on “the table†and everything went straight down. However the second time it worked with it I left the mobo in the case. Should have paid attention to the fact I need to “wiggle engineered†the fit. So out came the dremel and I notch the fins on the NB cooler, and was disappointed to learn that it is aluminum that has been anodized copper. The next series of pics will show what it looks like in place from several directions. In some of the pictures you can see where the fins on the 8700 were bent.
<O:p
<O:p
Also another major issue was the mosfet cooler kept falling off even after trying the new thermal tape. Re-cleaned everything and tried another piece of thermal tape and this time I decided to leave the system lying on the mobo side of the case in hopes the thermal tape would “setâ€.
<O:p
However when I decided to reseat the NB cooler I decided to work on this issue as well. Went with the “quick and dirty†jerry rig on this….used a piece of wire wrap that was lying around. Just hope it doesn’t get so hot as to melt the plastic coating!!
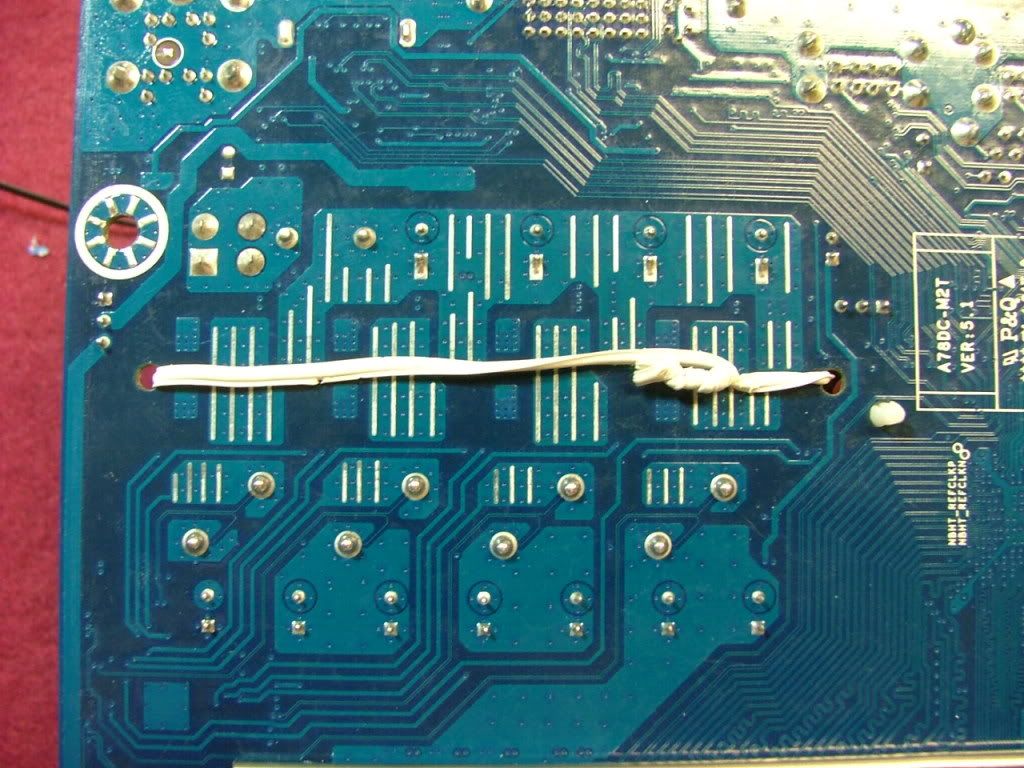
<O:p
The tape seems to be holding so figure with this to kind of “hold it in place†I should be okay. Well 6 hours later it is still “stuck†to the mosfets, the other times it fell off in 15 – 30 minutes.
<O:p
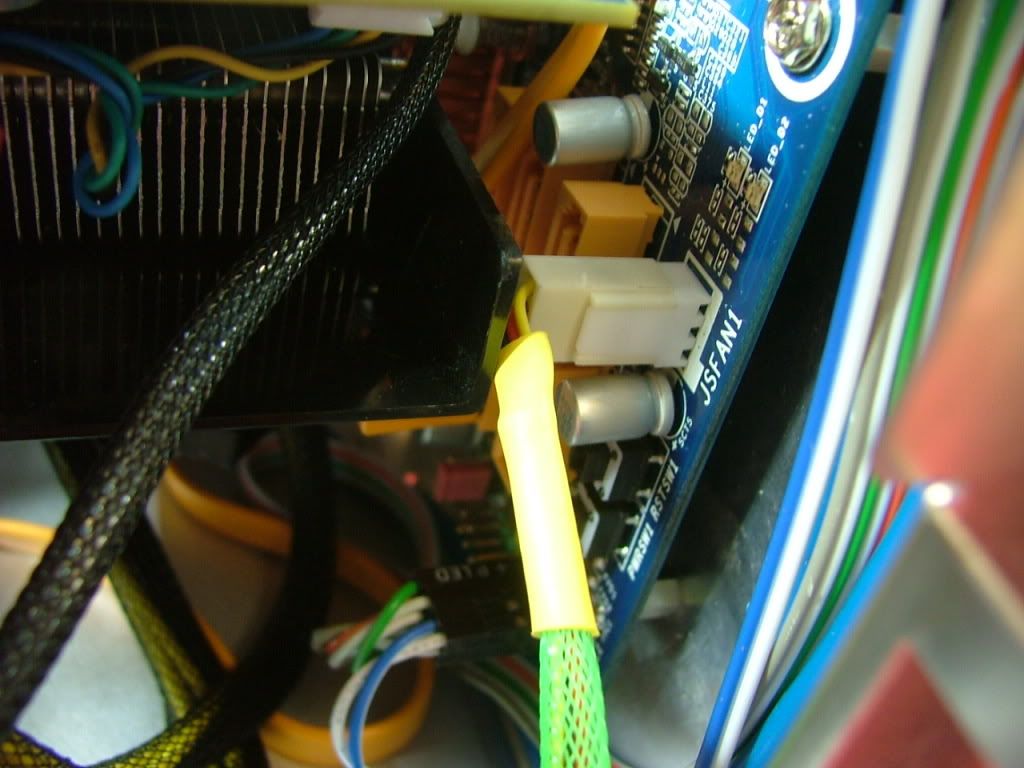
Another “problem†I needed to address was the fact the 120mm Tt Smart Fan mounted in the top front was running at max speed and really noisy. As I had to take everything apart I decided to look into what I might be able to do about that. As it turns out I was able to hook the fan’s thermal probe up and stick it into the CNPS 8700 so that it was fairly close to the CPU. I ran several tests with OCCT and it appears to work fairly well. The fan will increase in speed by almost 500 RPM under load. Under light usage it is a quiet 1400ish RPM….big difference from the 2500+ it was running! Here you see the leads
<O:p
<O:p
So everything is now buttoned back up and it appears I managed to resolve several issues at one time. Now to see what the best OC stable will be and figure out how to use the extra cores for folding when I’m not using it!
<O:p
PRESENT
<O:p
As life would have it I need to down size my computer farm and YsSMN v3.0 is on the bock. This is how it eventually ended up component wise.
<O:p
CASE: Silverstone SG03
PSU: OCZ OCZ00MXSP 600W
MOBO: Biostar 790GX XE
CPU: PII X3 720 BE
HSF: Zalman CNPS8700-CU LED
GPU: Sapphire 4870 1GB
MEMORY: F2-8500CL5D-2GBPK (2 x 1024)
HDD: WD Velociraptor, 300 Gigs
Optical Drive 1: LG GH22LS30 DVD Burner w/Light Scribe
Also need to add another point about my builds and logs...No build is ever finished! Hence the revision numbers. Also I have a modded Tech Station I did to do initial testing and overclocking. Again I’ve given a wee bit of a time line here with dates.03-17-09
<O:p
I’ve muddled through my multiple builds and have tried to figure out how to “name†the computers. With the recent wild hairs, associated purchases, and parts swap-a rounds several things happened, including an almost from scratch build. The total “new build†was going to get a new name, but then I’d loose one…..Yoda’sSizeMattersNot a.k.a. YsSMN. As this is another mATX build and will have the “biggest†new stuff decided to just do another one of my revisions……..so YsSMN v3.0 it will be! The major “up-in-the-air†component is the PSU as I have three new ones to distribute between the three “rebuilds†YsSMN v3.0 is now part of.
<O:pCASE: Silverstone SG03
PSU: Enermax Infiniti 650W or MODU82+ EMD525AWT (525W) or OCZ OCZ00MXSP (600W)
MOBO: Biostar 790GX XE
CPU: PII X3 720 BE
HSF: Zalman CNPS7500-CU
GPU: Sapphire 4870 1GB
MEMORY: F2-8500CL5D-2GBPK (2 x 1024)
HDD: WD Raptor X, 150 Gigs
Optical Drive 1: TBD
<O:p
Originally the CPU was to be a PI X3 8750BE but that will either be going over to Kermit "on ‘droids" rebuild or DC. Now have a PII X3 720 BE in the mail for this build. Otherwise this is at least 3 of the 4 major parts!
<O:p
<O:p
Here is the mobo / gpu / hsf that are going to be used on the Tech Station while working on the oc for the 8750BE.
<O:p
<O:p
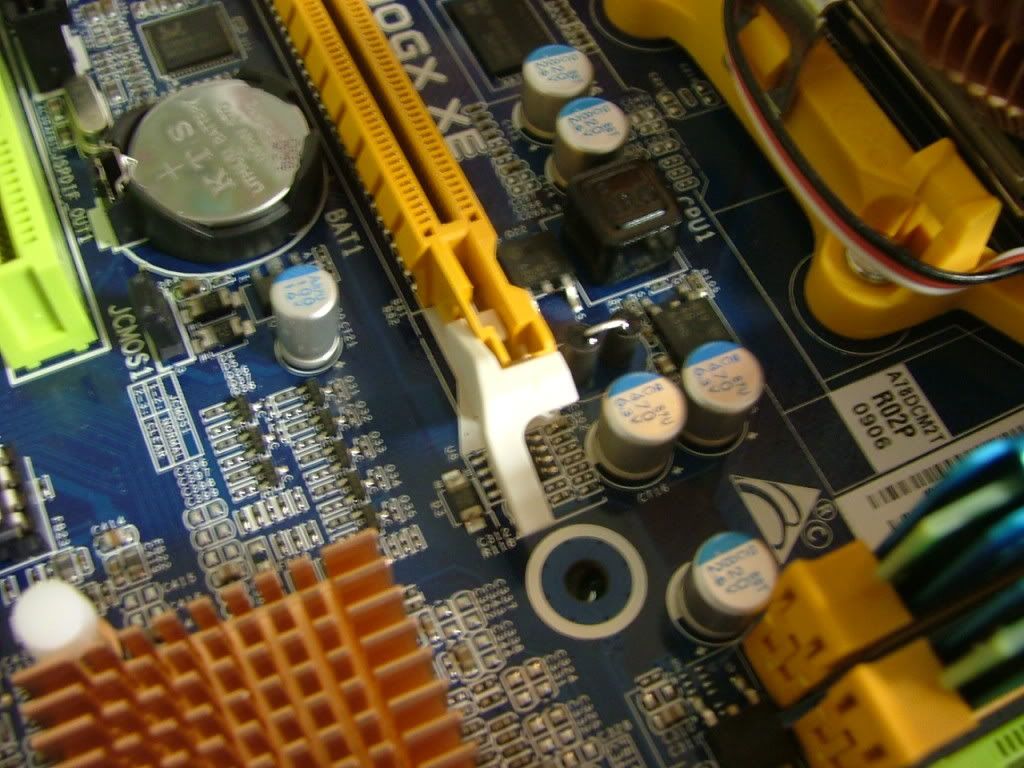
Right off the bat with having to reset the cmos quite often, I’ve learned to hate where Biostar put the jumper……
<O:p
<O:p
Look to the right edge of the PCI slot below the gpu cooler. Think a remote cmos reset switch will be in order, especially once all the stuff gets loaded into the SG03!
<O:p
And the last are just some general shots showing what appears to be diagnostic leds on the back of the 4870 and the temporary heat sinks mounted on the mobo mosfets for overclocking. I’ve have something “in the mail†to replace those if I can re-engineer the mounting.
<O:p
<O:p
<O:p03-24-09
<O:p
Have had the 720 BE for a while now and while I’ve managed some S & G types of overclocks, it looks like it will be settling into the 3.60 – 3.65GHz range when installed into the case. Also will use the OCZ OCZ00MXSP 600W as it has the shortest cables.
<O:p
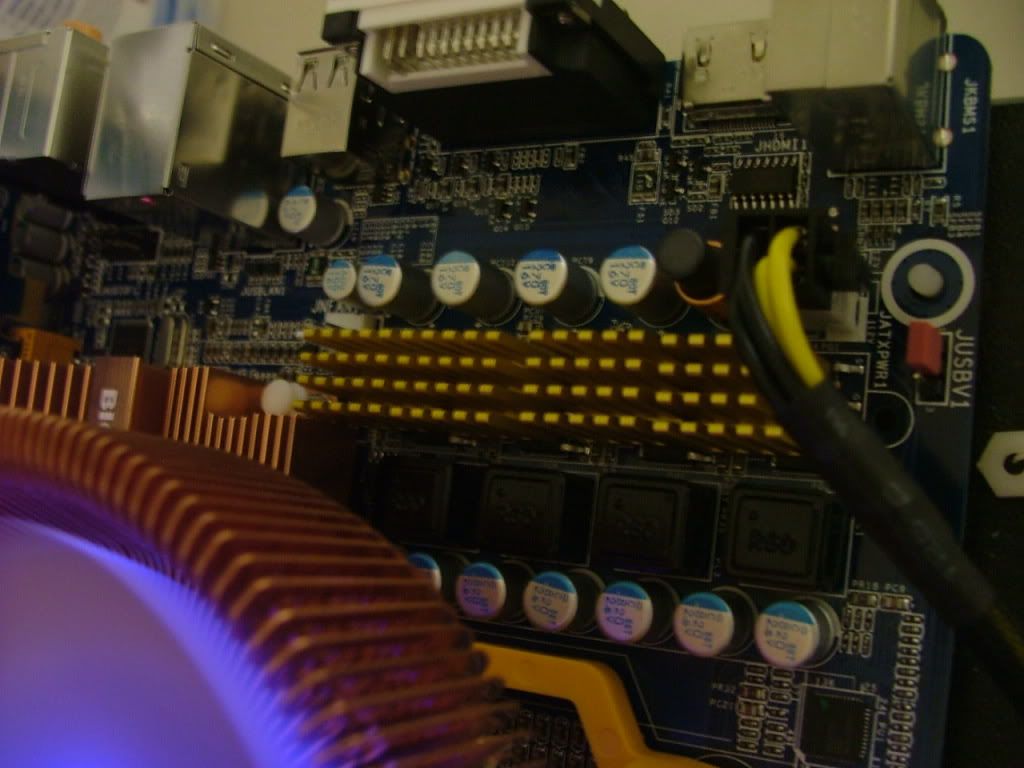
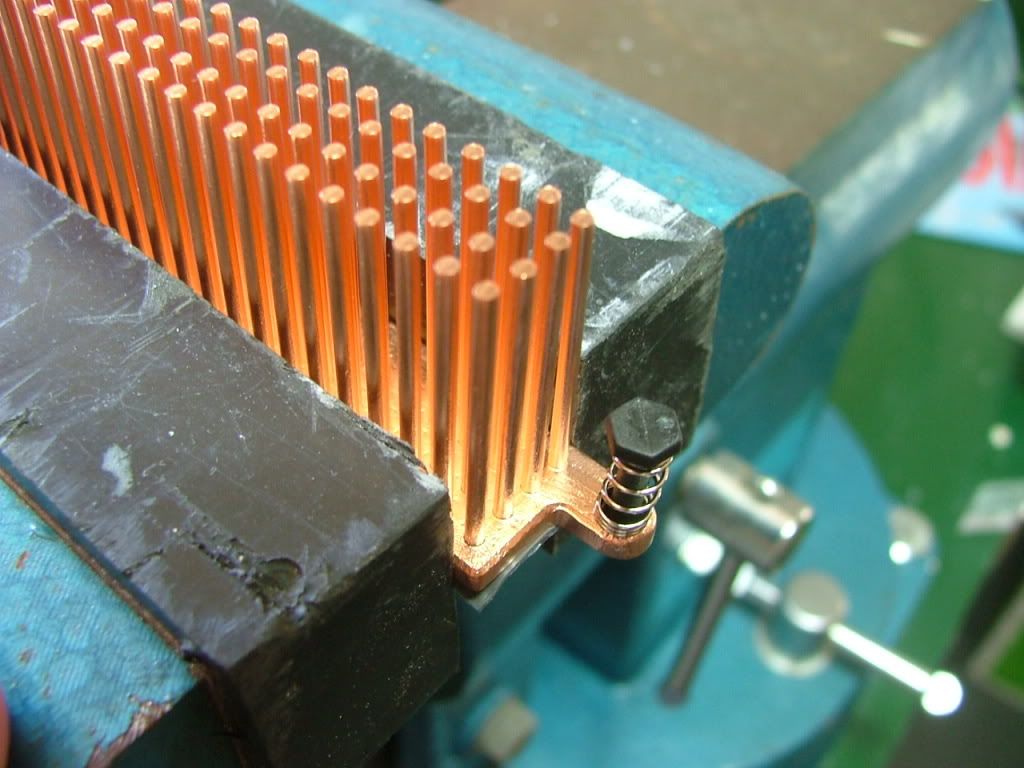
One of the small mods I did to start out was to cool the VR mosfets. As I couldn’t originally come up with an off the shelf cooler, I used several small aluminum coolers left over from some other build. Each block would cover three of the mosfets…you can see them mounted above. I had ordered Enzotech MST-81 knowing the mounting pins would not fit, but the “body†was the right size. When the sink came in I confirmed the base would cover all of the mosfets so off to the vise and to grab the hacksaw.
<O:p
The copper sink goes right along with the NB, SB, and CPU coolers!
<O:p
<O:p
As mentioned earlier in working with the Biostar TA790GX XE on the tech station, there are a couple of things that I’ve found rather irritating. The location of the CMOS jumper (as mentioned above), CMOS battery, and the orientation of the GPU release lever. For me is a real pain! All three end up under the cooler of a two slot cooled GPU. In the first picture you can see where they are without the GPU in place. As a repeat look to the left middle of the picture just behind the PCI slot and under the GPU cooler is the CMOS reset jumper!
<O:p
<O:p
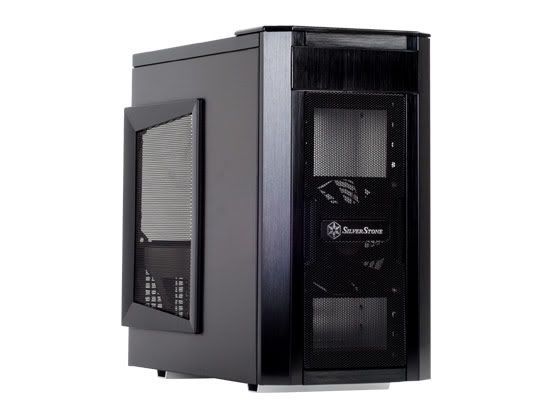
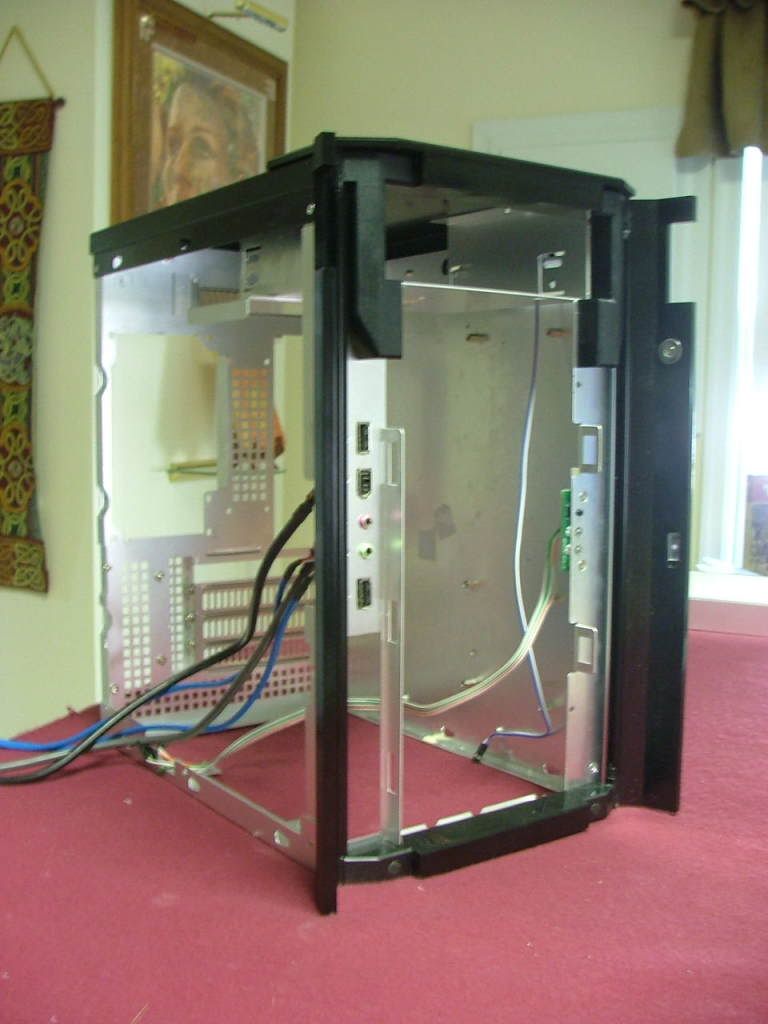
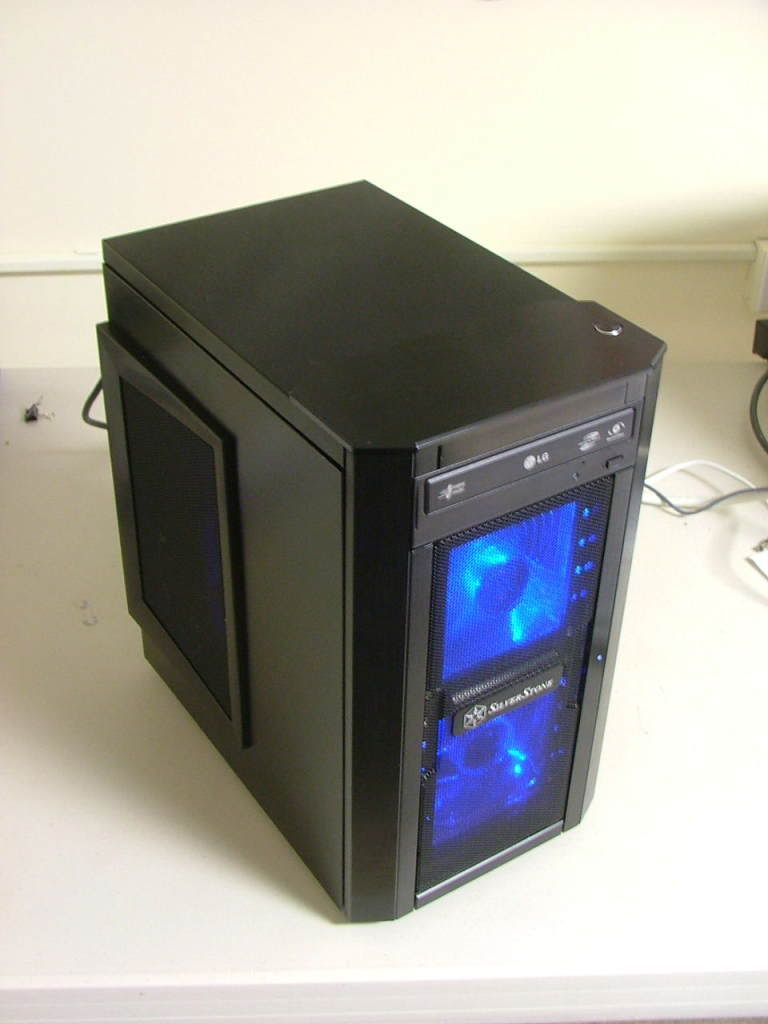
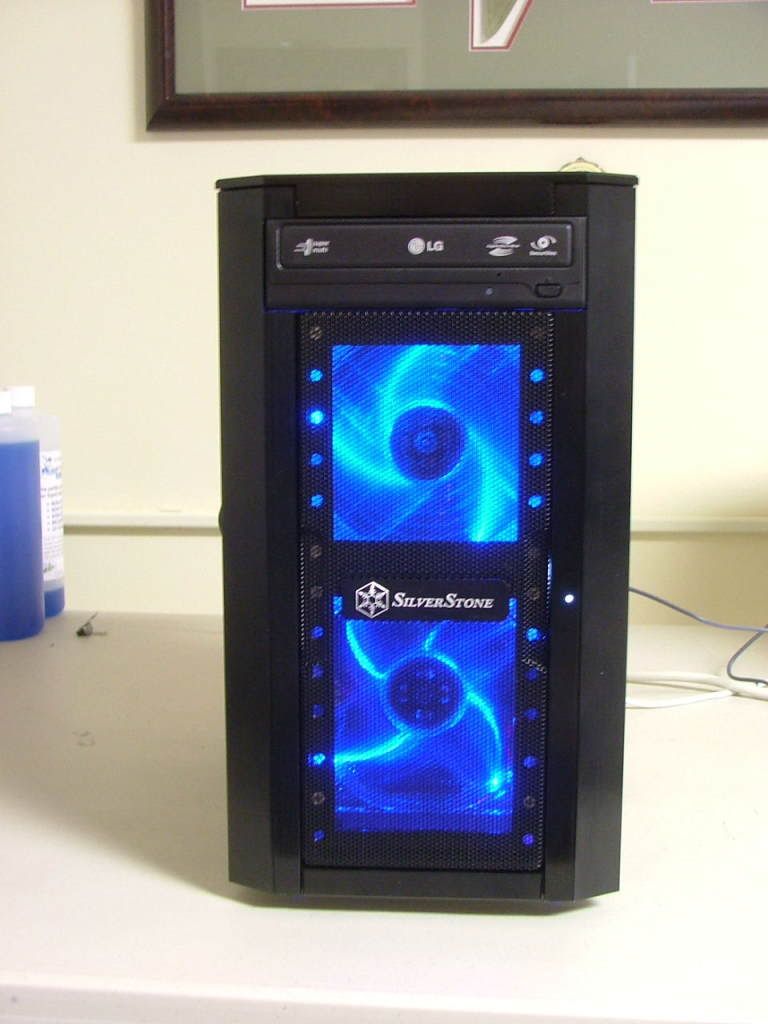
Other than that will hold off anymore whining until it is together. For those of you who may not be familiar with the Silverstone SG03 case it has one major character trait that one has to get used to. You have to almost totally disassemble the case to mount anything. We have a stock photo of it together and then here it is necked with everything removed to start placing stuff.
<O:p
<O:p
The first thing to go in is the optical drive in the one and only external 5.25†bay.
<O:p
<O:p
Next in goes the motherboard assembly and the Raptor X hdd. You may notice the mosfet heatsink is missing……it seems that what I thought was thermal tape ended up being just a thermal pad. When I lifted it off the tech station where the mobo is flat, it fell off! Waiting for some thermal tape to arrive.
<O:p
<O:p
One of the options that the case gives you is the orientation of the PSU in relation to having the fan pull in or sit over the CPU HSF and draw out some of the heat. Originally I wanted to have the fan facing the opening for aesthetics reasons and also concerned it might interfere with the HSF fan. As it turns out the fan will be facing down. With the fan up, all of the board power cables would be at the bottom with the connectors for system parts at the top. Just the opposite of where stuff is located.
<O:p
<O:p
In order to figure out cable routing I mounted the GPU as well. It is starting to get very tight!. Also you can see what clearance there is between the PSU and HSF.
<O:p
<O:p
Work has slowed a bit as I wait on the thermal tape and I’ve decided to swap out the CNPS7500 for a CNPS8700-CU. It is just as efficient (if not better) and weighs less. I’ll use the 7500 in the revised Kermit build as that motherboard lies flat in the case.
<O:p
03-27-09
<O:p
Okay due to my usual source (the bay!) and planning for the future (when and if I drop XP) the memory has changed........... picked up a 2 x 2048 set of TWIN2X4096-8500C5DF. Sadly because of the size of the CNPS8700 (or 7500 for that matter) the taller mem will end up in the outer two slots and I will not be able to use the F part.
<O:p
<O:p
Those of you that may have looked closely when I showed the PSU orientation issue pics would have seen them in place!
<O:p
03-30-09
<O:p
Thought this was going to be the entry when I showed the system assembled and running........... so much for that idea!
<O:p
Got it all put together with the exception of the mosfet cooler (waiting on some thermal tape) and fired it up.............everything seems to be on but no boot!! So I swapped out the mem (first time to running the 2 x 2GB Dominator) and still no joy. Reset cmos and still nothing, so broke it down and reassembled it on the tech station, adding one piece at a time to see what might be the culprit. Everything is running fine!! Then it dawned on me the one piece I hadn't hooked up that was different from when I tested everything originally. Remembered the Silverstone cmos reset switch? Guess what............... it seems that Biostar and Silverstone need to talk to each other as their pin-outs are opposite!!
<O:p
So, the issue wasn't the hardware or anything else.....I was constantly clearing the cmos!!
<O:p
Now to put it all back together! On second thought....think I'll wait on the thermal tape so I don't have to take it apart again.
<O:p
<O:p04-06-09
<O:p
After a major brew-ha-ha with the wife over why more than one computer and a “why can’t you be like everyone else and have just one, you know like a dell?†kind of “discussion†managed to get the system assembled. Sadly I didn’t get that many pictures as I wanted as it needed to get together before she had more time to “think about itâ€. Also as the fates and the bay would have it there has been a MAJOR change…….. the 4870 is out and I managed to shoe horn in the GTX260-216 that was in Kermit v2.0.
<O:p
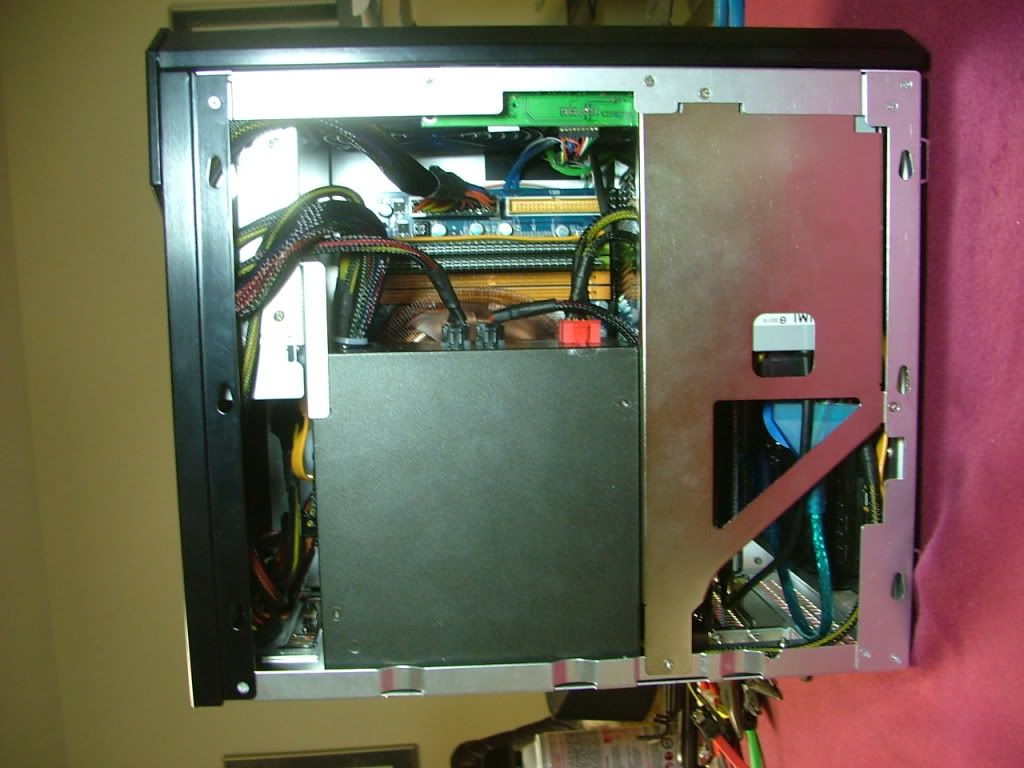
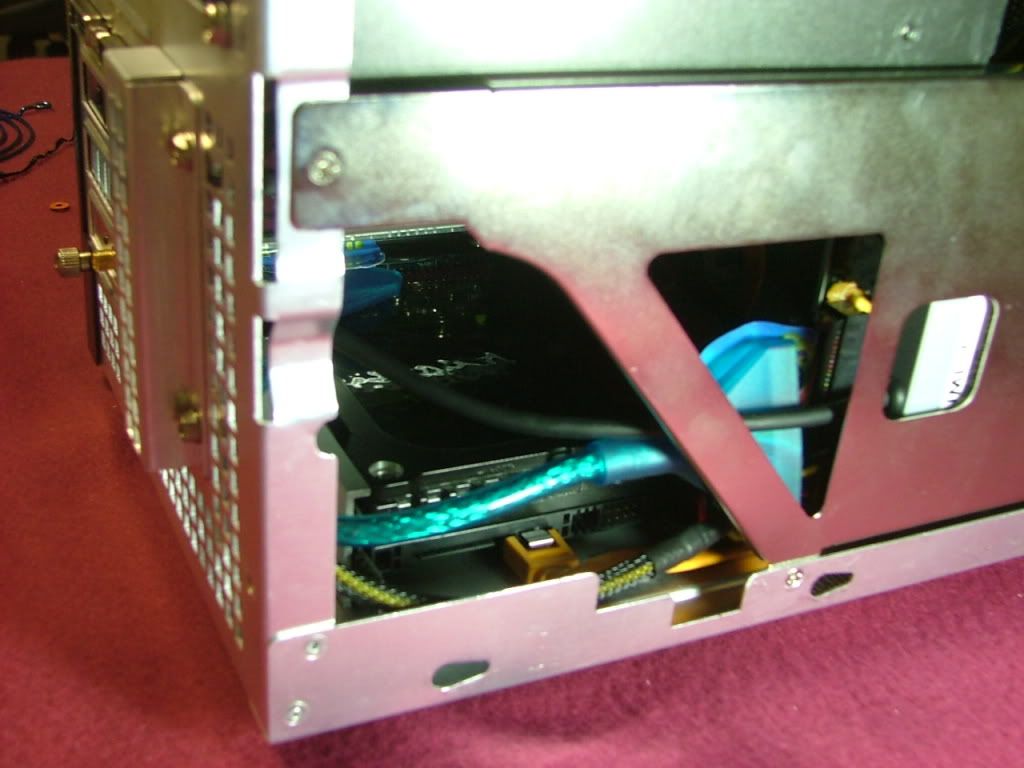
Anyway here we have the pieces going together………First of course was trying to get the miscellaneous cables laid out (see the 8700 in place), fit the GTX, mount the power supply and then install the FDD rack. Also threw in some pics to show just how “tight†things are, the system fan header under the GPU cooling shroud, and when I installed the 10.5†GTX I had to remove the fan grill from the lower fan so it could fit.
<O:p
<O:p
Also here is the item that did me in initially, the CMOS reset switch.
<O:p
<O:p
Finally here it is running with a Tt Smart Fan up top and one of the 120 LED fans from the tech station on the bottom. This is one of the disappointments of the build. With the motherboards I used before you could control the speed of the system fan as well as the HSF through the bios with temperatures. That is a no go however with the Biostar as “smart fan†only applies to the HSF. If I’m wrong PLEASE TELL ME HOW!! That Tt at full bore is a portable tornado and the other 120 isn’t much better.
<O:p
<O:p
Now the final kicker. While running the system notice that Temp1 in Speed Fan and (forget the name right now) in Hardware Monitor was indicating that the NB and mosfets were running 62 -65C. I’ve dropped vcore as low as I could to stay stable, but was baffled as on the tech station they were in the mid 40s. So in looking in the backside of the case through the cooling holes (that area is covered by the PSU) think I found the problem. The sink I mounted on the mosfets didn’t stick and is currently lying up against the back of the case. SO will have to pull the PSU and FDD rack out and figure out why the thermal tape didn’t work. To be on the safe side I ordered some Akasa Thermal Adhesive Tape AK-TT12 from sidewinder computers.
<O:p
04-13-09
<O:p
Ran into several problems, the biggest being that the sensor associated with the NB was giving some really weird readings and I thought that the senor was blown. After investigating further (read taking snit apart) it appears the HSF and NB cooler hit each other. When I first assembled everything it was on “the table†and everything went straight down. However the second time it worked with it I left the mobo in the case. Should have paid attention to the fact I need to “wiggle engineered†the fit. So out came the dremel and I notch the fins on the NB cooler, and was disappointed to learn that it is aluminum that has been anodized copper. The next series of pics will show what it looks like in place from several directions. In some of the pictures you can see where the fins on the 8700 were bent.
<O:p
<O:p
Also another major issue was the mosfet cooler kept falling off even after trying the new thermal tape. Re-cleaned everything and tried another piece of thermal tape and this time I decided to leave the system lying on the mobo side of the case in hopes the thermal tape would “setâ€.
<O:p
However when I decided to reseat the NB cooler I decided to work on this issue as well. Went with the “quick and dirty†jerry rig on this….used a piece of wire wrap that was lying around. Just hope it doesn’t get so hot as to melt the plastic coating!!
<O:p
The tape seems to be holding so figure with this to kind of “hold it in place†I should be okay. Well 6 hours later it is still “stuck†to the mosfets, the other times it fell off in 15 – 30 minutes.
<O:p
Another “problem†I needed to address was the fact the 120mm Tt Smart Fan mounted in the top front was running at max speed and really noisy. As I had to take everything apart I decided to look into what I might be able to do about that. As it turns out I was able to hook the fan’s thermal probe up and stick it into the CNPS 8700 so that it was fairly close to the CPU. I ran several tests with OCCT and it appears to work fairly well. The fan will increase in speed by almost 500 RPM under load. Under light usage it is a quiet 1400ish RPM….big difference from the 2500+ it was running! Here you see the leads
<O:p
<O:p
So everything is now buttoned back up and it appears I managed to resolve several issues at one time. Now to see what the best OC stable will be and figure out how to use the extra cores for folding when I’m not using it!
<O:p
PRESENT
<O:p
As life would have it I need to down size my computer farm and YsSMN v3.0 is on the bock. This is how it eventually ended up component wise.
<O:p
CASE: Silverstone SG03
PSU: OCZ OCZ00MXSP 600W
MOBO: Biostar 790GX XE
CPU: PII X3 720 BE
HSF: Zalman CNPS8700-CU LED
GPU: Sapphire 4870 1GB
MEMORY: F2-8500CL5D-2GBPK (2 x 1024)
HDD: WD Velociraptor, 300 Gigs
Optical Drive 1: LG GH22LS30 DVD Burner w/Light Scribe
0
Comments
1. The PSU fan ended up pointed toward the side
2. Added a Silverstone FX 121 Cross Flow Fan
3. Pulled out the constent speed 120mm bottom front fan for a thermally controlled Enermax Everest 120mm
So here are some pictures that so the little changes.....
Here you can see the two thermal leads as they cross the mobo, and them you have the thermal probe for the mosfets place in the cooler.
Because of reversing the PSU orientation and adding the cross flow fan that required the cable management to not be quite as clean as before.
This SG03 case was not modded at all which is unusual for me. It is just that for the most part I really liked it. If I were to do a mod it would be a blow hole for a 120mm located to rear of the top.