
From BluHaz to BluHaz reDux v4.0
This will be a worklog of the most changed of all my builds. While third one started it became “the primary†for a while. I will attempt to do it all in one long worklog. I’ll try to reduce any redundancy that may occur as parts get swapped and mods are made. Again it will be done with dates to show a timeline.
Mid - Late December 2005
<O:p
The idea of a mATX acrylic case came about around the end of ’03 / beginning of ’04 when I found what appeared to be a neat case here in the F/S section over at amdmb (now pcper). After my usual “stumbling around†the rest was spec’d out: Chaintech 7NIL1, 2500+ T’Bred, Tyan 9700 PRO, 2 x 256 PC3200, 350W PSU, CD-RW, 1.44, & a 40Gig HDD. This was to be my “super bling-bling†folder. Needless to say life and “engineering issues†got in the way and it wasn’t “completed†until October/November ’05.
<O:p
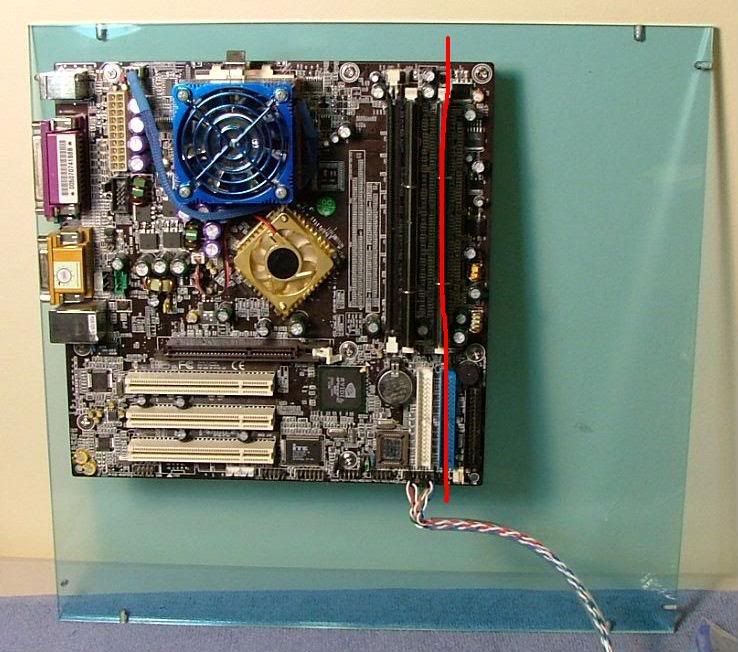
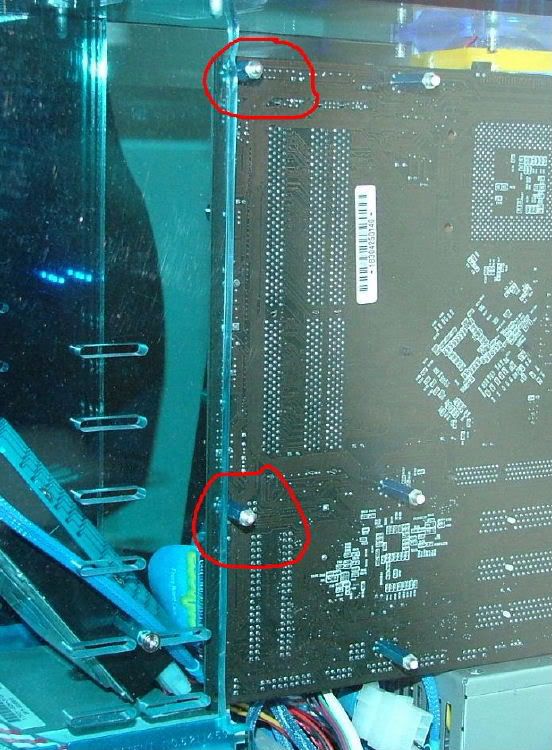
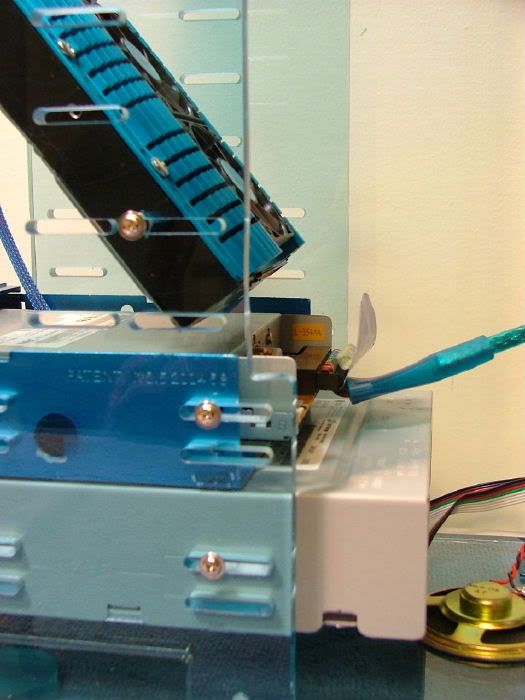
First thing I realized is there are 2 sizes of mATX boards >> case = “original†size & 7NIL1 = “largerâ€!! The extra dim slot did me in. First the mobo extended beyond the drive side plate & the side panel/mobo tray didn’t provide for mounting posts. Second the HDD and cables covered a lot of stuff!! Mobo pic with the red line shows approximately how much it covered the drive side plate. The pic with the rectangle shows about where the HDD sits. The pic with the circles shows where I added 2 standoffs (should have been three).
<O:p

<O:p
The hardware package came with mounting “extensions†for drive mounting in the cage. As above, I drill and tapped the acrylic side panel. This gave me the support for the mobo I needed, but now they hit the drive cage. So I attempted to drill two clearance holes for the stand offs in the one dive cage side. Lesson learned >> acrylic can be very brittle! Ended up making a long “notch†to allow for the added posts to slide in. Used a hack saw, then file, 250, 400, 600, & finally 1000 grit to get a “finished†look.
<O:p
As I could not put the HDD where it was supposed to go because it covered minor things like the floppy connector, cmos jumper, etc. Decided to drop the floppy down in a bay adapter and “fit†the hdd wherever I could. Using a rat-tail file I modified the mounting slots in the drive cage. Also had to mount it “up side down†because of the cables.
<O:p
<O:p
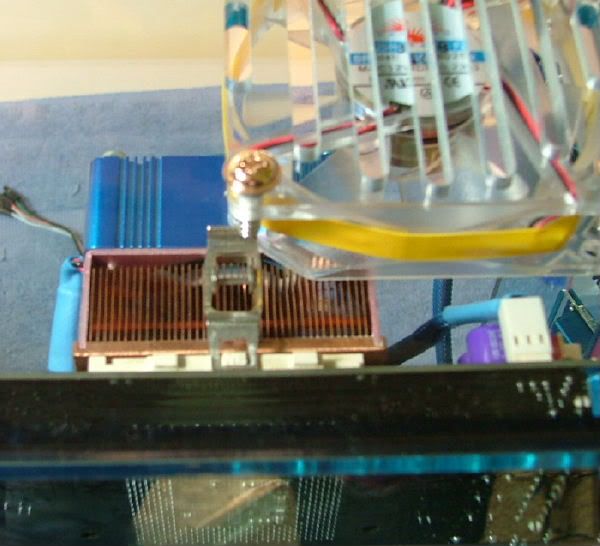
Because of not using a “stock†amd hsf, the blowhole fan needed to be notched to
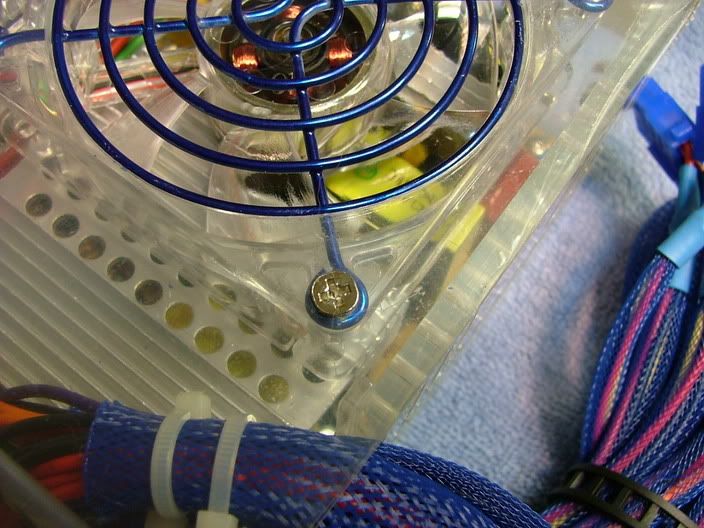
allow it to fit. After the initial assembly, it was determined the original machined grill blocked half of the exiting air, so that was cut out. You can see how much blockage there is in the pic showing the notched fan. The next few pictures show scribing the cutout using the fan grill and the “finished†cut out. More air than I would like is still blocked, but did not want to get too close to the mounting holes. Besides I have already begun to loose any enjoyment this project is giving me.
<O:p
<O:p
Bling- bling issues are covered by 1.) painted the I/O plate, PCI cover plates and frame, gpu end plate, fan grills, and the aluminum housings on the two AOC 60mm fans 2) two 80mm blue led fans 3) memory led light mod [ http://www.xoxide.com/rammod.html ] Had to modify the pci plate on this so both switches were on the same plate. These are the two red momentary switches seen in the back view 4) painted the floppy face plate and adapter frame. The original CD-RW’s faceplate was painted but the drive was too deep for the case, and got "lazy" with the new drive.
<O:p
Future plans: 1) Paint the combo drive faceplate? 2) Install a 3.5 bay fan controller for the 80mms and the one 60mm, 3) Sleeve the PSU and put on a blue acrylic cover, 4) Consider reworking the PSU mounting area to allow turning the PSU over, 5) Eliminating the floppy and replace with a multiple card reader/multi-function panel?
<O:p
Also when I redo the PSU think I'll try to "bob" off some of the cabling as it is real tight (see the interior side view).
<O:p
<O:p
By this time the “fun†had started to wane with the desire just to have the system running, if the floppy is removed all of the components will be black to avoid having to paint anymore. (Getting "lazy" )
)
<O:p
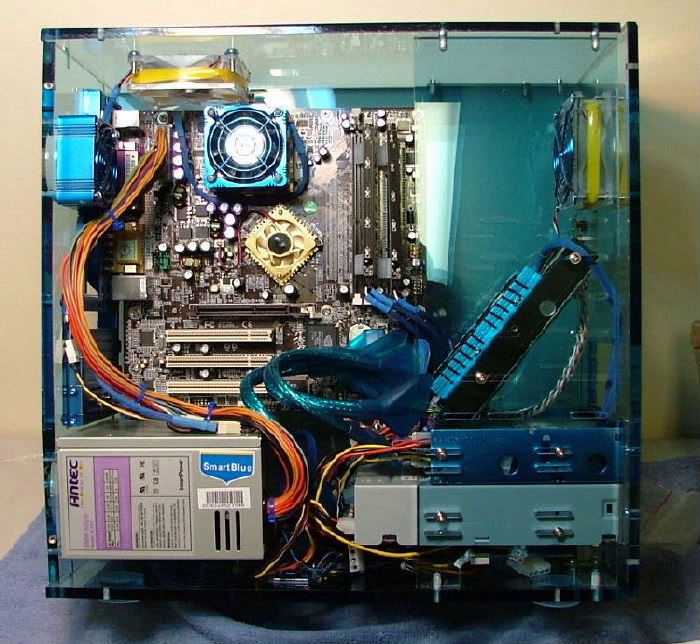
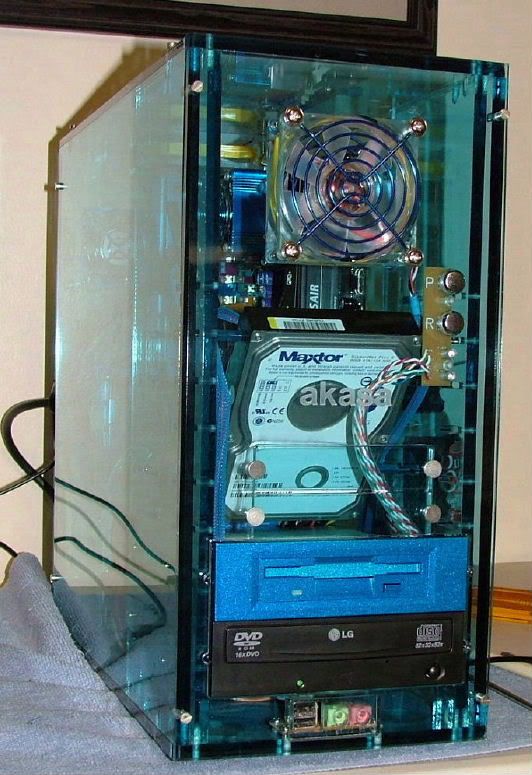
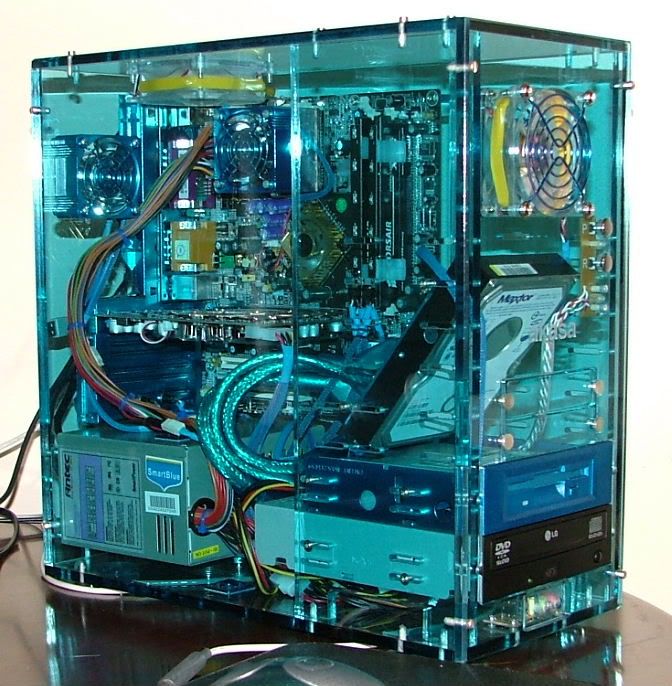
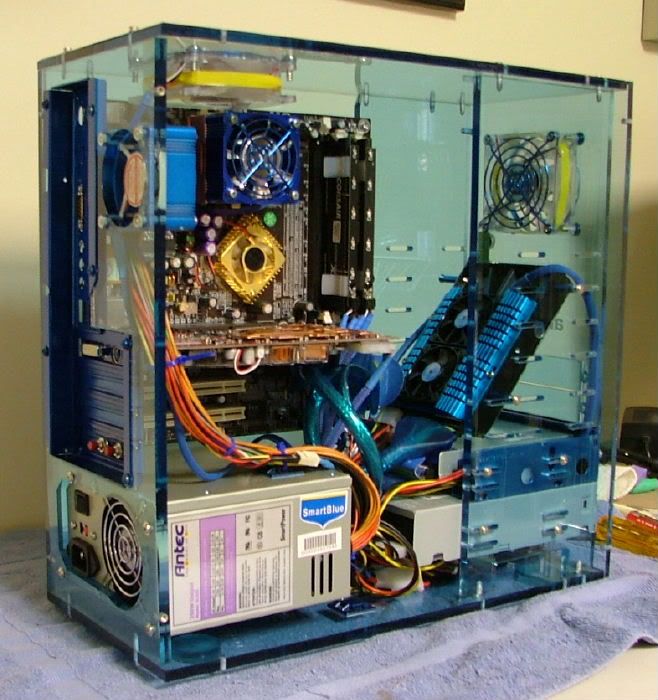
Here are some of the “finished†pictures,
<O:p
<O:p
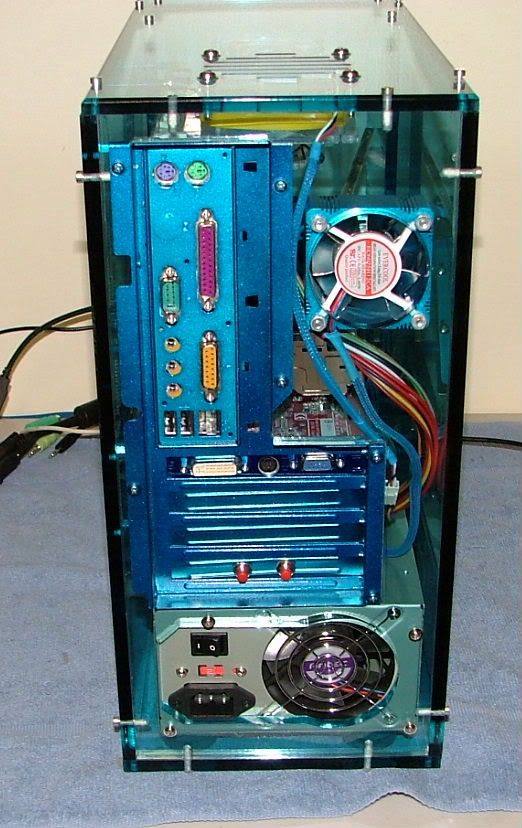
The only rear shot was taken before the blow hole was reworked.
<O:p
<O:p
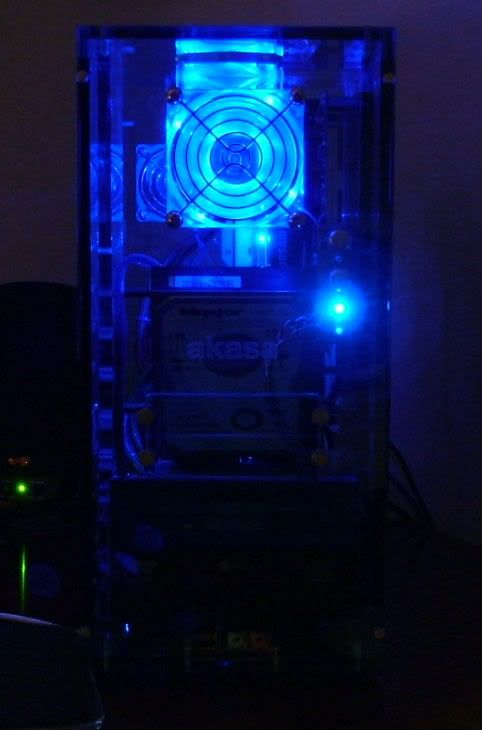
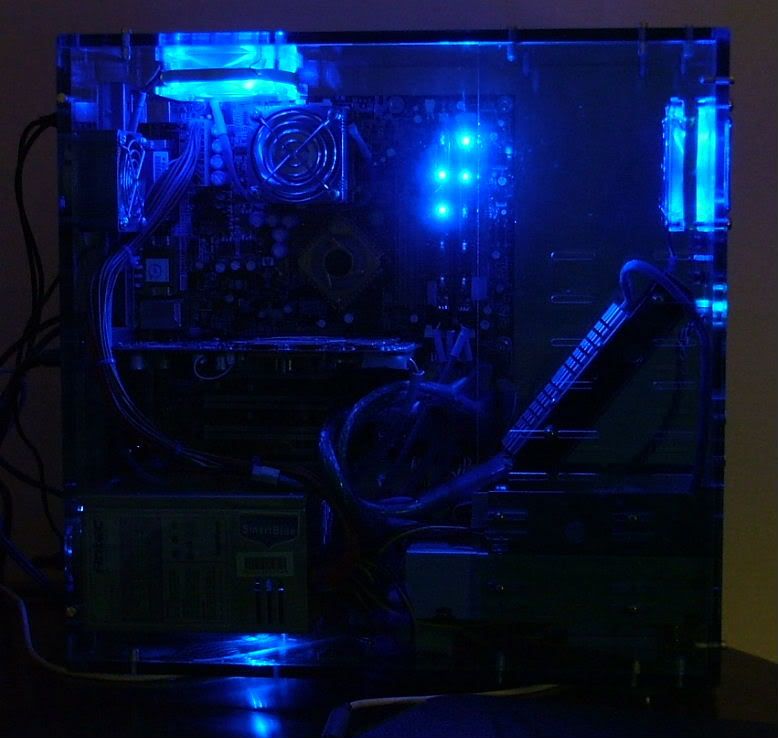
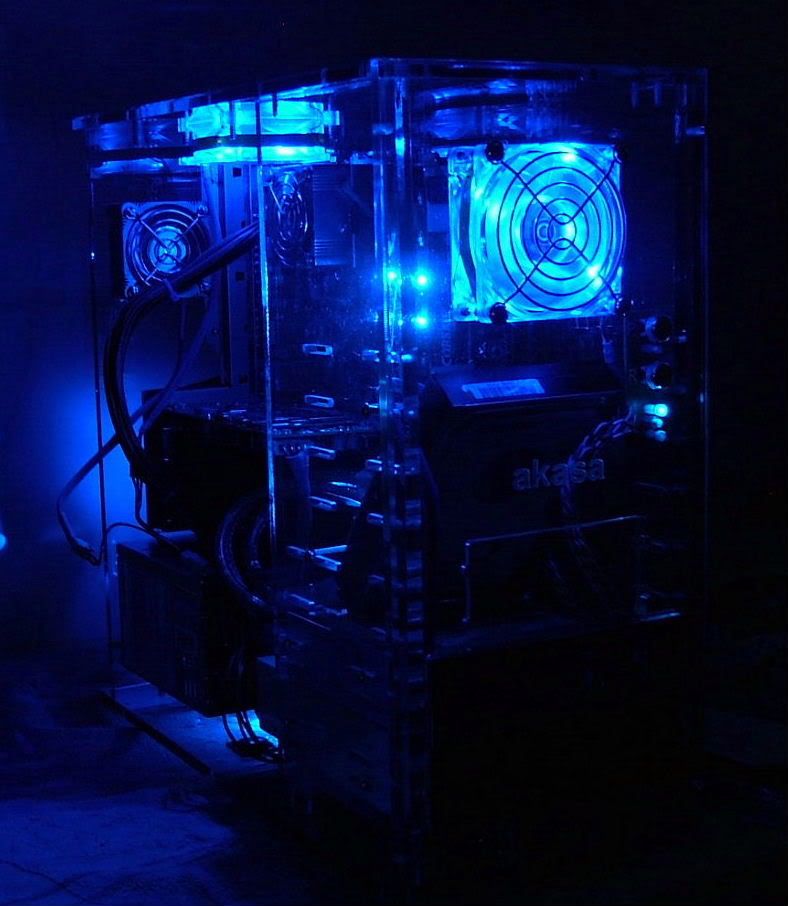
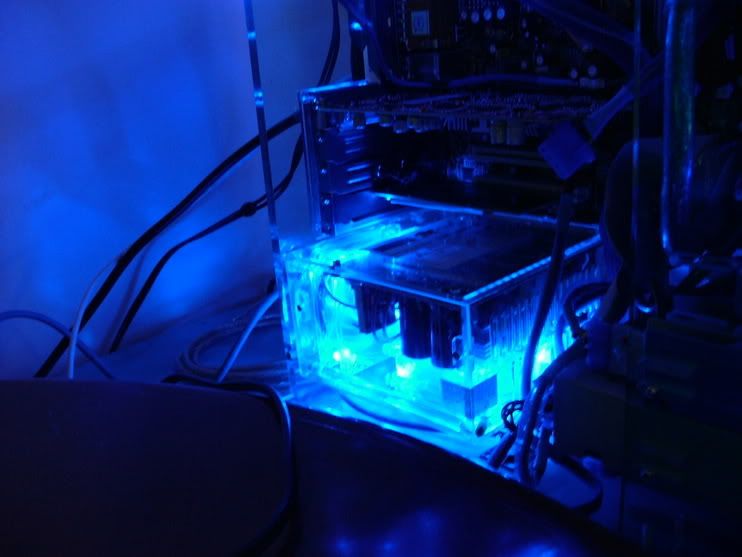
Here it is in the dark
<O:p
<O:p
NOTE: As I was trying to finishing the work log decided to start on the revisions already!
")
<O:p
1) The RAM is going to be replaced with a "generic" (NCP brand) PC3200 to go from 2 x 256 to 2 x 512 as XP is sucking (more ways than one) up most of the 512 I have in there now.
2) Found some blue led 60mm fans that should be a “simple†swap for the ones in the painted aluminum housings.
3) Install a 3.25 fan controller. If I can’t get it in black, guess I just have to paint everything blue. :barf: :bang: Look at the front view and see if you think all black will work or should I not be lazy and paint?
4) Figure out how to do without the PSU to get that reworked.
<O:p
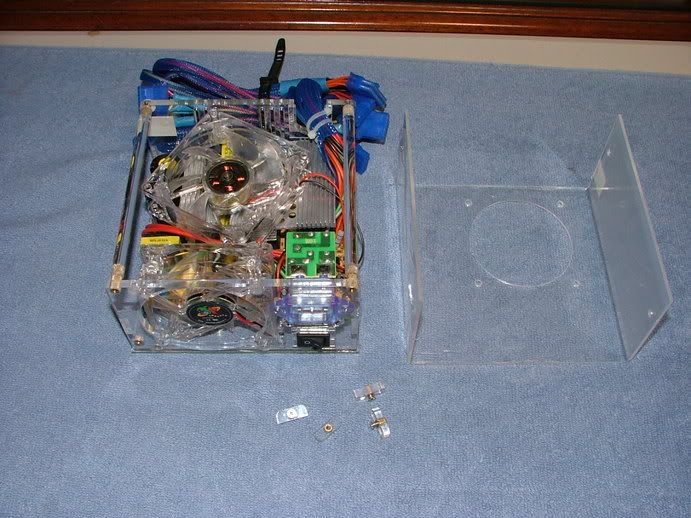
Okay, received the fan controller over Christmas weekend and guess what >> another friggen fit issue!! :bang: This mATX case has been a real challenge and I’m glad that I like the thing or it would probably be in many pieces by now.
<O:p
The picture below shows an issue I “expected†and already had plans to “hammer, grind, or file to suit†>> the mounting frame hits the HDD.
<O:p
<O:p
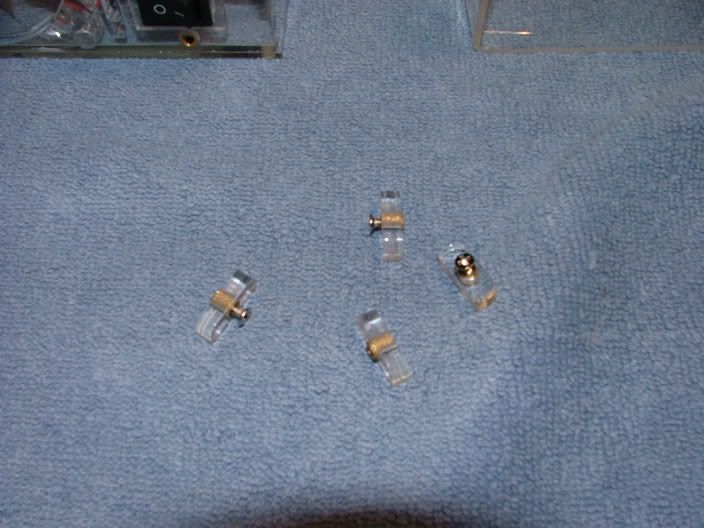
The following shows the part that I can’t “hammer, grind, or file to suit†>> the power plug hitting the HDD and the 3-pin plugs too close to plug anything in.
<O:p
<O:p
So I either figure out how to move the HDD, put the fan controller in the FDD’s spot, trash the idea of using the controller, or _______________ (you fill in the blank ).
).
<O:p
Thought I was finished!! :banghead: :bigggrin:
<O:p
<O:p
February 2006
<O:p
Spent a good part of this weekend trying to finalize BluHaz. Wanted to change over the two 60mm fans to led, install fan controller, fix the front USB ports, rework the psu, go to 1gb in memory, install the original 7NIL1 that I had purchased for it, and “tidy up†the wiring. Have been trying to oc the thing as much as possible and I have not been able to get it to do as well as someone else with the same mobo (200MHz FSB). So I wanted to try another 7NIL1 (original) and new memory (running 1gb of generic). Ended up with a 1 x 512 CMx512-3200 from e-bay and order a second from ZZF. When the mem arrived it turns out I had ordered CMX512-3200C2 and it ended up they are very different also wanted to get my home network up and running.
<O:p
Beside the memory issue several other things “went southâ€. The blue anodized paint I was using was acting weird (drying a powdery blue that had to be “buffed†to show the actual color). Found a Logisys 500W acrylic psu at performance-pcs and had it sleeved. Well I needed to paint the fan grills the anodized blue. It turns out they are mounted “inside†which required removing the cover and of course voiding the warranty. As I was taking the cover off all of the threaded tabs came unglued and fell off.
<O:p
Listed is a quick summery of what happened and will follow shortly with pictures and “explanationsâ€.
The Good:
1. Front USB ports function
2. Rearranged the HDD allowing me to install the fan controller and keep the FDD (I know I’m a dinosaur!)
3. The psu looks great (just glued the cover tabs back on)
4. Swapped out the 60mm fans and the leds look sweet! Also was able to get the outside fan grill on the rear 60mm.
5. Install a Linksys wireless card and it works!
6. The network is working for internet functions (four ports)
<O:p
The Bad:
1. The psu didn’t have enough Molex connectors for all of items. Need to order one more “Y†splitter.
2. Everything I painted sucked!
3. Can’t get the printers to work on the network. Dig deeper into the manual.
4. Have a bad rounded IDE cable, have to use ribbon until I get another (Coolmax Scorpio series)
<O:p
The Ugly:
1. Had a general “won’t work†issue when I fired up the system after redoing. Took the whole thing apart and started testing parts and ended up going back to the other mobo. Discovered the bad cable while swapping back and forth between mobos.
2. After reassembling everything my 9800XT had major artifact issues. Swapped back and forth between the two power supplies and did different power cable distribution hoping that was the issue. No joy, now running with a 9600XT until I get that figured out. :banghead::banghead::banghead:
<O:p
As stated earlier BluHaz wasn’t to stay “finished†for very long.
Okay the fiasco that is the rebuild of BluHaz officially started the weekend of 02/04-05/06. The primary part began at approximately 11:00 Saturday morning with my head hitting the pillow a little after 12:00 noon Sunday. The following will cover the things that were or were not accomplished. As circumstances would have it the system was actually rebuilt twice with the psu’s swapped out two or three times. Ended up with a probable dead 9800XT and a bad IDE cable.
<O:p60mm LED Fans
To add a little more light to the project I needed to find blue led 60mm fans. As it turns out a lighted version of the ones used were available. However I didn’t want to paint the aluminum “frames†over again. Ordered two and kept my fingers crossed. They arrived and sure enough a swap could be made. Except for the hsf, most of this was done a couple of days before the total rebuild.
<O:p
This kinda sorta show the led pcd/placement in the fan assembly
<O:p
On closer inspection the fan models are different. To get the leds, I lost rpm/cfm here are the specs:
<O:p
1St Fan = EC6025H12CA
Speed: 5000 rpm
Air Flow: 26.5 CFM
Noise Level: < 30 dBA
LED Fan = EC6025M12CACL
Speed: 4500 rpm
Air Flow: 23.72 CFM
Noise Level: < 32 dBA
<O:p
I initially just swapped out the rear fan, as I was unsure of what to do with the hsf.
As soon as I find what I did with my “Before†and “After†shoots I put here!
<O:p
It was decided to test the new fan as a unit before swapping out the bodies. Using prime95 and a fumbling attempt of using Sandra showed me that idle and load went up only 1 to 1-1/2 C with a max of 48 C once. So the swap was made.
<O:p
Logisys Acrylic PSU
When assembling the original setup, the Antec 350W psu’s cabling gave me fits. There were a lot of them and long. Trying to tidy them up and hide the extra was a royal pain. Thought about sending it out to performance-pcs to get it sleeved and have some of the leads “bobbed†off.
<O:p
While checking their site I happen to click on the “specials†section for power supplies and saw the Logicsys acrylic unit. It was partially sleeved, had blue led fans (it’s dark at the bottom of the case), and rated at 500W. Also it had fewer and shorter leads. Just how few and how short was realized later at assembly!
Googled it and found a review that stated while not outstanding, it gave consistent voltages so going for the bling part, it was ordered and had the balance of the leads sleeved. http://www.extrememhz.com/acrylicpsu-p1.shtml
<O:p
Needed to paint the fan grills. When I went to remove them it was discovered the only way to get them off was to remove the cover – and of course void the warranty. The cover was held in place by four screws, so no big deal >> yep, sure! As the cover came off the threaded taps feel off. As per the luck of this assembly, my super glue had dried up so in rummaging through the tool chest I found a tube of Locktite sealer/adhesive. Luckily there were “glue marks†to use as an alignment guide (see red circle)
<O:p
<O:p
Painted the grills and had the same issue with paint. The pictures try to show how the grill legs end up between the internal fan and inside of the surface.

<O:p
As a “teaser†here is what it looks like in the case as I’m awaiting the replacement parts.
<O:p
Fan Controller
<O:p</O:p
One of the additions is to be a fan controller for the two 80mm and 1 60mm case fans. I picked up a Nexus NXP-205-SL on e-bay with great expectations and found issues already stated. The unit needed to be painted the anodized blue, so the unit was taken down to it’s basic parts >> front bezel, pcb, “coverâ€, and knobs. True to Murphy’s Laws ran out of paint Christmas weekend and had issues with the nozzle on that can.<O:p</O:p
<O:p
Had concerns as to how one was to “read†the information on the bezel after painting, but realized one required a magnifying glass to read the text anyway. As it turned out the black lettering on the silver model is visible in direct light. The paint ran out and the nozzle was “spitting†when I did the cover, so it needed to be repainted.
<O:p</O:p
<O:p
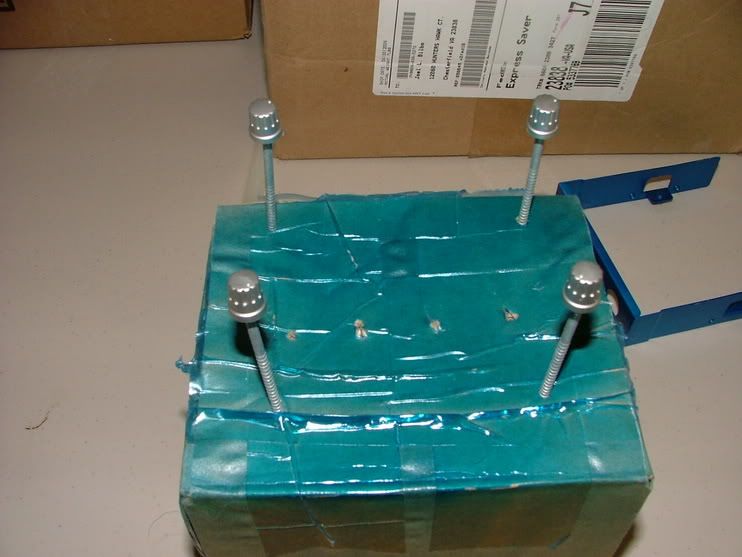
Besides the cover, the gray/silver control knobs needed to be painted. The
problem was how to “hold†them. Ended up hot gluing them to nails stuck into a cardboard box. Below you see them primed and then painted. For some reason the new can of paint was giving me issues as the paint was not drying glossy, but looked like a powder. Tied to show the difference in the pic with the bezel and knobs. Ended up having to rub/buff the things to look okay.
<O:p
 <O:p></O:p>
 <O:p></O:p>
<O:p</O:p
<O:p
Okay everything is done, dry, and wiped down ready for assembly. Didn’t take a pic of the assembled unit, but here are the parts ready for assembly. When it was all said and done, the cover didn’t get used, as I liked seeing the blue pcb.
<O:p
<O:p</O:p
<O:p
Another “teaser†as this is what it looks like in place, glad for the dark because as you can see in the second shot it was scraped at assembly.
<O:p
 <O:p></O:p>
<O:p
Interestingly enough the 6600GT is a wee bit shorter than the 9800XT and the mobo pwr cable is not getting as pinched. After getting my initial install issues resolved (my first intro to load nvidia "over" ATI drivers) we seem to be puttering along quit well. That is until I make a final decision on wither to change out the mixed memory and go to a 2800+ in trying to maximize the “final onfigurationâ€.
<O:p</O:p
<O:p
As far as the fan controller is concerned it “appears†to be more bling than function. I’m only using (testing) at the max and min settings. While there is somewhat of a noise reduction (not sure what my “electronically enhanced†ears are picking up) it seems to only vary one to two degrees at idle or “loadâ€. Load has been basically Prime95 and a sad attempt at running Sandra – no gaming yet.
<O:p</O:p
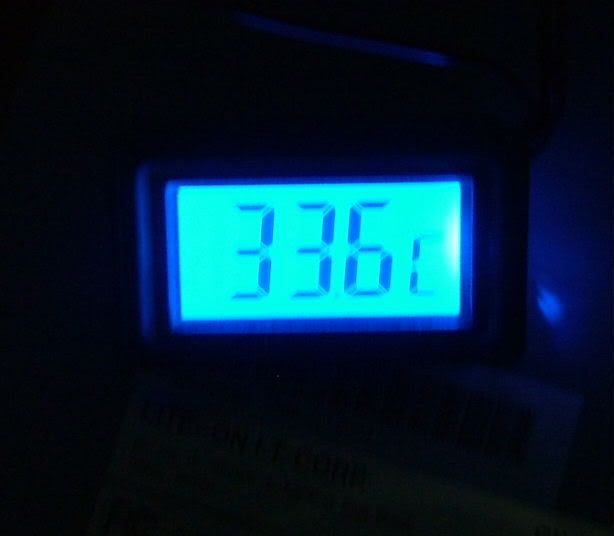
However it became obvious the led fan on the cpu is not keeping up as well as I had hoped. At first is seemed to only allow a degree of increase over the non-led version, now it appears to be 3 to 4. I have gotten up to about 53 - 55 C while using the above mentioned testing . When I make up my mind on the cpu (2600 or 2800) might reapply the goop and reseat the hsf.
<O:p
March 2006
<O:p</O:p
<O:p
Work on BluHaz has kinda slowed down during this time period as other ‘puter items kinda got in the way. Also thanks to ebay (my wife hates it the credit card loves it) picked up another 7NIL1. This will be my overclocking test bed to help decide the final cpu Config.<O:p</O:p
<O:p</O:p
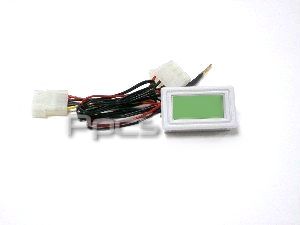
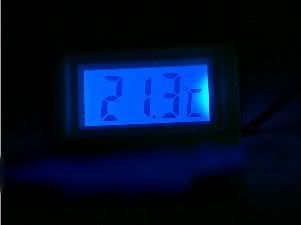
While I’ve consistently used MBM5 to monitor temps, I not totally happy with them. Tripped across this temp gauge at performance-pcs and liked it because it is not battery powered and has a “blue†back lit screen. <O:p</O:p
<O:p</O:p
<O:p</O:p
<O:p</O:p
Unfortunately they are indefinitely out of stock, however while rummaging through the “parts box†for Celtic Spirit (the build that started it all but hasn’t been finished) I found one!
<O:p
SO now to deside where to mount the thing. The only issue I have of course is fubaring the area where I would cut the mounting hole. No replacement parts available and it’d be hard to clue the piece(s) back. I have a dremel so can destroy!!
<O:p
June 2006
<O:p
The box mods stopped as I have been playing with the volt mod for some time now, but it has been a living nightmare. I have managed to get the 2800+ up to 187fsb (2.3) stable, but anything above goes to hell.<O:p</O:p
<O:p
Also have been having an hdd problem that was thought to be oc'ing based and I've re-formatted so often I almost can enter my key code blind folded.<O:p</O:p
<O:p
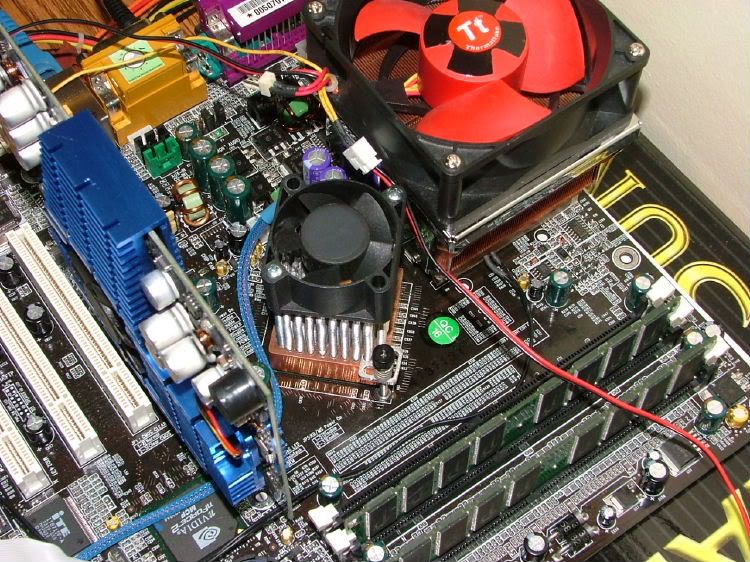
The board that is currently being used to test the oc’ing will eventually replace the mobo that is in BluHaz. It seems because of heat issues I will have to go with a larger hsf and that will require me to remove the led blowhole fan. Might see, after it is put back together, if an 80 x 80 x 15 will fit.<O:p</O:p
<O:p
Since the NB runs so hot on NF2 boards I have swapped out the stock NB cooler for a Swiftech 159.
<O:p
<O:p</O:p
<O:p
Also I have been using the temp gage I’ve found for testing and have found that is disagrees with MBM5 by almost as much as -12C.

<O:p</O:p
<O:p
Well I’ve declared my first “real†attempt at oc’ing finished (will be setting up the 2800+ Barton in BluHaz shortly) and now I’m ready to get back to the case modding side of the project!
<O:p</O:p
<O:p
As mentioned above, I will be taking out the blowhole fan because of needing a larger HSF. Using what I have “in stock†means a Tt Volcano 12 (currently on the oc’ed mobo) or a swiftech 462+. Since I’ve gone with a swiftech 159 for the NB, think I’ll keep it in the family. Also I’m not a great “fan†of that fan on the Volcano! With the oc’ed CPU and maybe a little boost to the gpu, it might get a little warm once the case is buttoned up! If the blowhole ends up being a passive vent, that will leave me with only a 80mm in and one 60mm out.
<O:p</O:p
<O:p
All this is leading up to the fact I want to mount the temperature gauge in the faceplate of BluHaz. It will more than likely go dead center, just about the akasa name. Then again I have found another source and am considering two gauges.
<O:p</O:p
<O:p
If there is room on the front may install a second temp gauge. The question here is where to use the second temp probe! With one probe for the cpu, wondered for a while if I should try to measure ambient air, hdd, or NB temps.
<O:p
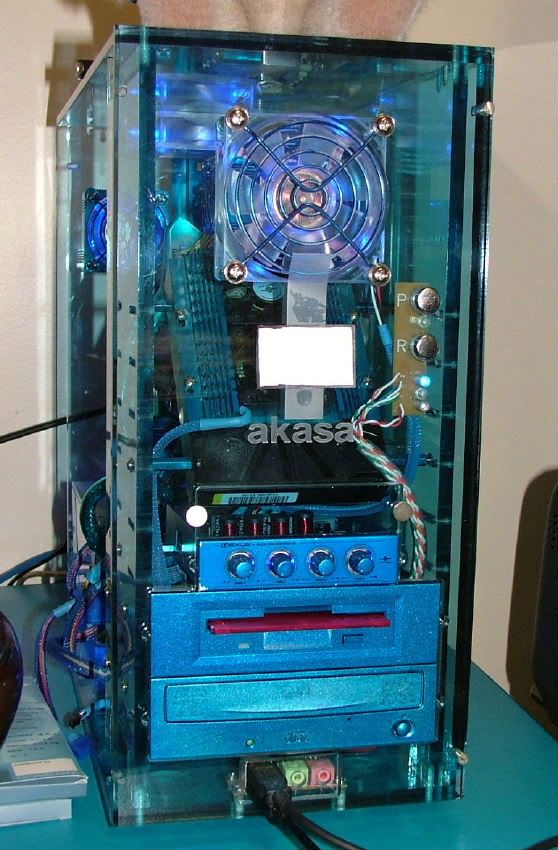
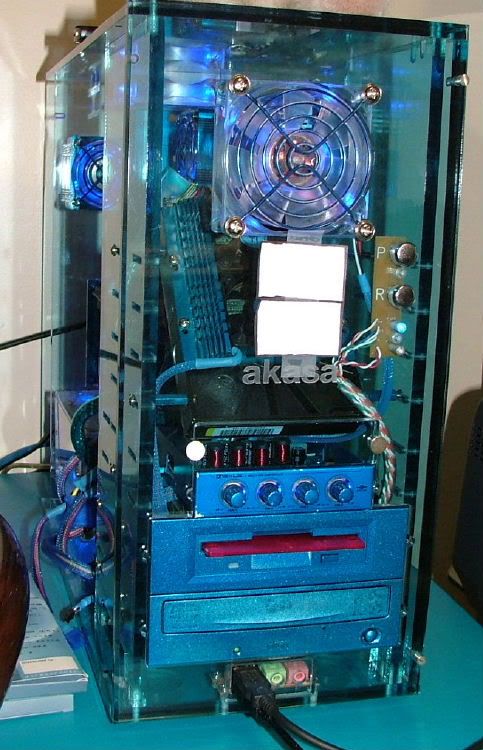
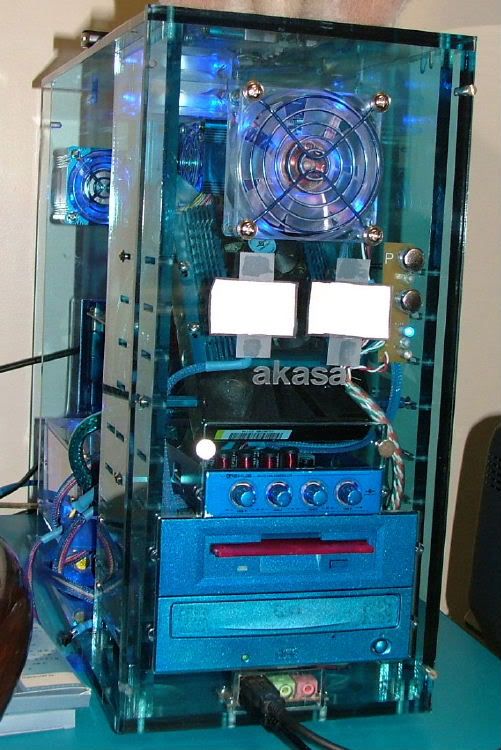
Doing some real rough old school “cut & paste†was looking at the potential locations of the temperature gauge(s) for BluHaz. In theory there are three:
<O:p</O:p
<O:p
Single Gauge = one cutout with room to spare and “symmetricalâ€.<O:p</O:p
2 Gauges Vertical = single vertical cut (as the friction clamps are on the side) with a tight fit between the akasa logo and the 80mm fan<O:p</O:p
2 Gauges Horizontal = 2 separate cutouts that are not “symmetrical†about center because of the switch assembly.
<O:p</O:p
And here are pics in the order given above.
<O:p</O:p
<O:p</O:p
<O:p</O:p
<O:p
As it turned out the gage(s) decision wasn’t made until the next incarnation occurred…….to be continued.
Mid - Late December 2005
<O:p
The idea of a mATX acrylic case came about around the end of ’03 / beginning of ’04 when I found what appeared to be a neat case here in the F/S section over at amdmb (now pcper). After my usual “stumbling around†the rest was spec’d out: Chaintech 7NIL1, 2500+ T’Bred, Tyan 9700 PRO, 2 x 256 PC3200, 350W PSU, CD-RW, 1.44, & a 40Gig HDD. This was to be my “super bling-bling†folder. Needless to say life and “engineering issues†got in the way and it wasn’t “completed†until October/November ’05.
<O:p
First thing I realized is there are 2 sizes of mATX boards >> case = “original†size & 7NIL1 = “largerâ€!! The extra dim slot did me in. First the mobo extended beyond the drive side plate & the side panel/mobo tray didn’t provide for mounting posts. Second the HDD and cables covered a lot of stuff!! Mobo pic with the red line shows approximately how much it covered the drive side plate. The pic with the rectangle shows about where the HDD sits. The pic with the circles shows where I added 2 standoffs (should have been three).
<O:p
<O:p
The hardware package came with mounting “extensions†for drive mounting in the cage. As above, I drill and tapped the acrylic side panel. This gave me the support for the mobo I needed, but now they hit the drive cage. So I attempted to drill two clearance holes for the stand offs in the one dive cage side. Lesson learned >> acrylic can be very brittle! Ended up making a long “notch†to allow for the added posts to slide in. Used a hack saw, then file, 250, 400, 600, & finally 1000 grit to get a “finished†look.
<O:p
As I could not put the HDD where it was supposed to go because it covered minor things like the floppy connector, cmos jumper, etc. Decided to drop the floppy down in a bay adapter and “fit†the hdd wherever I could. Using a rat-tail file I modified the mounting slots in the drive cage. Also had to mount it “up side down†because of the cables.
<O:p
<O:p
Because of not using a “stock†amd hsf, the blowhole fan needed to be notched to
allow it to fit. After the initial assembly, it was determined the original machined grill blocked half of the exiting air, so that was cut out. You can see how much blockage there is in the pic showing the notched fan. The next few pictures show scribing the cutout using the fan grill and the “finished†cut out. More air than I would like is still blocked, but did not want to get too close to the mounting holes. Besides I have already begun to loose any enjoyment this project is giving me.
<O:p
<O:p
Bling- bling issues are covered by 1.) painted the I/O plate, PCI cover plates and frame, gpu end plate, fan grills, and the aluminum housings on the two AOC 60mm fans 2) two 80mm blue led fans 3) memory led light mod [ http://www.xoxide.com/rammod.html ] Had to modify the pci plate on this so both switches were on the same plate. These are the two red momentary switches seen in the back view 4) painted the floppy face plate and adapter frame. The original CD-RW’s faceplate was painted but the drive was too deep for the case, and got "lazy" with the new drive.
<O:p
Future plans: 1) Paint the combo drive faceplate? 2) Install a 3.5 bay fan controller for the 80mms and the one 60mm, 3) Sleeve the PSU and put on a blue acrylic cover, 4) Consider reworking the PSU mounting area to allow turning the PSU over, 5) Eliminating the floppy and replace with a multiple card reader/multi-function panel?
<O:p
Also when I redo the PSU think I'll try to "bob" off some of the cabling as it is real tight (see the interior side view).
<O:p
<O:p
By this time the “fun†had started to wane with the desire just to have the system running, if the floppy is removed all of the components will be black to avoid having to paint anymore. (Getting "lazy"
)<O:p
Here are some of the “finished†pictures,
<O:p
<O:p
The only rear shot was taken before the blow hole was reworked.
<O:p
<O:p
Here it is in the dark
<O:p
<O:p
NOTE: As I was trying to finishing the work log decided to start on the revisions already!
<O:p
1) The RAM is going to be replaced with a "generic" (NCP brand) PC3200 to go from 2 x 256 to 2 x 512 as XP is sucking (more ways than one) up most of the 512 I have in there now.
2) Found some blue led 60mm fans that should be a “simple†swap for the ones in the painted aluminum housings.
3) Install a 3.25 fan controller. If I can’t get it in black, guess I just have to paint everything blue. :barf: :bang: Look at the front view and see if you think all black will work or should I not be lazy and paint?
4) Figure out how to do without the PSU to get that reworked.
<O:p
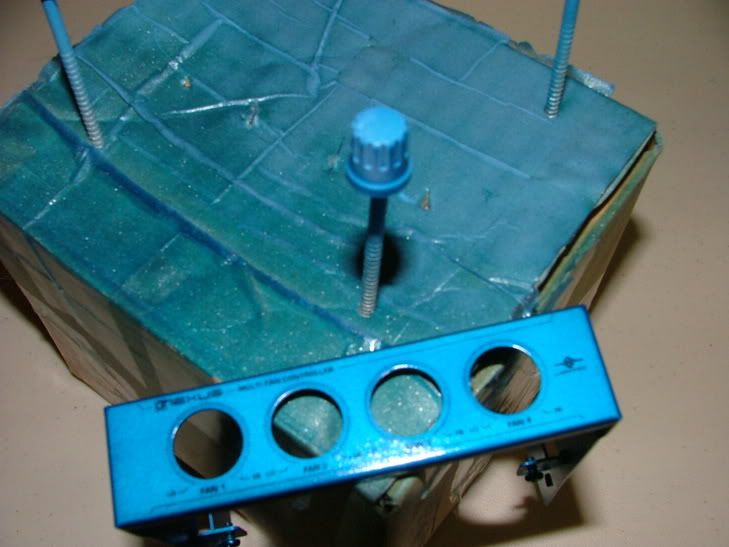
Okay, received the fan controller over Christmas weekend and guess what >> another friggen fit issue!! :bang: This mATX case has been a real challenge and I’m glad that I like the thing or it would probably be in many pieces by now.
<O:p
The picture below shows an issue I “expected†and already had plans to “hammer, grind, or file to suit†>> the mounting frame hits the HDD.
<O:p
<O:p
The following shows the part that I can’t “hammer, grind, or file to suit†>> the power plug hitting the HDD and the 3-pin plugs too close to plug anything in.
<O:p
<O:p
So I either figure out how to move the HDD, put the fan controller in the FDD’s spot, trash the idea of using the controller, or _______________ (you fill in the blank
). <O:p
Thought I was finished!! :banghead: :bigggrin:
<O:p
<O:p
February 2006
<O:p
Spent a good part of this weekend trying to finalize BluHaz. Wanted to change over the two 60mm fans to led, install fan controller, fix the front USB ports, rework the psu, go to 1gb in memory, install the original 7NIL1 that I had purchased for it, and “tidy up†the wiring. Have been trying to oc the thing as much as possible and I have not been able to get it to do as well as someone else with the same mobo (200MHz FSB). So I wanted to try another 7NIL1 (original) and new memory (running 1gb of generic). Ended up with a 1 x 512 CMx512-3200 from e-bay and order a second from ZZF. When the mem arrived it turns out I had ordered CMX512-3200C2 and it ended up they are very different also wanted to get my home network up and running.
<O:p
Beside the memory issue several other things “went southâ€. The blue anodized paint I was using was acting weird (drying a powdery blue that had to be “buffed†to show the actual color). Found a Logisys 500W acrylic psu at performance-pcs and had it sleeved. Well I needed to paint the fan grills the anodized blue. It turns out they are mounted “inside†which required removing the cover and of course voiding the warranty. As I was taking the cover off all of the threaded tabs came unglued and fell off.
<O:p
Listed is a quick summery of what happened and will follow shortly with pictures and “explanationsâ€.
The Good:
1. Front USB ports function
2. Rearranged the HDD allowing me to install the fan controller and keep the FDD (I know I’m a dinosaur!)
3. The psu looks great (just glued the cover tabs back on)
4. Swapped out the 60mm fans and the leds look sweet! Also was able to get the outside fan grill on the rear 60mm.
5. Install a Linksys wireless card and it works!
6. The network is working for internet functions (four ports)
<O:p
The Bad:
1. The psu didn’t have enough Molex connectors for all of items. Need to order one more “Y†splitter.
2. Everything I painted sucked!
3. Can’t get the printers to work on the network. Dig deeper into the manual.
4. Have a bad rounded IDE cable, have to use ribbon until I get another (Coolmax Scorpio series)
<O:p
The Ugly:
1. Had a general “won’t work†issue when I fired up the system after redoing. Took the whole thing apart and started testing parts and ended up going back to the other mobo. Discovered the bad cable while swapping back and forth between mobos.
2. After reassembling everything my 9800XT had major artifact issues. Swapped back and forth between the two power supplies and did different power cable distribution hoping that was the issue. No joy, now running with a 9600XT until I get that figured out. :banghead::banghead::banghead:
<O:p
As stated earlier BluHaz wasn’t to stay “finished†for very long.
Okay the fiasco that is the rebuild of BluHaz officially started the weekend of 02/04-05/06. The primary part began at approximately 11:00 Saturday morning with my head hitting the pillow a little after 12:00 noon Sunday. The following will cover the things that were or were not accomplished. As circumstances would have it the system was actually rebuilt twice with the psu’s swapped out two or three times. Ended up with a probable dead 9800XT and a bad IDE cable.
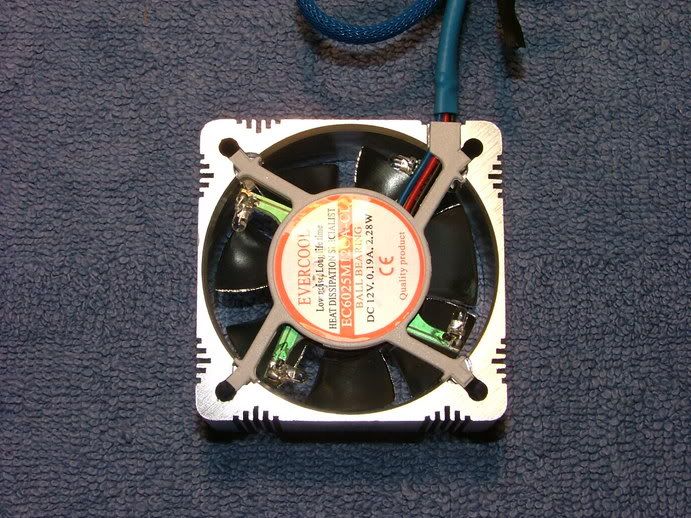
<O:p60mm LED Fans
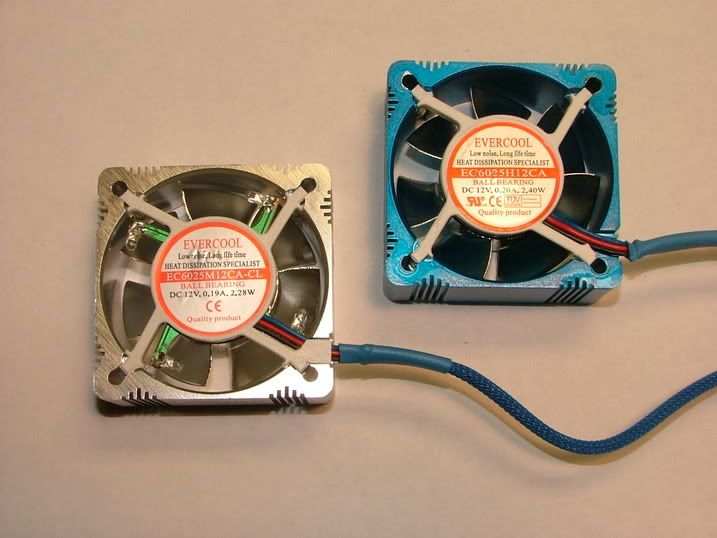
To add a little more light to the project I needed to find blue led 60mm fans. As it turns out a lighted version of the ones used were available. However I didn’t want to paint the aluminum “frames†over again. Ordered two and kept my fingers crossed. They arrived and sure enough a swap could be made. Except for the hsf, most of this was done a couple of days before the total rebuild.
<O:p
This kinda sorta show the led pcd/placement in the fan assembly
<O:p
On closer inspection the fan models are different. To get the leds, I lost rpm/cfm here are the specs:
<O:p
1St Fan = EC6025H12CA
Speed: 5000 rpm
Air Flow: 26.5 CFM
Noise Level: < 30 dBA
LED Fan = EC6025M12CACL
Speed: 4500 rpm
Air Flow: 23.72 CFM
Noise Level: < 32 dBA
<O:p
I initially just swapped out the rear fan, as I was unsure of what to do with the hsf.
As soon as I find what I did with my “Before†and “After†shoots I put here!
<O:p
It was decided to test the new fan as a unit before swapping out the bodies. Using prime95 and a fumbling attempt of using Sandra showed me that idle and load went up only 1 to 1-1/2 C with a max of 48 C once. So the swap was made.
<O:p
Logisys Acrylic PSU
When assembling the original setup, the Antec 350W psu’s cabling gave me fits. There were a lot of them and long. Trying to tidy them up and hide the extra was a royal pain. Thought about sending it out to performance-pcs to get it sleeved and have some of the leads “bobbed†off.
<O:p
While checking their site I happen to click on the “specials†section for power supplies and saw the Logicsys acrylic unit. It was partially sleeved, had blue led fans (it’s dark at the bottom of the case), and rated at 500W. Also it had fewer and shorter leads. Just how few and how short was realized later at assembly!
Googled it and found a review that stated while not outstanding, it gave consistent voltages so going for the bling part, it was ordered and had the balance of the leads sleeved. http://www.extrememhz.com/acrylicpsu-p1.shtml
<O:p
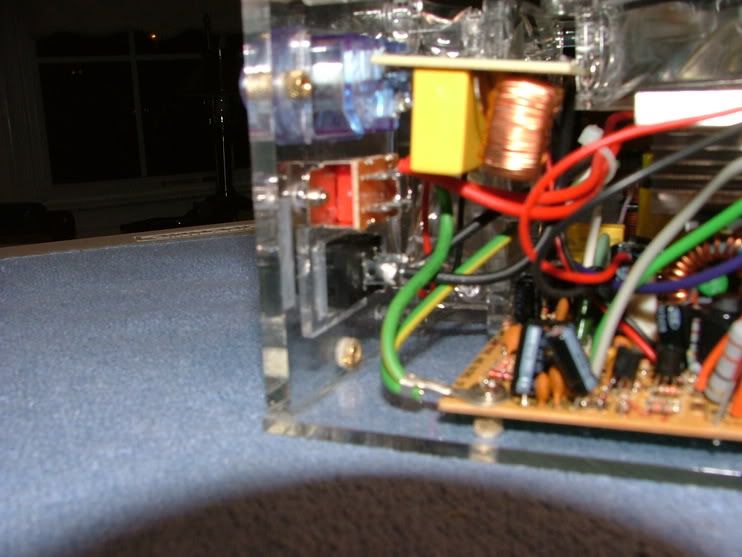
Needed to paint the fan grills. When I went to remove them it was discovered the only way to get them off was to remove the cover – and of course void the warranty. The cover was held in place by four screws, so no big deal >> yep, sure! As the cover came off the threaded taps feel off. As per the luck of this assembly, my super glue had dried up so in rummaging through the tool chest I found a tube of Locktite sealer/adhesive. Luckily there were “glue marks†to use as an alignment guide (see red circle)
<O:p
<O:p
Painted the grills and had the same issue with paint. The pictures try to show how the grill legs end up between the internal fan and inside of the surface.
<O:p
As a “teaser†here is what it looks like in the case as I’m awaiting the replacement parts.
<O:p
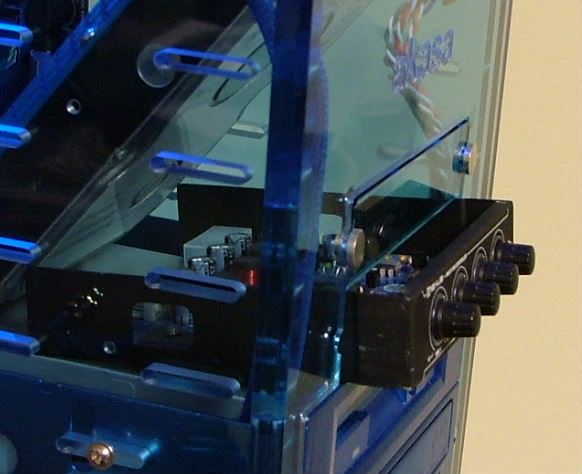
Fan Controller
<O:p</O:p
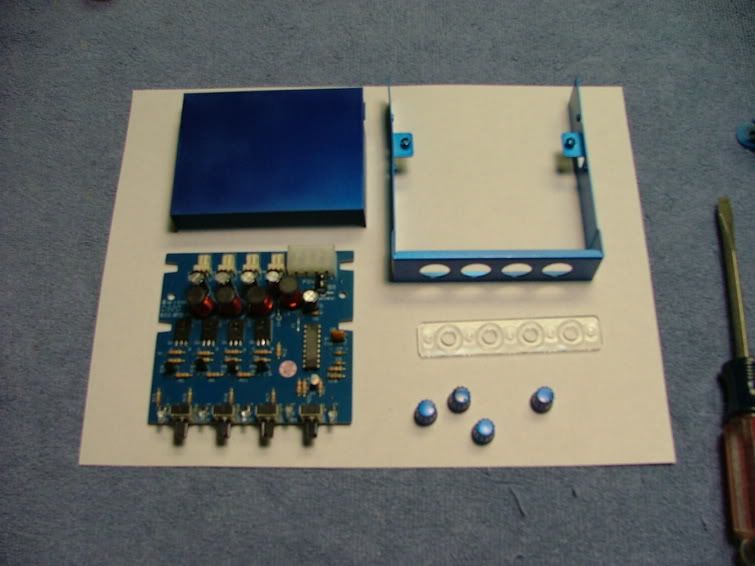
One of the additions is to be a fan controller for the two 80mm and 1 60mm case fans. I picked up a Nexus NXP-205-SL on e-bay with great expectations and found issues already stated. The unit needed to be painted the anodized blue, so the unit was taken down to it’s basic parts >> front bezel, pcb, “coverâ€, and knobs. True to Murphy’s Laws ran out of paint Christmas weekend and had issues with the nozzle on that can.<O:p</O:p
<O:p
Had concerns as to how one was to “read†the information on the bezel after painting, but realized one required a magnifying glass to read the text anyway. As it turned out the black lettering on the silver model is visible in direct light. The paint ran out and the nozzle was “spitting†when I did the cover, so it needed to be repainted.
<O:p</O:p
<O:p
Besides the cover, the gray/silver control knobs needed to be painted. The
problem was how to “hold†them. Ended up hot gluing them to nails stuck into a cardboard box. Below you see them primed and then painted. For some reason the new can of paint was giving me issues as the paint was not drying glossy, but looked like a powder. Tied to show the difference in the pic with the bezel and knobs. Ended up having to rub/buff the things to look okay.
<O:p
<O:p></O:p><O:p></O:p><O:p</O:p
<O:p
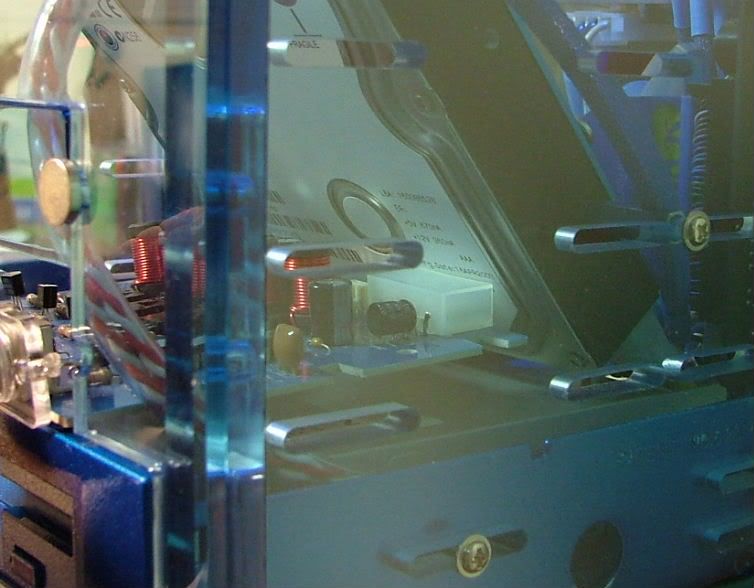
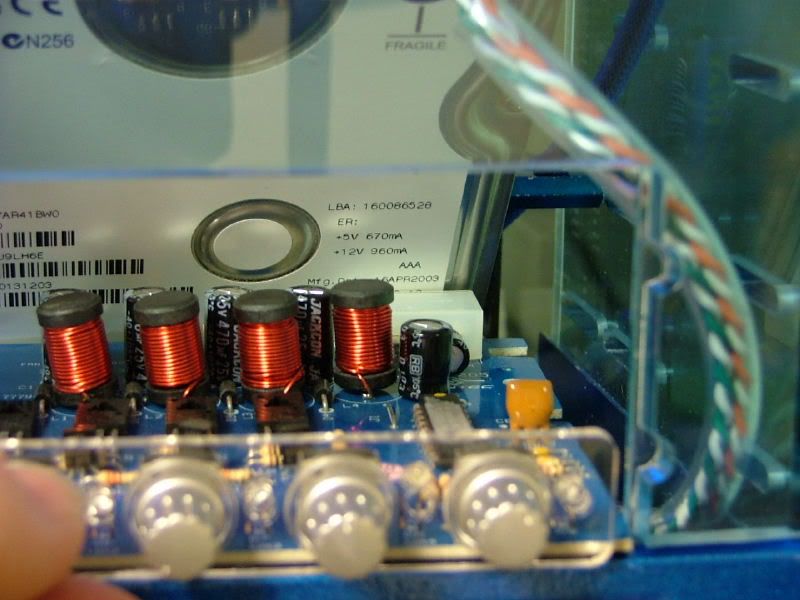
Okay everything is done, dry, and wiped down ready for assembly. Didn’t take a pic of the assembled unit, but here are the parts ready for assembly. When it was all said and done, the cover didn’t get used, as I liked seeing the blue pcb.
<O:p
<O:p</O:p
<O:p
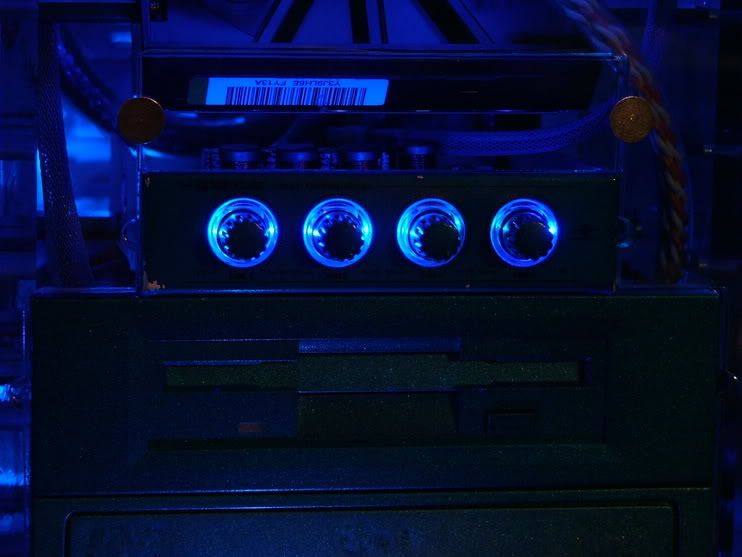
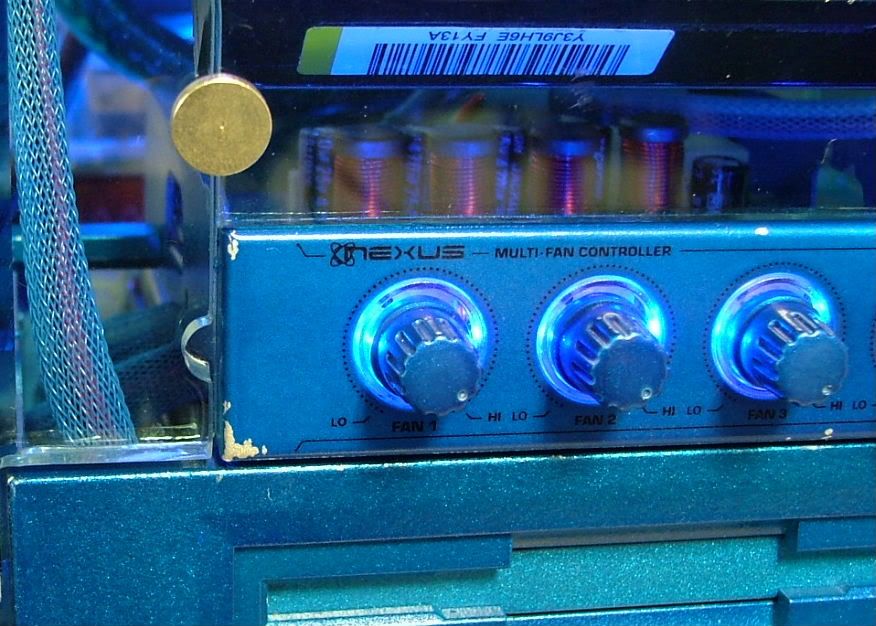
Another “teaser†as this is what it looks like in place, glad for the dark because as you can see in the second shot it was scraped at assembly.
<O:p
<O:p></O:p><O:p
Interestingly enough the 6600GT is a wee bit shorter than the 9800XT and the mobo pwr cable is not getting as pinched. After getting my initial install issues resolved (my first intro to load nvidia "over" ATI drivers) we seem to be puttering along quit well. That is until I make a final decision on wither to change out the mixed memory and go to a 2800+ in trying to maximize the “final onfigurationâ€.
<O:p</O:p
<O:p
As far as the fan controller is concerned it “appears†to be more bling than function. I’m only using (testing) at the max and min settings. While there is somewhat of a noise reduction (not sure what my “electronically enhanced†ears are picking up) it seems to only vary one to two degrees at idle or “loadâ€. Load has been basically Prime95 and a sad attempt at running Sandra – no gaming yet.
<O:p</O:p
However it became obvious the led fan on the cpu is not keeping up as well as I had hoped. At first is seemed to only allow a degree of increase over the non-led version, now it appears to be 3 to 4. I have gotten up to about 53 - 55 C while using the above mentioned testing . When I make up my mind on the cpu (2600 or 2800) might reapply the goop and reseat the hsf.
<O:p
March 2006
<O:p</O:p
<O:p
Work on BluHaz has kinda slowed down during this time period as other ‘puter items kinda got in the way. Also thanks to ebay (my wife hates it the credit card loves it) picked up another 7NIL1. This will be my overclocking test bed to help decide the final cpu Config.<O:p</O:p
<O:p</O:p
While I’ve consistently used MBM5 to monitor temps, I not totally happy with them. Tripped across this temp gauge at performance-pcs and liked it because it is not battery powered and has a “blue†back lit screen. <O:p</O:p
<O:p</O:p
<O:p</O:p
<O:p</O:p
Unfortunately they are indefinitely out of stock, however while rummaging through the “parts box†for Celtic Spirit (the build that started it all but hasn’t been finished) I found one!
<O:p
SO now to deside where to mount the thing. The only issue I have of course is fubaring the area where I would cut the mounting hole. No replacement parts available and it’d be hard to clue the piece(s) back. I have a dremel so can destroy!!
<O:p
June 2006
<O:p
The box mods stopped as I have been playing with the volt mod for some time now, but it has been a living nightmare. I have managed to get the 2800+ up to 187fsb (2.3) stable, but anything above goes to hell.<O:p</O:p
<O:p
Also have been having an hdd problem that was thought to be oc'ing based and I've re-formatted so often I almost can enter my key code blind folded.<O:p</O:p
<O:p
The board that is currently being used to test the oc’ing will eventually replace the mobo that is in BluHaz. It seems because of heat issues I will have to go with a larger hsf and that will require me to remove the led blowhole fan. Might see, after it is put back together, if an 80 x 80 x 15 will fit.<O:p</O:p
<O:p
Since the NB runs so hot on NF2 boards I have swapped out the stock NB cooler for a Swiftech 159.
<O:p
<O:p</O:p
<O:p
Also I have been using the temp gage I’ve found for testing and have found that is disagrees with MBM5 by almost as much as -12C.
<O:p</O:p
<O:p
Well I’ve declared my first “real†attempt at oc’ing finished (will be setting up the 2800+ Barton in BluHaz shortly) and now I’m ready to get back to the case modding side of the project!
<O:p</O:p
<O:p
As mentioned above, I will be taking out the blowhole fan because of needing a larger HSF. Using what I have “in stock†means a Tt Volcano 12 (currently on the oc’ed mobo) or a swiftech 462+. Since I’ve gone with a swiftech 159 for the NB, think I’ll keep it in the family. Also I’m not a great “fan†of that fan on the Volcano! With the oc’ed CPU and maybe a little boost to the gpu, it might get a little warm once the case is buttoned up! If the blowhole ends up being a passive vent, that will leave me with only a 80mm in and one 60mm out.
<O:p</O:p
<O:p
All this is leading up to the fact I want to mount the temperature gauge in the faceplate of BluHaz. It will more than likely go dead center, just about the akasa name. Then again I have found another source and am considering two gauges.
<O:p</O:p
<O:p
If there is room on the front may install a second temp gauge. The question here is where to use the second temp probe! With one probe for the cpu, wondered for a while if I should try to measure ambient air, hdd, or NB temps.
<O:p
Doing some real rough old school “cut & paste†was looking at the potential locations of the temperature gauge(s) for BluHaz. In theory there are three:
<O:p</O:p
<O:p
Single Gauge = one cutout with room to spare and “symmetricalâ€.<O:p</O:p
2 Gauges Vertical = single vertical cut (as the friction clamps are on the side) with a tight fit between the akasa logo and the 80mm fan<O:p</O:p
2 Gauges Horizontal = 2 separate cutouts that are not “symmetrical†about center because of the switch assembly.
<O:p</O:p
And here are pics in the order given above.
<O:p</O:p
<O:p</O:p
<O:p</O:p
<O:p
As it turned out the gage(s) decision wasn’t made until the next incarnation occurred…….to be continued.
0