Ever since I acquired a gaming capable laptop, I have been looking for a way to keep my save files in sync between my desktop and laptop. I thought about using Dropbox for a while, but all that copying back and forth between the Dropbox folder and the location each game expects its save files to be takes away precious time I could be spending gaming. Then I discovered Spideroak.
SpiderOak is similar to Dropbox in many ways. It backs your data up to their servers, and it can sync data between connected computers. It’s also cross platform and has a web interface you can pull files down from. A free account starts off with 2GB of space. Sounds like many of the other cloud file storage services, right?
The great thing about Spideroak, however, is the ways in which it is different from Dropbox. In this case specifically, the fact that instead of having a single special folder that gets synced, you can configure it to back up and sync any folder(s) on your system with any folder(s) on any other system you run it on. Oh, and did I mention SpiderOak also doesn’t have backdoor keys to decrypt your data like Dropbox does, so if you store sensitive data in it, they have no way of accessing it.
Still with me? Good. Here’s how to set up SpiderOak to keep your precious save games backed up and in sync across computers.
Using SpiderOak to sync data
First things first. Head on over to the SpiderOak website, sign up for an account and download the installer. The install process is pretty straightforward—I trust you can handle it. The setup for SpiderOak is a bit more complicated than Dropbox though.
Once you have it installed, launch SpiderOak. You should see a window similar to this one:
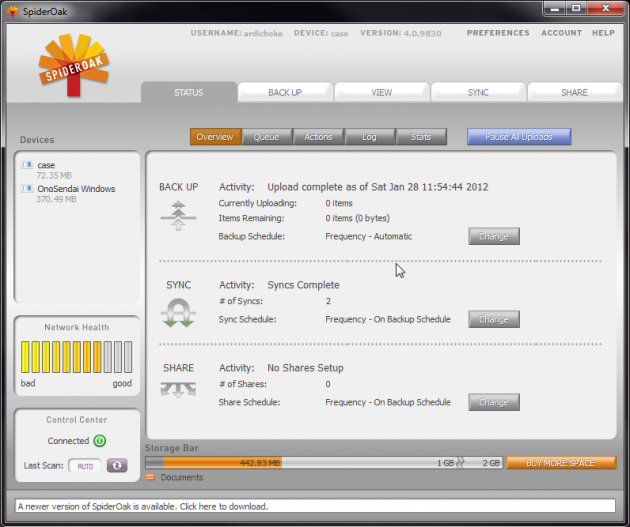
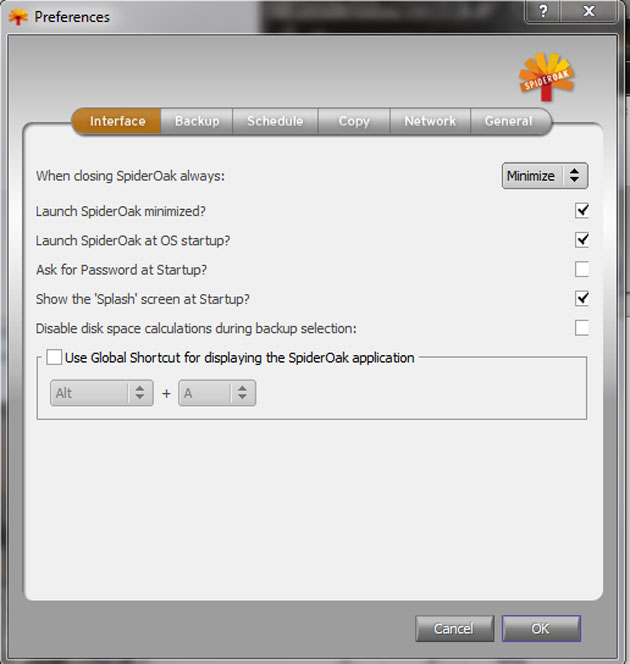
First, we will want to set up some of the basic preferences for SpiderOak. Go ahead and click that “Preferences” button. By default, SpiderOak does not enable itself at startup. You should probably turn that on for maximum automation. You will probably want to set it to launch minimized as well and may want to turn off the startup splash screen.
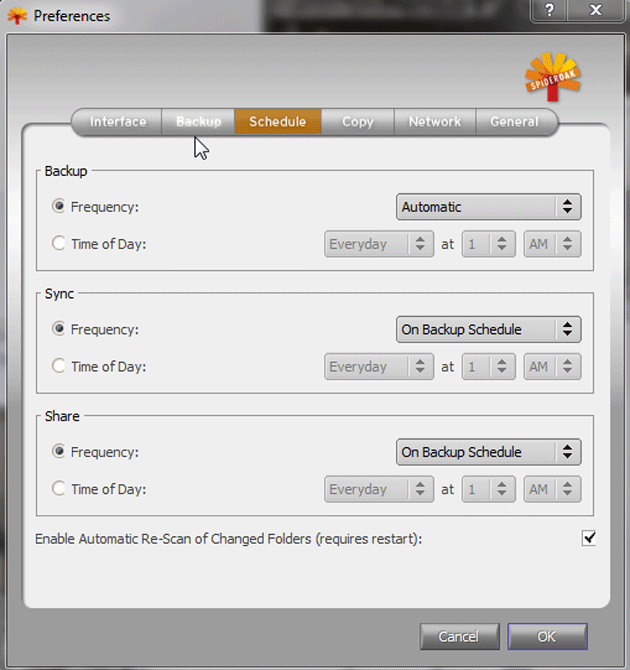
Next, you will want to go to the “Schedule” tab. Here you will want to set your Backup and Sync frequency to Automatic, once again, for maximum automation. If you have a slow connection, you may want to change this frequency to something else, like every 15 minutes. I’ll leave that to your discretion though.
There are a lot of other fun settings here, but those are the important ones for our purposes. Click OK and head back to the main interface. Our next stop is the “BACK UP” tab in the main window. You will need to switch this to “Advanced” mode for maximum control. You will then want to select any files or folders that you want to keep in sync. As you can see, I’m syncing my entire Documents folder as well as my “Saved Games” folder. This covers most modern games—while also keeping my other documents securely backed up and in sync. Bonus!
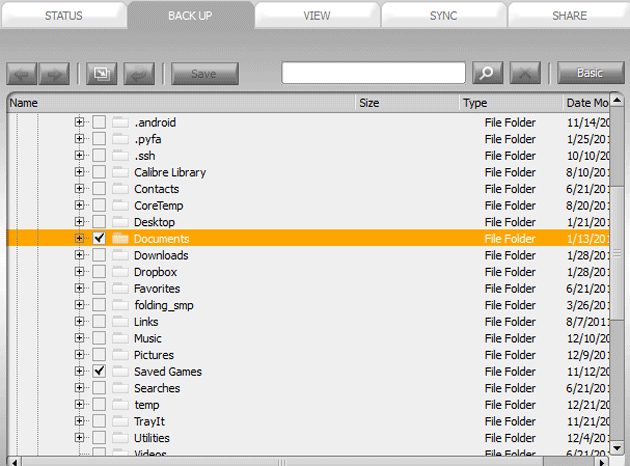
Once you have selected the locations of any save files that you want to keep synced, SpiderOak will start encrypting your data and sending it to their servers. Depending on how much you have, this may take a while. You should take this time to install SpiderOak and configure your backup settings on any other computers you want to keep in sync now.
Once you have more than one system set to back up, we move on to the most important part—syncing. Click the SYNC tab. Then click New. Give your new sync setup a name and description.
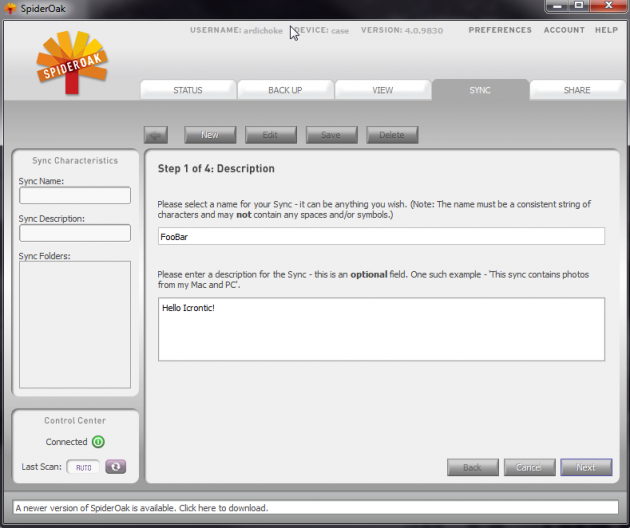
Click the almighty Next button, which will bring up your folder selection dialog. Click browse and select the locations you would like to keep in sync. If you want to keep more than 2 computers or folders in sync with each other, you can add additional folders by clicking the + button.
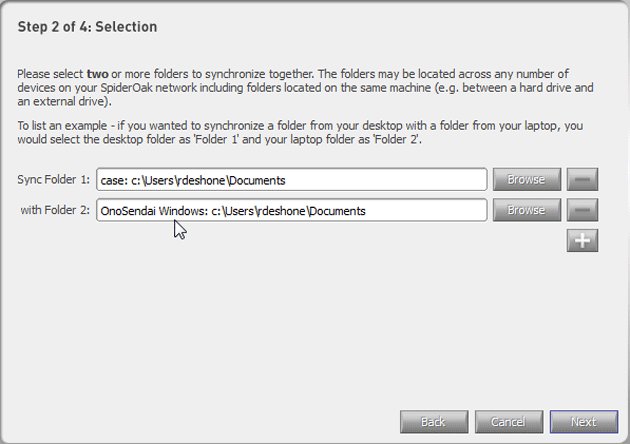
Once again, click Next. On the next screen you can choose any files you would like to exclude. I tend to exclude *.exe files, in case I download a certain GPU manufacturers drivers to my Documents folder on accident, but that’s just my personal preference. Putting nothing here means everything will be synced. Once you’ve added anything you want to exclude, click Next again. The final screen will show you all your settings for verification. Look it over and make sure things are set up how you want. If everything looks good, click Start Sync.
You should repeat the sync steps for any other folders you want to keep in sync. Once you have all your syncs set up, give SpiderOak some time to fling bits back and forth. After it has finished its bit slinging, you’ll now have synced save files on all your computers that are automatically kept up to date. Of course, there are some games that do strange things like storing stuff in the registry for its save games, and this won’t help with that… but as long as the developer didn’t do anything too wonky with its save formats this will let you move your games seamlessly between systems. Oh, and did I mention that SpiderOak lets you roll back your files? That’s right, if you ever screw up one of your save files, you can just go into SpiderOak and roll it back to an older state.
Who needs Steam Cloud anyway?




 Articles RSS