(This is part of an ongoing series detailing my move from air cooling into the world of liquid cooling. Part one can be found here)
There are any number of reasons to move away from the stock cooler. Stock coolers are noisy, they’re terrible at removing heat—especially on faster CPUs—they don’t look cool, and they are a pain in the butt to install and remove.
When building my first computer (a long time ago now), I started out using the stock heatsink. I was on a budget and overclocking wasn’t really a big thing at the time. It wasn’t until my second system that I learned of aftermarket coolers. That system, built around a Celeron 300A (which was nothing more than a Pentium II 450 with half the cache disabled and set to run on a 66MHz FSB), was my first overclocking project. In overclocking that system, I located a cooler with dual fans (Slot 1 CPUs were weird).
It wasn’t until several years later the idea of watercooling a home PC entered the scene. At the time, kits consisted of giant external boxes and the system case often required modification to work with them. Now we have an entire industry dedicated to the DIY custom loop. Between the extremes of stock and custom we have the self-contained liquid cooling loop.
For this part of the project, we’ll look at the performance for two coolers representing the extreme ends of air cooling and one entry level all-in-one liquid solution.
Many different ways to cool
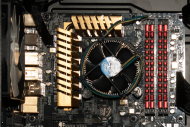 The starting point is the Intel OEM heatsink. This model comes with every retail box Intel CPU from the lowest Celeron to the top-end Core i7. It works well and adds nothing to the cost of a system build. It won’t win a beauty pageant and you won’t impress your friends with this heatsink in your rig, but if you’re on a tight budget and not doing any crazy overclocking it’s one of the few safe ways to save a buck. It is designed to handle the heat produced by a CPU at stock speeds, and nothing more.
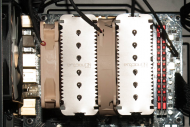 Next up is the Noctua NH-D14. This heatsink has been around for a few years now and it is widely recognized as one of the best (if not the best) air cooler around. It costs around $85.99 on Newegg depending on what deals are available and is the best money you will ever spend on an air cooler. Not content to have a single stack of fins and heatpipes, this monster packs double cooling towers and twelve heatpipes to keep temperatures low during your overclocking endeavors. The 120mm square and 140mm round fans are damn near silent too.
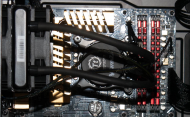 Moving on to the all-in-one liquid solution, we have the Thermaltake Water 2.0 Performer that Brian reviewed. This is the budget entry in Thermaltake’s Water 2.0 line. It costs $62.99 on Newegg before rebates (which take the final price down to $52.99). It’s one of the least expensive all-in-one kits available, and is well worth the money. Protip: if you install this kit, take the motherboard out of the case as Brian did. Leaving the motherboard in the case adds a maddening degree of difficulty to the install process, requires extra hands to hold parts in place, and requires lots of patience.
Choosing the system
Originally the AMD benchmarking system was to be the guinea pig for this test, but for some reason it wouldn’t overclock stably. Given this problem and a desire to progress towards the end goal of a custom liquid cooling setup, I switched to the Intel benchmarking system:
- CPU: Intel Core i7 2600K
- Motherboard: ECS Z77H2-A2X (1.0)
- RAM: 16GB (4x4GB) DDR3-1600
- GPU: AMD Radeon HD 6950 2GB
- TIM: OCZ Freeze
- Coolers:
- Intel stock heatsink
- Noctua NH-D14
- Thermaltake Water 2.0 Performer
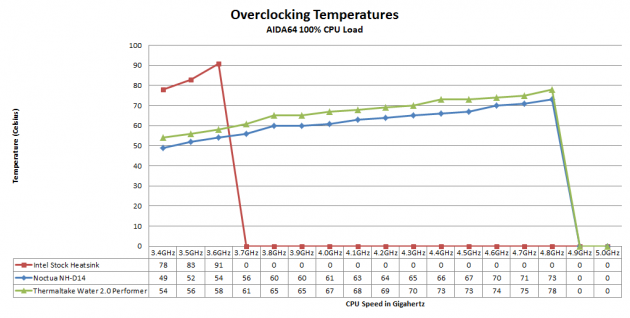
In the ECS Z77H2-A2X overclocking article, 4.8GHz was found to be the maximum stable overclock for this particular CPU. We’ll start at the stock speed of 3.4GHz and increase the multiplier one step at a time until the maximum speed is reached or until a problem is encountered. Temperature readings and CPU load will come from AIDA64. Ambient temperatures were maintained at 21.1C (70F). Voltage settings were left to automatic except for the PLL (socket) voltage which was increased 0.20V for overclocking stability—the ECS motherboard adjusts other voltages automatically and stays within Intel’s specs.
Let’s just get the obvious statement out of the way: if you’re overclocking, the stock Intel cooler has no business being in your system. It’s designed to remove the heat from a CPU at stock speeds, and nothing more. Considering the increased heat levels at 3.5GHz, and especially so at 3.6GHz, it’s no wonder Intel never took Sandy Bridge beyond the 2700K; anything more and the system would shut down or throttle due to heat.
On the opposite end of the spectrum, both the Noctua and Thermaltake coolers perform extremely well. How much better are the aftermarket coolers? The Thermaltake Water 2.0 cools the CPU to 78C at 4.8GHz, which happens to be the same temperature the Intel cooler keeps the CPU at when the CPU is at its stock 3.4GHz. I’m actually pretty surprised at just how well the less expensive Thermaltake all-in-one cools—it’s a bit cheaper than the Noctua air cooler and the temperature deltas are pretty small at every step of overclocking. Both aftermarket coolers are nearly silent no matter how hot things get.
So if you’re looking to overclock, want something more quiet, better looking, or just are generally not happy with the stock cooler but you’re not ready to take the plunge into assembling a custom loom, there’s a solution out there for you. It’s just a matter of determining your budget and going for it.
Coming up next…
The next step in this series is a custom liquid cooling loop, then a test of various coolants.
The custom loop is being prepared.





 Articles RSS