You may not be aware, but there is a massive scientific and medical research program being conducted right at this very moment that uses average people’s home computers to study the folding and misfolding of proteins. When proteins misfold, diseases such as cancer, Parkinson’s, and Alzheimer’s occur.
The core problem with studying these diseases is that the math involved is almost unfathomably complex. Proteins are three-dimensional objects that can physically fold into a huge variety of shapes; the physical configuration of proteins and how they latch on to each other is what’s being studied. This involves tons and tons of number crunching in three-dimensional spaces… and that just so happens to be something that home computers are really, really good at.
In order to get these home computers recruited into the Folding@Home armada, Stanford University’s Vijay Pande and his group have written a small and easy-to-use program that anybody can install on their PC, Mac, or Linux computer (or even their PlayStation 3). The program downloads a tiny chunk of data from Stanford, crunches it, and returns the results. Your computer uses CPU power that would have gone unused to process this data, so your computer doesn’t slow down, and it runs invisibly in the background. With minimal effort, your computer can be contributing valuable medical research that could potentially help discover cures for a wide variety of protein-related diseases.
While just running the program is useful, and all that Stanford really asks of us, power users can up the ante and offer a far higher level of processing power to the cause by configuring Folding@Home to run on their GPUs, running cutting-edge beta clients, or building dedicated Folding computers just to run the program. Since there is a bit of a light-hearted competition involved (Stanford offers points to users, and leaderboards to make it fun to compete with friends and join teams), many people do just that.
This guide will explain how to set up a dedicated Folding box that runs a light OS (Ubuntu Linux) so that Folding power is maximized.
Folding@Home on Ubuntu
This guide will go over the process of installing Ubuntu to your hard drive (“bare metal”) and getting it folding SMP work units. The guide also includes a section of “special cases” where you can increase your folding glory or efficiency (some cases are limited to certain hardware). The guide should work for Ubuntu 10.x through at least 11.10 but will probably work beyond that. At some point, Pandegroup may release an update binary, in which case the article will be updated to reflect the change in download path and any resulting setting changes. This guide concerns itself with external monitoring and, therefore, does not use the folding beta v7.
If you are looking to add folding to your existing Windows installation, see my guide here.
Ubuntu Desktop edition provides you with some bundled software and a nice GUI interface (Unity, by default). However, nearly all of this is changeable, as you can pick different window managers or remove most of the software as you see fit. Ubuntu Server edition is a minimal set of software that only comes as a command line (which means you can find an excellent excuse to use PuTTY for SSH access!)
Getting Ubuntu installed
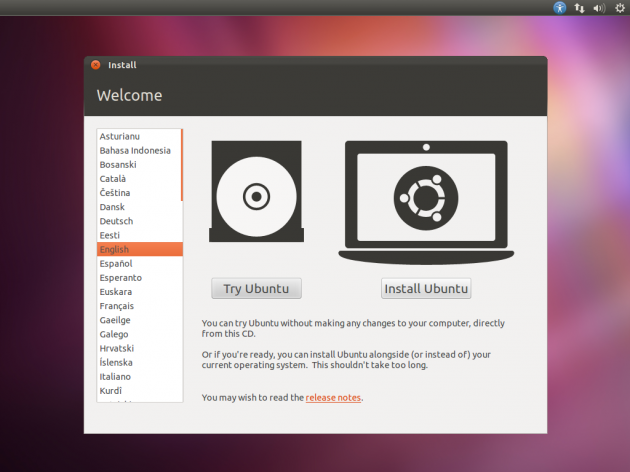
The screenshots below are for Ubuntu 11.10, but all of the install from 10.x onward are very similar). The basic steps are:
- Download the desired version (x64 is best for Folding). Use the torrent version to save bandwidth and get it faster, if you already have a torrent client installed.
- Burn to CD or build a bootable usb (instructions are available on the download page)
- Boot from CD/USB (this will depend on your computer, but typically involves pressing a button for a boot menu at startup and then selecting the drive)
Select “Install Ubuntu”
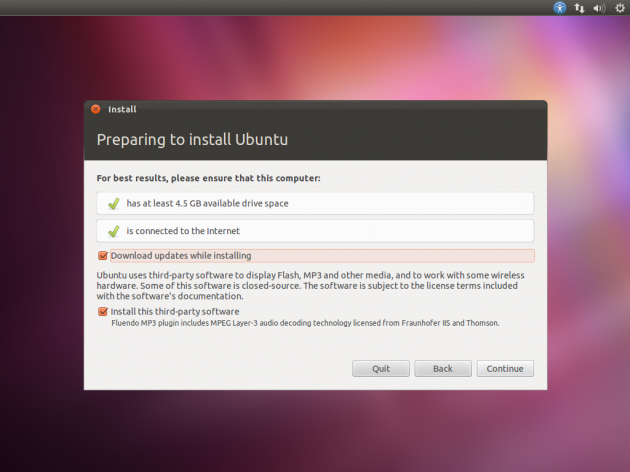
Check “Download updates while installing” and examine the information regarding Flash/MP3 and check the box if you desire the closed-source packages to be installed as well (you don’t need these for pure folding). Click continue.
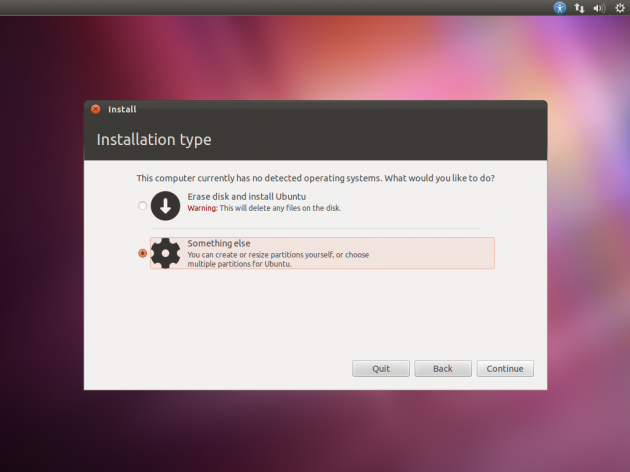
If you have nothing else on the HDD or do not wish to save anything, you can choose “Erase disk and install Ubuntu”. If you wish to save stuff or setup a dual-boot, you need to do that ahead of time and plan how you will partition the drive. There are plentiful guides around for dual-booting Windows with Ubuntu, but if you have questions, feel free to ask.
Click Install Now. It will begin to install while asking you some questions. It probably auto-selected your region, but change it if necessary to the correct time zone. Double-check your keyboard layout and select the correct one if it wasn’t already done. Click continue. Type in your desired display name, computer name, username, and password. If this is a pure folding machine (or you’re not concerned with its security), select “Log in automatically”. If you are not sure about whether you want your computer to do so or are otherwise worried, leave it on the default option. You are on your own for encrypting the /home partition (if you think you need it, you’ll know what and why).
Go eat a sandwich, watch the latest episode of your favorite TV show, kill some Cylons, tinker with quantum particles … okay finished up now!
Your computer should tell you that it has completed installing and needs to restart. Click “Restart Now” and remove any installation media (USB or CD) when the computer is rebooting to avoid potentially booting from it again.
When it finishes booting to your newly installed OS, it will present you with a login screen (if you select log in automatically, you will not see this). Click on your username and type in your password.
First thing, check for updates (yep, it downloads them but doesn’t install them during OS setup). To do this, click on the “dash home” button and type “update”. Click on Update Manager and click “Install Updates”. Type in your password and let Update Manager do its thing (alternatively, a box will pop up on the “taskbar” with a nice large number of updates available). Reboot afterward.
After rebooting, we’re getting to the good part!
Installing Folding@Home
Now, you have a choice to make: You can run version 7 (the newest beta client from Pande) or use the “normal” SMP (multiprocessor) client. The v7 client is a beta, and therefore it’s considered only for advanced users. If you do want to install the v7 beta client, Pande group has an excellent pictorial guide for installing it on Linux, located here. If you have any questions about it, feel free to ask in the comments.
Here is how to install the normal SMP client. Keep in mind that all of this can be done via GUI, but doing this in the terminal serves the dual purposes of making you look like a hacker, and letting this guide work for Ubuntu Server Edition as well:
Open a terminal window (“start” button, Accessories –> Terminal or type “terminal”). Then copy and paste or type (exactly) the following into a terminal window:
mkdir fah
cd fah
wget "http://www.stanford.edu/group/pandegroup/folding/release/FAH6.34-Linux64-SMP.exe"
 mv FAH6*.* fah6
 chmod 755 fah6
What you’ve done here is make a directory called “fah”, moved “into” it, and then downloaded the client software. Next, you changed the name to “fah6” and made it executable (so that the computer can run it). Now, you will configure it for use:
./fah6 -configonly
Type in the details as they come
User name [Anonymous]?
username (if you’ve never folded before, check here)
Team Number [0]?
93 (Team 93 is Icrontic’s team!)
Passkey []?
you definitely want a passkey on ALL folding clients you run. Go here to get one after your username.
Ask before fetching/sending work (no/yes) [no]?
Hit enter to leave this blank
Use proxy (yes/no) [no]?
No, unless you use a proxy or plan to use Langouste (see special cases)
Allow receipt of work assignments and return of work results greater than 5MB in size (such work units may have large memory demands) (no/yes) [no]?
yes Bigger Work Units (WUs) yield more points
Change advanced options (yes/no) [no]?
yes There be dragons ahead!
Core Priority (idle/low) [idle]?
Hit enter to leave this blank
Disable highly optimized assembly code (no/yes) [no]?
Hit enter to leave this blank
Interval, in minutes, between checkpoints (3-30) [15]?
Hit enter to leave this blank
Memory, in MB, to indicate (xxxx available) [xxxx]?
Hit enter to leave this blank, indicating that it can use all available memory. If you are running anything 2GBs+, you should never see an issue with this.
Set -advmethods flag always, requesting new advanced scientific cores and/or work units if available (no/yes) [no]?
yes More points and more glory! (sometimes)
Ignore any deadline information (mainly useful if system clock frequently has errors) (no/yes) [no]?
Hit enter to leave this blank
Machine ID (1-16) [1]?
Hit enter if this is the only/first folding instance on this machine (i.e. no GPU folding already going). Every instance of folding needs a different machine ID on one physical workstation.
The following options require to restart the client before they take effect
Disable CPU affinity lock (no/yes) [no]?
Hit enter to leave this blank
Additional client parameters []?
-smp -verbosity 9 If you are folding bigadv (you have a fast processor, with 8+ available cores and will be leaving the machine on for days), you should set this line as “-smp -bigadv -verbosity 9″
IP address to bind core to (for viewer) []?
Hit enter to leave this blank
Some information will scroll by here, indicating that it is connecting to the server and verifying/setting information. When you see “-configonly flag given, so exiting.” you’ll be placed back at the command line.
To run F@H, you can simply type ./fah6 and let it live in the terminal screen. However, I do not like having a terminal window open all the time, so I use a script to launch it at boot and detached from a terminal. See special cases below.
Special cases:
Credit to musky for the great guide he put together that got me rocking (and everything he had was about as efficient as you could get):
Launch in background at boot
This requires editing a boot file, but nothing particularly bad will happen if you don’t do it right and we’ll make a backup first anyways.
(This can also be done via the GUI “Startup Applications”, but you still have to install screen either via the GUI route or terminal method below)
Open terminal and copy/paste the following three lines and type in your password as appropriate
sudo apt-get install screen
sudo cp /etc/rc.local /etc/rc.local.bak
sudo nano /etc/rc.local
There will probably be “nothing” listed outside of the comments section other than exit. Use your cursor keys to move to the space between exit and the comments above and type in or paste the following:
cd /home/%yourusername%/fah && sudo -u %yourusername% screen -d -m ./fah6
Example (do not copy and paste this, unless you have an identical username for your Ubuntu login):
#!/bin/sh -e
#
# rc.local
#
# This script is executed at the end of each multiuser runlevel.
# Make sure that the script will "exit 0" on success or any other
# value on error.
#
# In order to enable or disable this script just change the execution
# bits.
#
# By default this script does nothing.
cd /home/tushon/fah && sudo -u tushon screen -d -m ./fah6
exit 0
In the example, the username is “tushon” and the folder in tushon’s home folder is called fah. For monitoring this, you can use HFM (see the last case) or the following terminal script:
tail ~/fah/FAHlog.txt
This will show you the last ten lines of the F@H log file. HFM will give you nice predictions and other fun stuff, or you can setup remote monitoring so that you can have one machine monitor several (because once you pop, you can’t stop). If you wish to view the live folding terminal (which you shouldn’t need to, between either HFM or the tail command, you can see what has happened most recently), you can re-attach to the folding process by typing
screen -r
into a terminal. To send it back to the background, hold down Ctrl and hit A then D. Release Ctrl and exit the terminal.
BFS (for Intel systems only)
Warning: this is valid for 10.04-11.10. Check this website for any other version)
Open terminal and input password when needed, then copy and paste the following into your window:
sudo apt-get install python-software-properties
sudo add-apt-repository ppa:chogydan/ppa && sudo apt-get update
For Ubuntu versions 10.10 and 11.04 (Maverick and Natty):
sudo apt-get install linux-image-generic-ck linux-headers-generic-ck
For Ubuntu version 11.10 (Ocelot):
sudo apt-get install linux-image-generic-bfs linux-headers-generic-bfs
then either way, complete this command
sudo update-grub
In the last few lines of the terminal, you should see some information about grub generating a new boot record. If the first two entries following “Generating grub.cfg …” end with -ck, you are done.
In the list, if they are the third and fourth rather than the first and second, do the following in terminal:
sudo nano /etc/default/grub
Find the line
GRUB_DEFAULT=0
and change it to
GRUB_DEFAULT=2
Press CTRL + X then tap Y for yes.
sudo update-grub
Reboot your computer and type the following into a terminal
uname -r
If you see a line that ends with -ck, you are done. If not, redo the “if not” steps above and check the location of the -ck kernels in grub.cfg.
kraken (For multi-proc AMD systems only – bigadv folding)
The kraken is a wrapper for the F@H executable which helps with the CPU scheduler effectively giving all the power it can to F@H. This is very important for multi-proc AMD systems to use. Credit to tear for writing and maintaining this (original post)
BIOS Settings to check for:
- NUMA is enabled
- node interleave is disabled
- ACPI SRAT is enabled
- Enable C6 States
The latest version at the time of this writing is 0.4. Before installing the kraken, you need to download the core for folding. So, run the following code from your terminal until you see something along the lines of “Entering M.D.” at the bottom of your screen. Hit CTRL+C to kill the process at this point. (Alternatively, you can download the cores using the shell script cited here by saving the contents of the box marked “shell script for ubuntu” to a file like “folding.sh” and running it from the command line. Make sure to read the directions)
./fah6
You needed it to download the core before applying the kraken wrapper. Ahoy, there be monsters about!
Install make tools (if they are not already there, doesn’t hurt to run it to check)
sudo apt-get install gcc make
Now that you have the core, lets get the kraken and install it. You can copy and paste this into your terminal:
cd ~/fah
wget "http://darkswarm.org/thekraken-0.4.tar.gz"
tar -xzf thekraken-0.4.tar.gz
cd thekraken-0.4
make
sudo make install
Now, to start it with the kraken:
cd ~/fah
sudo thekraken -i
There will be some text that talks about installation.
Now, start the client normally
./fah6
And you’ll be riding the kraken! To check this, open another terminal window and type
top
If the process at the very top of that list is titled “thekraken…” then you have done everything correctly.
Install Samba (remote monitoring with v6, using HFM.NET on another machine)
sudo apt-get install samba
sudo nano /etc/samba/smb.conf (there is a backup at /usr/share/samba/smb.conf in case you want to start over)
Use Ctrl+V (or PgDn) to move quickly through the file. The first thing you want to do is change the workgroup to represent whatever your existing workgroup is named (default for windows is “WORKGROUP”). This setting is under the global section and is directly below the “Browsing/Identification” line. Just move your cursor to it and delete/type as needed.
Next up, head down to the “Authentication” section. The first paragraph talks about security. Change the line following it from
# security = user
to
security = share
Finally, we’ll actually create the share. Go all the way to the end of the file and add something like the following. Make sure to substitute your user name where I have %yourusername%, so my path line would be “path =/home/tushon/fah”
[FAH Share]
path = /home/%yourusername%/fah
available = yes
read only = yes
browsable = yes
public = yes
guest ok = yes
Write out your changes with Ctrl+O and then exit with Ctrl+C. Now restart your Samba server with
sudo smbd restart
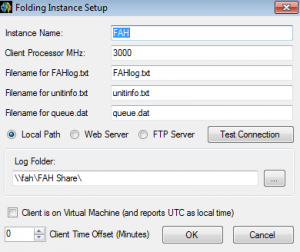
You should now be able to browse to the PC on your network and it will have the share waiting for you. In HFM, your settings should look like this (substituting your actual folding machine’s name at the bottom):
Hit test connection and it should let you know if it got data or not. There will be a warning about “validation errors”. You can press yes and ignore that. Make sure to save your HFM changes!
Updates: for pure folding machines, you can disregard updates entirely and disable their warnings. For everyone else, I would recommend performing security updates automatically and everything else as you need (I always installed all updates on my machines). They do come out much more frequently than Windows-only users will be used to, but that has to do with the open-source nature of Ubuntu. People find, fix and submit patches for any problems much more quickly than Windows and Canonical releases those patches much more quickly than the typical Windows update cycle allows for.
That should be everything you need to get going with advanced Folding in Ubuntu Linux! If you’ve gotten this far, you’re already well on your way to becoming a Folding addict.





 Articles RSS